Introduction: Real-Life Home Restoration Without Breaking the Bank
Restoring a home is often seen as a project reserved for those with deep pockets or access to professional crews. But across the United States, a growing number of homeowners are proving that you don’t need a limitless budget to breathe new life into an aging property. From classic bungalows in the Midwest to rustic farmhouses in the South, passionate DIYers have discovered resourceful ways to tackle restoration while keeping costs under control. The process isn’t just about saving money—it’s about making smart choices, leveraging community resources, and learning from the experiences of others who’ve walked the same path. In this comprehensive guide, we’ll explore practical, field-tested strategies for restoring your home on a budget, supported by real-life stories and actionable tips. Whether you’re dealing with a tight budget, a historic gem, or just looking to get the most bang for your buck, this article is packed with the guidance and inspiration you need to make your project a success.
Why Budget Restoration Matters: More Than Saving Money
Restoring a home is about more than simply updating finishes or boosting property value. For many homeowners, it’s a journey toward preserving history, improving functionality, and creating a living space that reflects their personal style. But the financial reality of restoration can’t be ignored. Unchecked spending can derail projects, create stress, and lead to unfinished dreams. That’s why a budget-conscious approach is essential. By learning from real DIYers who’ve succeeded, you can avoid the most common cost traps and make progress—one step at a time.
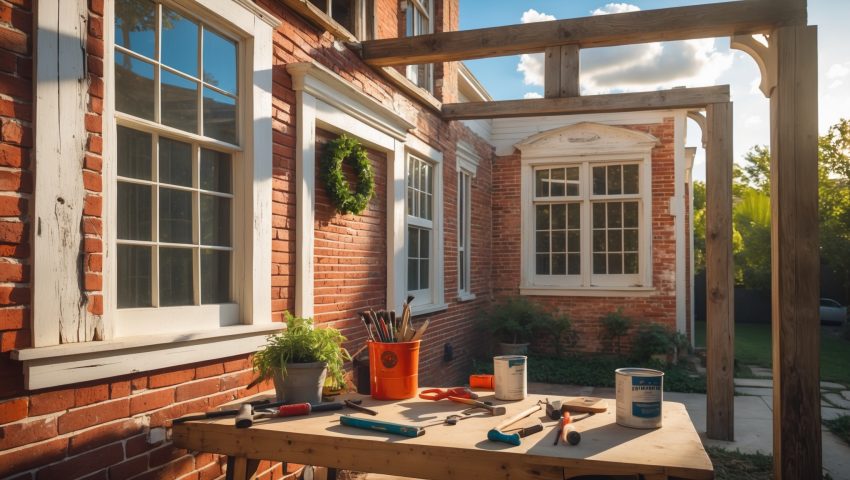
Case Study 1: The $15,000 Victorian—How the Watsons Restored Charm in Ohio
Initial Challenges and Assessment
The Watson family purchased a 1901 Victorian in rural Ohio for $55,000, knowing it needed significant work. Their priorities: restore original woodwork, update the kitchen, and fix a failing roof. With only $15,000 in savings earmarked for repairs, they faced tough choices.
Key Budget Strategies
- DIY Demolition and Prep: By handling demolition, scraping, and prep work themselves, the Watsons saved over $3,000 in labor costs.
- Salvage and Reuse: They sourced period-appropriate doors and hardware from local salvage yards, preserving historic details and cutting material costs by 40% compared to new reproductions.
- Phased Approach: Tackling the roof first prevented further water damage. They then restored rooms one at a time, freeing up cash flow and minimizing disruptions.
Lessons Learned
The Watsons advise fellow DIYers to spend more time on planning and less on impulse purchases. “Every dollar saved on prep gave us more for the finishes we really wanted,” says Mrs. Watson.
Budgeting Basics: Setting Realistic Restoration Goals
Assessing True Project Scope
Before swinging a hammer, create a detailed list of what needs to be restored and what can wait. Prioritize repairs that affect safety and structural integrity (roof, foundation, electrical) before cosmetic upgrades. Use a simple spreadsheet or a free project management app to track tasks and costs.
Cost Research: Regional Variations Matter
Material and labor costs vary widely across the U.S. For example, restoring hardwood floors in the Northeast can cost 30% more than in the Midwest due to material scarcity and local demand. Use online calculators, get multiple quotes, and consult local forums to set a realistic budget for your area.
Contingency Funds: Expect the Unexpected
Set aside at least 15-20% of your total budget for surprises—hidden water damage, outdated wiring, or pest issues are common in older homes. Building in this buffer keeps your project on track when challenges arise.
Case Study 2: Turning a 1940s California Cottage Into a Modern Classic for Under $10,000
Creative Sourcing and Networking
When Marcus Lee bought a 1940s cottage in inland California, he faced a tight $10,000 restoration budget. His solution: tap into online swap groups and local contractor surplus sales. Marcus scored flooring, windows, and light fixtures for pennies on the dollar by being flexible with style and timing.
- Networking: Building relationships with local tradespeople led to discounted materials and helpful advice.
- Barter and Trade: Marcus traded his web design skills for help with plumbing and electrical work, reducing professional labor expenses by $2,500.
Outcome
By embracing secondhand materials and community connections, Marcus completed his restoration under budget and with a unique blend of vintage and modern flair.
Saving on Materials: Proven Tactics
- Shop Reuse Stores: Habitat for Humanity ReStores and similar outlets offer surplus and gently used building materials at steep discounts.
- Online Marketplaces: Craigslist, Facebook Marketplace, and Freecycle are goldmines for everything from cabinets to tiles—often free or at a fraction of retail cost.
- Bulk and Off-Season Purchases: Buy in bulk for common items like drywall or insulation, and shop for seasonal deals on paint and flooring at big box stores.
- Manufacturer Seconds: Look for “scratch and dent” or overstock sales for appliances and fixtures. Minor blemishes can mean major savings.
DIY vs. Professional Help: Making Smart Choices
Which Tasks to Tackle Yourself
- Best for DIY: Demolition, painting, trim installation, wall repairs, and landscaping are achievable for most handy homeowners.
- Leave to Pros: Electrical upgrades, major plumbing, structural changes, and roof work often require permits, expertise, and insurance coverage.
Hybrid Approach
Many successful restorers blend DIY and professional labor. For example, prepping walls and removing old fixtures yourself lets you pay pros only for the skilled finish work. Always get at least three quotes and check references before hiring help.
Case Study 3: Budget Restoration in a Hurricane-Prone Region—Lessons From Louisiana
Resilience and Cost Control
After Hurricane Laura, the Rodrigue family faced the daunting task of restoring their 1970s ranch outside Lake Charles. Insurance covered some repairs, but they needed to stretch a $12,000 personal budget across electrical, insulation, and cosmetic fixes.
- Community Tool Libraries: Borrowing specialty tools from local organizations saved hundreds in rental fees.
- Weather-Resistant Choices: Investing in durable, storm-rated materials up front prevented future costly repairs.
Key Takeaway
Balancing immediate needs with long-term value is crucial—cutting corners on quality can cost more in the long run, especially in harsh climates.
Phasing and Pacing Your Project: Avoiding Burnout and Budget Overruns
Room-by-Room Planning
Divide your restoration into manageable phases. Focus on one room or system at a time—this limits disruption and helps you evaluate progress and spending before moving on. Use a project calendar to schedule work around your job and family commitments.
Setting Milestones and Celebrating Progress
Break large goals into smaller milestones (e.g., “finish painting living room,” “install kitchen backsplash”). Celebrate each achievement to stay motivated and avoid feeling overwhelmed.
Hidden Cost Traps and How to Avoid Them
- Permits and Inspections: Skipping required permits can lead to fines and costly rework. Always check local codes before starting.
- Scope Creep: Stick to your original plan—adding “just one more thing” can quickly blow your budget.
- Underestimating Labor: Even with DIY, some tasks take longer than expected. Pad your timeline to prevent costly delays or rushed work.
- Transportation Costs: Factor in delivery fees or multiple trips for materials, especially in rural areas.
Smart Financing Options for DIY Restorers
Cash, Credit, and Home Equity
- Cash Savings: The safest option—no debt, no interest.
- 0% APR Credit Cards: Useful for short-term financing if paid off before the promotional period ends.
- Home Equity Loans/Lines: Consider only if you have significant equity and a clear repayment plan; use for major structural work, not cosmetic upgrades.
Grants and Local Assistance
Check for local grants or low-interest loans, especially if restoring a historic home or improving energy efficiency. City or state programs can cover part of your costs if you meet eligibility requirements.
Leveraging Community Resources
- Tool Libraries: Many cities offer free or low-cost access to tools and equipment for residents.
- Neighborhood Work Groups: Organize or join volunteer days to tackle labor-intensive projects as a team.
- Online Forums: Connect with other restorers on platforms like Reddit, Old House Web, or local Facebook groups for advice, support, and material swaps.
Maintenance Best Practices: Preserving Your Restoration Investment
Routine Inspections
Schedule seasonal checks for leaks, pests, and mechanical systems. Early detection saves money and prevents small issues from becoming expensive repairs.
DIY Maintenance Skills
- Learn to patch plaster, recaulk windows, and touch up paint—these basic skills will protect your investment for years to come.
- Keep a simple toolkit stocked with essentials: screwdrivers, adjustable wrench, pliers, utility knife, caulk gun, and a cordless drill.
Conclusion: Your Path to a Restored Home—One Smart Step at a Time
Restoring a home on a budget may seem daunting, but the stories and strategies shared here prove it’s not only possible—it’s deeply rewarding. By learning from the experiences of real U.S. homeowners, you can avoid costly mistakes, leverage community resources, and maximize every dollar you invest in your property. The key is thoughtful planning: prioritize essential repairs, phase your work, and don’t be afraid to blend DIY effort with professional expertise where needed. Creative sourcing—whether through salvage yards, online marketplaces, or networking—opens doors to affordable materials and unique finds. Most importantly, remember that restoration is a journey, not a race. Celebrate small victories, stay flexible when challenges arise, and maintain your investment with regular upkeep. In the end, your restored home will reflect both your vision and your resourcefulness, standing as a testament to what’s possible with determination, smart budgeting, and a willingness to learn from others. Whether your dream is to revive a historic gem or simply update a well-loved family home, you have the power—and the tools—to make it happen without breaking the bank.
Are there community resources or materials exchanges that you’ve found especially helpful for sourcing affordable vintage fixtures like those in the Ohio Victorian?
Many DIYers mention Habitat for Humanity ReStores and local salvage yards as great sources for vintage fixtures. Community Facebook groups, Craigslist, and neighborhood swap events can also be helpful for finding unique, affordable pieces.
How did the Watsons decide which original features of their Victorian home to restore first, and did they face any unexpected expenses during the process?
The Watsons prioritized restoring original features that were both visible and essential, like the ornate staircase and vintage moldings. They did encounter unexpected expenses, especially when hidden water damage was discovered behind one of the restored walls.
Do you have any advice on sourcing affordable original woodwork or period-appropriate materials for older homes like the Watsons’ Victorian?
Try checking local salvage yards, architectural reuse stores, and online marketplaces for original woodwork and materials. Estate sales and auctions often have period-appropriate items. Networking with local contractors can also lead to good finds for older homes.
Could you share more about how DIYers find affordable materials or community resources when tackling big projects like kitchen updates?
DIYers often check local Habitat for Humanity ReStores, salvage yards, and online marketplaces for affordable materials. Many also join community Facebook groups or neighborhood forums where people give away or sell surplus renovation supplies at low prices.
For someone new to home restoration, what are some common cost traps that beginners should look out for before starting a budget-friendly project?
Watch out for underestimating material costs, skipping proper prep work, and unexpected repairs hidden behind walls or floors. Also, be careful with tool rentals and avoid buying unnecessary supplies in bulk. Always add a buffer to your budget for surprises.
How did the Watsons prioritize repairs when so much needed attention, especially balancing things like the kitchen versus structural issues?
The Watsons focused first on essential structural repairs to ensure their home’s safety, like fixing the roof and foundation. Once those critical issues were addressed, they turned their attention to spaces like the kitchen, balancing safety and livability.
Could you elaborate on any community resources the DIYers used to save money during their projects, especially in rural areas like Ohio?
DIYers in rural areas like Ohio often used local Habitat for Humanity ReStores and community swap events to find affordable materials. Some also borrowed tools through neighborhood tool libraries or connected with local Facebook groups for trades and advice.
For someone dealing with a failing roof like the Watsons, are there affordable repair options you’d recommend before committing to a full replacement?
Yes, patching leaks with roofing sealant, replacing damaged shingles, or installing a protective roof coating are affordable options. These can help extend your roof’s life and give you time to budget for a full replacement later.
If I want to restore original woodwork in my own older home, what are some budget-friendly options you recommend for refinishing rather than replacing?
You can refinish original woodwork by sanding and re-staining or painting it instead of replacing. Use wood filler for minor imperfections, and rent or borrow tools when possible to save money. Stripping old finishes with citrus-based removers is also affordable.
Could you share more about how the Watsons prioritized their restoration tasks to stay within their $15,000 budget?
The Watsons began by addressing essential repairs like fixing the roof and plumbing to prevent further damage. Once those were handled, they focused on high-impact, cost-effective updates such as painting and refinishing floors, always choosing DIY methods when possible to save money.
Did the Watsons run into any unexpected costs during their Victorian restoration, and how did they handle those surprises while sticking to their $15,000 budget?
The Watsons did encounter unexpected costs, especially related to outdated wiring and hidden water damage. They managed these surprises by prioritizing essential repairs, tackling some work themselves, and sourcing reclaimed materials to stay within their $15,000 budget.
I’m just starting to look at older homes myself. What community resources do people actually use for saving money on materials or tools during a big DIY restoration?
Many DIYers use local Habitat for Humanity ReStores, community tool libraries, and neighborhood social media groups to find affordable materials and borrow tools. Some also check city-sponsored salvage yards or swap meets for discounted supplies.
For someone with a tight budget but minimal experience, what would you recommend as the first step to assess which restoration projects to prioritize?
Start by making a list of all areas needing attention, then check for urgent issues like leaks or safety hazards first. Focus on small, manageable projects, and prioritize those that prevent further damage or add the most comfort to your home.
How do you balance preserving the historical features of an old home with making modern upgrades when you have a tight budget?
Focus on preserving the most unique or irreplaceable historical features, like original woodwork or windows, while choosing cost-effective modern upgrades elsewhere. Prioritize repairs that protect the home’s structure first, and tackle cosmetic updates gradually as your budget allows.
For someone living in an older home like a farmhouse rather than a Victorian, would these restoration strategies still apply or does the type of home make a big difference?
Most of the restoration strategies shared work for any older home, including farmhouses. You might need to adjust materials or techniques to fit your house’s style, but the basic budget-friendly principles still apply.
For a parent with limited free time, which budget-friendly restoration tasks can realistically be tackled on weekends without taking on too much stress?
Painting a room, updating cabinet hardware, or installing peel-and-stick backsplash tiles are great weekend projects. These tasks are budget-friendly, manageable for beginners, and can make a noticeable difference without overwhelming your schedule.
For someone about to restore an old farmhouse on a tight budget, what were the biggest unexpected expenses the featured homeowners faced and how did they handle them?
The featured homeowners often encountered unexpected expenses like hidden water damage, outdated wiring, and structural issues. They managed these costs by prioritizing repairs, sourcing materials from salvage yards, and doing as much of the labor themselves as possible.
How did the Watsons prioritize projects on a tight budget? I always struggle to decide what to tackle first when everything seems urgent.
The Watsons focused on essentials first, like fixing leaks and updating insulation to prevent bigger expenses later. They made a list of needs versus wants, tackling critical repairs before moving on to cosmetic improvements.
For small business owners looking to renovate a commercial space on a tight budget, do the strategies mentioned here for home DIYers work just as well, or are there key differences to consider?
Some strategies for home DIY restoration, like sourcing materials affordably and doing some work yourself, can also help with commercial spaces. However, commercial renovations often require permits, meet specific codes, and involve specialized contractors, so be sure to factor those differences in.
I’m curious about leveraging community resources as mentioned—could you share specific examples of what kinds of help or materials local groups provided to these DIYers?
DIYers in the article mentioned borrowing tools from neighborhood tool libraries, getting leftover paint and lumber from community swaps, and receiving advice or hands-on help from local volunteer groups. These resources helped them save money and complete projects more efficiently.
Do you have any advice for prioritizing projects when tackling multiple major repairs, like the Watsons did with their Victorian’s roof and kitchen updates?
When facing multiple major repairs, prioritize projects that address safety and prevent further damage, like roof repairs. After urgent issues, focus on high-use areas such as kitchens. This approach helps protect your investment while improving daily comfort.
How did the Watsons decide which original features were worth restoring versus replacing, especially with their limited budget?
The Watsons focused on restoring original features that added character and historical value, like wood trim and hardwood floors, while opting to replace items that were too damaged or costly to repair, balancing both aesthetics and budget.
How did these homeowners handle unexpected expenses during their restoration projects without going over budget?
Homeowners managed unexpected expenses by prioritizing essential repairs first, setting aside a contingency fund, and choosing more affordable materials or doing some tasks themselves to save money. They also adjusted their plans as needed to stay within their overall budget.
What would you suggest for someone working with an even tighter budget on an old farmhouse—are there key areas you’d prioritize to avoid running out of funds partway through the project?
With a tight budget, focus first on essentials like the roof, foundation, and plumbing to prevent bigger future costs. Address safety and structural issues before cosmetic changes, and do projects in stages as funds allow.
Do the featured DIYers recommend any particular sources for affordable supplies or reclaimed materials, especially for period-appropriate home features like woodwork or fixtures?
Yes, several DIYers in the article suggest checking local salvage yards, Habitat for Humanity ReStores, and online marketplaces for affordable, period-appropriate supplies. They also mention estate sales and auctions as good sources for unique woodwork and vintage fixtures.
How did the Watson family leverage community resources for their Victorian restoration in Ohio, and are there nationwide programs that help small businesses with similar projects?
The Watson family collaborated with local historical societies and volunteers to access restoration expertise and discounted materials. For small businesses, programs like Main Street America and certain state grants offer support for historic property renovations nationwide.
How did the Watsons prioritize which parts of their Victorian to restore first with such a limited budget?
The Watsons focused on urgent repairs first, like fixing the leaky roof and addressing electrical issues. After taking care of safety concerns, they tackled smaller cosmetic updates in high-traffic areas to make a big impact without overspending.
Do you have any tips for sourcing affordable materials, especially when trying to preserve original features like woodwork in older homes?
Consider checking salvage yards, architectural reuse stores, and online marketplaces for reclaimed materials. These often carry vintage woodwork that matches older homes. Also, local auctions and estate sales sometimes offer original fixtures at lower prices.
Did the Watsons handle all the restoration work themselves, or did they hire professionals for certain parts like the roofing?
The Watsons completed most of the restoration work themselves, but they did hire professionals for specialized tasks such as roofing and electrical updates to ensure safety and quality.
Did any of the DIYers mentioned use local community resources or organizations to help lower renovation costs, and if so, which ones were most helpful?
Yes, several DIYers featured in the article used local community resources like Habitat for Humanity ReStores and neighborhood tool libraries. These options helped them save on building materials and equipment rentals during their home restoration projects.
Did the Watson family encounter any unexpected expenses during their Victorian restoration, and how did they handle budget surprises?
The Watson family did face unexpected expenses, especially with hidden water damage discovered during their Victorian home’s restoration. They managed these surprises by prioritizing repairs, postponing less urgent projects, and setting aside a small contingency fund in their budget.
Could you share more about how the Watsons prioritized which original features to restore first while staying within their $15,000 budget?
The Watsons focused first on restoring features essential to their home’s structure and safety, like original hardwood floors and windows. They then allocated remaining funds to visible elements that added character, such as trim and light fixtures, to maximize both value and charm.
What were some ways the DIYers avoided overspending or running out of money before finishing big projects? I’m worried about getting halfway and having to stop.
The DIYers stuck to a detailed budget, tackled projects one room at a time, and reused materials where possible. They also set aside an emergency fund for unexpected costs to avoid running out of money mid-project.
For business owners managing multiple properties, do you have any tips on balancing restoration projects without overspending the yearly budget?
Prioritize urgent repairs first and group similar tasks to save on materials and contractor fees. Create a clear timeline and budget for each property, and consider bulk purchasing supplies to lower costs across projects.
Did any of the DIYers mention how they balanced taking on major projects like a roof repair with everyday family life and responsibilities?
Yes, several DIYers shared that balancing big projects like roof repairs with family life meant working during weekends, involving family members when possible, and breaking up the project into smaller, manageable tasks to avoid feeling overwhelmed.
For a small business owner with minimal renovation experience, what are some common cost traps to avoid during initial home restoration projects?
Watch out for underestimating material costs, skipping a detailed project plan, and hiring unvetted contractors. Also, surprises behind walls or under floors can add up—set aside a contingency fund in your budget for unexpected expenses.
I’m curious how long budget-friendly restoration projects like these usually take when balancing family life and DIY work.
Most DIYers in the article reported that budget-friendly restoration projects typically took anywhere from a few weekends to several months, depending on project size and available time after family and work commitments. Planning and breaking tasks into small steps helped them fit projects into busy schedules.
When restoring original woodwork on a tight budget, what were some cost-saving materials or techniques that proved most effective for the DIYers featured?
The DIYers found that sanding and refinishing existing wood rather than replacing it saved a lot of money. They often used affordable stains and sealants, repurposed old hardware, and patched damaged areas with wood filler instead of buying new materials.
Are there specific community resources or local programs that helped DIYers in the article save on materials or labor?
Yes, the article mentions that several DIYers used local Habitat for Humanity ReStores, community tool libraries, and neighborhood social media groups to find discounted materials and tools, which helped them save money on their restoration projects.
Did the Watsons handle the roof repairs themselves or did they hire help to stay within their $15,000 budget?
The Watsons did the roof repairs themselves, which helped them stay within their $15,000 budget. They mentioned tackling most of the work on their own to save on labor costs.
How did the Watsons decide which updates to tackle themselves versus hiring out, especially when it came to major things like roofing?
The Watsons focused on handling repairs that matched their skills and comfort level, like painting and flooring. For major updates such as roofing, they chose to hire professionals due to safety concerns and the technical expertise required.
How did the Watsons prioritize which projects to tackle first on their Victorian home with a limited $15,000 restoration budget?
The Watsons focused their $15,000 budget on urgent repairs first, like fixing the leaky roof and updating unsafe wiring. After addressing these essentials, they moved on to cosmetic improvements, choosing projects based on necessity and long-term cost savings.
If you’re on a really tight budget, is it better to tackle one room completely or spread improvements across the house gradually like the DIYers in the article?
If your budget is very limited, focusing on completing one room at a time is usually more satisfying and manageable. This gives you a fully finished space to enjoy, which can motivate you for future projects.
For a historic home restoration, what are some practical ways to preserve original features like woodwork while still keeping expenses reasonable?
You can clean and refinish original woodwork instead of replacing it, use wood filler for minor repairs, and source reclaimed materials for any replacements needed. Doing most of the work yourself and working in stages also helps manage costs.
I’d love to know what community resources the Watsons in Ohio were able to use for their Victorian restoration. Are there specific local organizations or programs that helped them stick to their budget?
The Watsons used their local Habitat for Humanity ReStore for discounted materials and joined an Ohio historic preservation group, which offered free workshops and advice. They also received small grants from a local heritage society that supports Victorian home restorations in their county.
Could you share more about leveraging community resources for DIY restoration—are there specific programs or groups that helped the homeowners featured in your article?
The homeowners in the article found help through local tool libraries, neighborhood Facebook groups, and community workshops. Some also benefited from city-sponsored DIY classes and Habitat for Humanity programs, which provided both resources and expert advice.
Do you have suggestions for small business owners who want to restore a storefront on a limited budget, similar to how homeowners approach historic house restoration?
Many DIY techniques from historic home restoration work for storefronts too. Focus on repainting, repairing original fixtures, and sourcing salvaged materials. Prioritize curb appeal with updated signage and lighting—small changes can make a big difference without overspending.
When restoring older homes on a tight budget like the Watsons, how do you decide which repairs to prioritize if the initial assessment reveals multiple urgent issues?
When facing several urgent issues, most DIYers recommend tackling structural and safety concerns first, like leaks or electrical problems. After that, focus on repairs that prevent further damage or save money in the long run, such as insulation or weatherproofing.
If someone has a smaller budget than the Watsons, say under $10,000, what would you suggest prioritizing first in a historic home restoration?
For a budget under $10,000, prioritize structural repairs and essential systems like roofing, plumbing, or electrical. These are crucial for safety and can prevent costlier problems later. Cosmetic updates, like painting or refinishing floors, can be tackled as budget allows.
Does the article include tips on finding affordable, period-appropriate materials for restoring original woodwork in older homes like the Watsons’ Victorian?
Yes, the article shares tips for sourcing affordable, period-appropriate materials, including advice on checking local salvage yards, online marketplaces, and community exchanges for original woodwork that matches older homes like the Watsons’ Victorian.
If I wanted to restore original woodwork on a tight budget, what would be the most cost-effective first step based on the strategies in the article?
Start by gently cleaning and sanding the wood to remove dirt and old finishes. This uses inexpensive supplies and helps reveal the wood’s condition, so you can decide if affordable repairs or touch-ups are needed before considering pricier refinishing steps.
For those of us working on older farmhouses instead of Victorians, do you have tips on prioritizing which repairs to tackle first when resources are limited?
Start with essentials like roofing, plumbing, and electrical systems to ensure safety and prevent further damage. After that, focus on structural repairs, then move on to insulation and windows for comfort and efficiency. Save cosmetic updates for last.
Do you have suggestions for finding quality materials at lower costs when restoring original features, like woodwork or vintage fixtures, especially for older homes?
Try looking for salvaged materials at architectural salvage yards, local auctions, or online marketplaces. Habitat for Humanity ReStores often have quality items at reduced prices. Also, consider connecting with local contractors who might have leftover materials from previous jobs.
Are there specific community resources or local programs you’d recommend for sourcing affordable materials in a rural area like the Watsons did?
You might check with local Habitat for Humanity ReStores, area salvage yards, or community swap groups. Some rural areas also have building material exchanges or church-run programs that offer discounted supplies to residents.
What are some affordable ways to restore original woodwork without losing its historical character, as mentioned in the article?
The article suggests gentle cleaning with mild soap, using wood fillers for minor repairs, and applying natural finishes like oil or wax. These methods help preserve the original woodwork’s historical character while keeping costs low.
I’m new to DIY—how do homeowners like the Watsons know which parts of a restoration should be tackled first without overspending?
Homeowners like the Watsons usually start by prioritizing urgent repairs that affect safety or prevent further damage, such as leaks or electrical issues. They then focus on projects with the best value or visible impact, keeping their budget in mind throughout.
How did the Watsons decide which original features to restore versus replace when working with a limited $15,000 budget?
The Watsons prioritized restoring features that added character and value, like hardwood floors and crown molding, while replacing elements that were too damaged or costly to repair, such as outdated plumbing and broken windows, to stay within their $15,000 budget.
Can you share more about using community resources during home restoration, such as where to find reclaimed materials or local volunteer help?
You can find reclaimed materials at local Habitat for Humanity ReStores, salvage yards, or online marketplaces. For volunteer help, check with community centers, neighborhood social media groups, and local nonprofits that organize home repair projects.
If the Watsons had to prioritize just one update for both budget and livability, would it be the kitchen or the roof repairs, and why?
The Watsons prioritized roof repairs first because a sound roof is essential for protecting the whole house from damage. While a kitchen upgrade improves daily life, fixing the roof ensures the home’s safety and long-term livability.
How did the Watsons prioritize which projects to tackle first on their Victorian home without going over their $15,000 budget?
The Watsons focused first on repairing urgent structural issues and ensuring the home was safe and weatherproof. After addressing those essentials, they allocated the remaining budget to updating key living spaces they used daily.
How did the DIYers balance sourcing materials locally or using community resources versus buying new when restoring historic elements in their homes?
DIYers often prioritized finding materials at local salvage yards, reuse stores, or through community swaps to match historic elements. They only bought new when original materials were unavailable or unsuitable, helping preserve authenticity while saving money.
Could you share more details about how the Watsons prioritized repairs on their Victorian? Did they follow a specific order to manage their $15,000 budget effectively?
The Watsons started by addressing urgent structural issues like the roof and foundation, then moved on to electrical and plumbing fixes. Only after those essentials did they budget for cosmetic updates, ensuring safety and functionality came first within their $15,000 limit.
Are there any tips in the article for sourcing affordable materials, like reclaimed wood or fixtures, especially for historic homes?
Yes, the article mentions looking for salvaged materials at local reuse centers, browsing online marketplaces, and connecting with community groups to find affordable reclaimed wood and vintage fixtures, which are especially helpful for maintaining the character of historic homes.
Did the article mention how the Watsons prioritized which projects to tackle first on their Victorian? I always struggle with deciding what needs urgent attention versus what can wait.
Yes, the article explains that the Watsons began by addressing structural and safety issues first, like repairing the roof and old wiring. They then moved on to cosmetic updates, focusing on what would make their home livable and safe before taking on decorative projects.
Are there any hidden costs during restoration projects that first-time DIYers should watch out for, based on the experiences shared in this article?
Yes, the article mentions hidden costs like permit fees, unexpected structural issues, and tool rentals. DIYers often overlook expenses for safety gear or disposing of old materials, so it’s smart to budget extra for surprises.
For homeowners with limited DIY experience, what projects from your guide are safest or most cost-effective to start with before tackling bigger renovations?
Painting walls, updating cabinet hardware, and installing peel-and-stick backsplash tiles are safe, beginner-friendly projects. These are inexpensive, require basic tools, and can make a noticeable impact before you try larger renovations.
If you discover unexpected structural issues mid-renovation, how would you recommend reallocating your budget without derailing the whole project?
If you find structural issues, consider prioritizing safety-related repairs first. Pause non-essential updates and shift funds from cosmetic projects to essential fixes. You might also tackle smaller cosmetic changes yourself or postpone them until the main issue is resolved.
What were some unexpected expenses in the Watsons’ restoration, and how did they adjust their plan when those came up?
The Watsons faced unexpected expenses with old wiring and hidden water damage. To adjust, they prioritized safety repairs, postponed cosmetic updates, and started doing more work themselves to keep within their budget.
Can you share more about how DIYers find and use community resources to cut costs during restoration, especially for things like sourcing materials or skilled help?
DIYers often connect with local community groups, online forums, and social media to find free or low-cost materials from neighbors or salvage yards. They also exchange skills, seek advice, or barter services with others who have renovation experience.
If a project ends up costing more than expected, what are some practical steps to keep restoration moving forward without putting family finances at risk?
Consider pausing to reassess your budget and prioritize essential repairs first. Look for lower-cost material alternatives, tackle smaller tasks yourself, or spread out the work over time to avoid financial strain. Avoid relying on high-interest loans if possible.
How did the Watsons decide which repairs to tackle themselves versus what needed a professional, especially with big issues like the roof?
The Watsons assessed each project’s complexity and safety. They handled tasks they felt confident about, like painting and minor repairs, but chose to hire professionals for major issues like the roof due to safety and warranty concerns.
What did other DIYers do when unexpected repair costs popped up during their budget restorations—are there strategies for staying on track financially?
Many DIYers adjusted their project plans, prioritized urgent repairs, and sourced materials from discount stores or secondhand. Some paused work to save up before continuing. Tracking expenses closely helped them avoid overspending and stay within their budget.
How did the Watsons prioritize which projects to tackle first when they started restoring their Victorian house on such a limited budget?
The Watsons focused first on urgent repairs like fixing the leaky roof and old wiring to ensure the house was safe and habitable. They then prioritized smaller, cost-effective updates in high-use areas before moving on to larger, cosmetic changes.
Can you share more specifics on how the Watsons prioritized repairs versus cosmetic updates to stretch their $15,000 restoration budget?
The Watsons first focused their $15,000 on essential repairs like fixing the roof and addressing plumbing issues. Only after those basics were handled did they use leftover funds for cosmetic updates such as painting and refinishing floors.
For a first-time DIYer like me, how did the Watsons decide what tasks to handle themselves versus hiring professionals, especially with things like the roof and original woodwork?
The Watsons assessed their skills and comfort level for each project. For specialized or risky work like roofing, they hired professionals, but handled tasks like sanding and painting original woodwork themselves to stay within budget and ensure safety.
Did the article mention how the Watsons prioritized which repairs to tackle first on their Victorian home? I’m curious what they considered essential versus optional on a limited budget.
Yes, the article explained that the Watsons first focused on structural repairs like fixing the roof and foundation, considering them essential for safety and preventing further damage. Cosmetic projects, such as repainting rooms, were labeled optional and saved for later.
How did the Watsons prioritize which parts of their Victorian home to restore first without going over their $15,000 budget?
The Watsons focused on urgent repairs like fixing the roof and updating electrical wiring first, since these were essential for safety. They then allocated their remaining budget to restoring high-traffic rooms they use daily, such as the kitchen and bathroom.
Could you share more about leveraging community resources during budget restorations? Are there specific organizations or programs that homeowners commonly turn to for affordable materials or volunteer labor?
Many homeowners use local Habitat for Humanity ReStores for discounted materials. Community tool libraries, neighborhood swap groups, and local church volunteer programs are also helpful for sourcing affordable supplies and assistance during budget restorations.
For someone with a historic home but very little DIY experience, what small-scale projects would you recommend starting with before moving on to bigger renovations like roofing or kitchens?
Start with tasks like painting rooms, refinishing wood trim, replacing hardware, or restoring old light fixtures. These projects let you build skills, boost confidence, and make visible improvements without risking damage to your historic home’s structure.
Can you share more about how the Watsons prioritized which projects to tackle first in their Victorian restoration? I struggle with deciding where to start without overspending.
The Watsons began by addressing structural and safety concerns like the roof and foundation before moving to cosmetic updates. They made a list, set a strict budget for each phase, and focused on essentials before tackling decorative projects.
How did the Watsons decide which parts of their Victorian to restore first with a limited $15,000 budget?
The Watsons prioritized repairing their Victorian’s roof and fixing plumbing issues first, since these were essential to making the home safe and livable. They saved cosmetic updates and non-urgent projects for later once the basics were covered.
Did the Watsons do most of the work themselves on their Victorian, or did they hire out any of the bigger updates like the roof? I’m trying to figure out what’s realistic to tackle solo.
The Watsons handled much of the interior restoration themselves, but they did hire professionals for larger projects such as the new roof and electrical upgrades. Tackling major structural or safety-related work solo can be challenging and sometimes risky.
Did the Watsons encounter any unexpected costs during the roof repair, and if so, how did they adjust their overall budget to stay on track?
The Watsons did face unexpected costs when they found additional water damage under the old shingles. To stay within their budget, they reduced spending on landscaping and postponed updating their outdoor deck.
How did the Watsons handle restoration tasks that required professional expertise, like the roof repair, without blowing their budget?
The Watsons saved on costs by doing as much DIY work as possible themselves, then hired professionals only for specialized tasks like roof repair. They compared quotes from multiple contractors to find affordable options and scheduled work during off-peak times for better rates.
How did the Watsons prioritize which parts of their 1901 Victorian to restore first without going over their $15,000 budget?
The Watsons focused first on essential repairs like fixing the roof and updating outdated wiring to ensure safety. They then tackled smaller projects, such as painting and refinishing floors, prioritizing tasks based on need and staying within their $15,000 budget.
For someone with a slightly older house but a much smaller budget than $15,000, which restoration strategies from real DIYers do you think would give the biggest impact?
Focusing on painting, refinishing cabinets, updating fixtures, and making small repairs can offer a big transformation without high costs. Many DIYers in the article emphasized creativity, repurposing materials, and tackling one room at a time to maximize impact.
I’m curious if leveraging community resources made a significant difference in costs for any of the DIYers mentioned. Were there certain tools or skills they found locally that really helped?
Yes, several DIYers highlighted that borrowing tools from local tool libraries and joining skill-sharing groups made a big difference in cutting costs. Access to equipment and advice from experienced neighbors also helped them tackle tasks they might not have managed alone.
For DIYers working on old homes like the Victorian in the article, what are some affordable options for updating kitchens without sacrificing the home’s historic character?
Consider repainting or refinishing original cabinets, adding vintage-style hardware, and using peel-and-stick backsplash tiles that mimic period designs. Open shelving with reclaimed wood also keeps costs down while fitting the home’s historic look.
Were there any unexpected costs the Watsons ran into while restoring the original woodwork, and how did they handle them without breaking their $15,000 budget?
Yes, the Watsons discovered hidden water damage behind some original wood trim, which required extra materials and repairs. They managed this by reallocating funds from less urgent projects and doing most of the repair work themselves to stay within their $15,000 budget.
Did any of the DIYers mention how they handled unexpected costs during their restoration projects, especially when working with a really limited budget?
Yes, some DIYers shared that they handled unexpected costs by setting aside a small contingency fund, prioritizing essential repairs first, and choosing affordable materials or secondhand items to stay within their tight budgets.
For those dealing with historic properties, what are some ways to ensure updates remain budget-friendly but still respect the home’s original character, as mentioned in your Midwest and Southern examples?
To balance budget and character in historic homes, the article suggests repurposing original materials, choosing paint and finishes that reflect the era, and tackling cosmetic upgrades yourself. Salvaging fixtures and shopping secondhand also help preserve authenticity while saving money.
Can you share some examples of community resources or programs that US DIYers have used to offset restoration costs, especially in more rural areas like where the Watsons live?
DIYers in rural areas often use local Habitat for Humanity ReStores for discounted building materials, join neighborhood tool-lending libraries, and participate in county-sponsored home repair grants or volunteer days to reduce restoration expenses.
Did the Watsons run into any unexpected repair costs during their Victorian restoration, and how did they handle those without going over their $15,000 budget?
Yes, the Watsons did encounter unexpected repair costs, including hidden water damage. To stay within their $15,000 budget, they prioritized urgent repairs, sourced secondhand materials, and did much of the labor themselves to save money.
How did the Watsons prioritize which projects to tackle first on their old Victorian with such a limited budget?
The Watsons focused first on repairing structural issues and essential systems like plumbing and electrical, since those affected safety and livability. After that, they moved on to smaller cosmetic updates as their budget allowed.
What were some of the unexpected expenses or challenges the DIYers encountered during the restoration process, and how did they handle them without exceeding their budgets?
DIYers often faced hidden issues like water damage, outdated wiring, and structural repairs. They managed costs by prioritizing urgent fixes, reusing materials, and learning new skills online instead of hiring professionals, allowing them to stay within budget.
Did the Watson family tackle any of the major repairs themselves, like the roof, or did they hire professionals for those parts to stay within their $15,000 budget?
The Watson family handled most of the interior work themselves but chose to hire professionals for major repairs like the roof. This approach helped them stay within their $15,000 budget by saving on labor for simpler tasks.
If you hit unexpected structural problems mid-project, are there affordable ways to deal with them without blowing your budget?
If you encounter unexpected structural issues, get multiple quotes from local contractors for just the repair work. Consider doing non-specialized labor yourself and prioritize urgent fixes first. Also, check if local nonprofits or community programs offer assistance for home repairs.
For homeowners restoring historic properties like the Watsons, do you recommend sourcing materials from architectural salvage yards or sticking to local hardware stores for better savings?
Architectural salvage yards are often the best choice for historic restorations. You can find authentic materials that match your home’s era, and prices are usually competitive or lower than retail. Local hardware stores are great for basics, but salvaged items add genuine character.
I’m curious how long it took the Watson family to complete the main phases of their home restoration while sticking to their budget.
The Watson family completed the main phases of their home restoration over six months. They paced the work carefully to stay within their budget, tackling one room at a time and allowing time for sourcing affordable materials.
Can you share more about how the Watsons prioritized which parts of their Victorian home to restore first while staying within their $15,000 budget?
The Watsons started by addressing structural issues like the roof and foundation to prevent further damage. Next, they focused on essential systems—plumbing and electrical. Only after these priorities did they tackle cosmetic updates, making sure each step fit within their $15,000 budget.
I’m curious if any community resources or local organizations helped lower costs for the DIYers mentioned in the article?
Yes, some DIYers mentioned using local tool libraries, community workshops, and neighborhood swap events to access materials or equipment at lower costs. These community resources played a big role in reducing their overall expenses.
Did the Watsons handle the kitchen update themselves, or did they need to hire out any of the work to stay within their $15,000 budget?
The Watsons did most of the kitchen update themselves, tackling tasks like painting cabinets and installing new fixtures. However, they did hire professionals for electrical work to ensure safety, all while staying within their $15,000 budget.
How did the Watsons figure out which original features were worth restoring versus replacing to stay within their budget on the Victorian?
The Watsons prioritized restoring original features that added historical charm and were still structurally sound, like woodwork and stained glass. If something was too damaged or costly to repair, they chose affordable replacements to keep their project within budget.
Could you share more about how DIYers in the Midwest found community resources to help cut restoration costs?
Midwestern DIYers often partnered with local non-profits, joined neighborhood tool libraries, and attended community workshops. Many also exchanged skills or materials with neighbors, which helped lower expenses and build a support network during their restoration projects.
Are there certain community resources or local programs you recommend for finding affordable materials like the DIYers in the Midwest and South used in their restorations?
Check local Habitat for Humanity ReStores, city salvage yards, and online marketplaces like Facebook Marketplace or Craigslist. Many communities also have tool libraries or materials exchanges where you can find discounted or even free building supplies.
For someone juggling work and kids, what realistic project timeline should I expect if I try a room-by-room restoration on a tight budget like the Watsons?
If you’re working with limited time, expect each room to take about 2–4 weeks when working evenings and weekends. Prioritize essential repairs first, and allow extra time for unexpected issues. Planning and sticking to a schedule helps keep things manageable.
For someone working with a similar $15,000 budget, what would you recommend doing differently if the house also has historic features that need preserving?
With historic features, prioritize preserving original elements like woodwork or stained glass. Allocate more budget for specialist restoration and less for cosmetic updates. Consider gentle cleaning methods and use period-appropriate materials to maintain authenticity.
Are there specific strategies for restoring old woodwork on a budget that worked for Midwestern homes like the Watsons’ in Ohio?
The article highlights affordable strategies like sanding and refinishing original trim, using wood filler for small repairs, and shopping for surplus or reclaimed wood. The Watsons found that doing the work themselves and sourcing materials locally kept costs low in their Ohio home.
In the Watsons’ case, how did they prioritize their restoration tasks to stay within their $15,000 budget, and were there any unexpected expenses along the way?
The Watsons focused on essential repairs first, like fixing structural issues and updating outdated wiring. They tackled cosmetic upgrades later. Unexpected expenses included hidden water damage behind walls, which required reallocating part of their budget to address the issue.
Did the Watsons have to do any electrical or plumbing updates in their Victorian, and if so, how did they fit those potentially expensive repairs into their $15,000 budget?
The Watsons did need to update both electrical wiring and some plumbing in their Victorian. They saved money by tackling minor tasks themselves and hiring licensed professionals only for critical work, prioritizing safety while staying within their $15,000 budget.
Did the Watsons mention how they prioritized which repairs to tackle first on their Victorian, especially with such a limited budget?
Yes, the Watsons prioritized urgent repairs first, like fixing the leaking roof and addressing electrical issues, before moving on to cosmetic updates. They focused on safety and structural concerns to make sure their budget went to the most critical needs.
For someone completely new to restoration, how do you recommend finding reliable community resources to help keep costs down?
Start by visiting local hardware stores and community centers—they often know about DIY workshops and tool lending libraries. Neighborhood social media groups can also connect you with experienced locals willing to offer advice or share resources inexpensively.
Can you share more examples of how DIYers leveraged community resources or local groups to find affordable materials during their projects?
Many DIYers joined local online groups or neighborhood forums to find surplus building materials or leftover paint. Others attended community swap events or checked with nearby construction sites for discarded wood and fixtures they could repurpose affordably.
What are some common unexpected expenses first-time budget restorers should plan for based on the real-life stories you mentioned?
Based on the real-life stories, first-time restorers often face unexpected costs like hidden water damage, electrical issues behind walls, permit fees, and the need to rent specialty tools. Setting aside extra funds for these surprises can make your project smoother.
How did the Watsons decide which original features to keep versus what to replace entirely when restoring their Victorian home?
The Watsons evaluated each feature based on its historical value and structural condition. They kept original elements like the hardwood floors and crown molding, while replacing parts that were too damaged or unsafe, such as outdated wiring and broken windows.
What are some common cost traps DIYers should watch out for during restoration projects, especially when working on something as big as a roof?
Watch out for hidden water damage, underestimating material costs, and skipping proper permits. DIYers often misjudge roof square footage or forget to budget for safety gear and disposal fees, which can significantly increase expenses.
When the Watsons restored their 1901 Victorian, how did they decide which original features to prioritize within a $15,000 budget?
The Watsons focused on retaining the home’s stained glass windows, ornate woodwork, and original hardwood floors. They chose these features because they defined the home’s character, fit their budget, and added the most historic value.
How did the Watsons decide which restoration tasks to prioritize first in their Victorian home without going over budget?
The Watsons focused on urgent repairs first, like fixing a leaky roof and addressing electrical hazards. They then tackled budget-friendly updates, prioritizing projects that improved safety and functionality before considering purely cosmetic changes.
I’m curious if any of the featured DIYers ran into unexpected expenses mid-project and how they adjusted their plans to stay on track financially.
Yes, several DIYers mentioned encountering surprise costs, like hidden water damage or outdated wiring. To stay on budget, they prioritized essentials, paused non-urgent upgrades, and shopped for discounted materials or reused items where possible.
How did the Watsons prioritize which restoration projects to tackle first on their Victorian home with such a limited budget?
The Watsons prioritized urgent structural repairs and essential safety issues first, such as fixing the roof and addressing electrical problems, before moving on to aesthetic updates. This approach helped them stretch their limited budget while ensuring their home was safe and livable.
Did the Watsons run into any surprises with hidden issues once they started their Victorian restoration in Ohio, and how did they handle unexpected expenses on a tight budget?
The Watsons did uncover hidden water damage and outdated wiring during their Victorian restoration. To manage unexpected expenses, they prioritized urgent repairs, tackled simpler tasks themselves, and sourced materials from local salvage yards to stay within budget.
Are there specific community resources or local programs the article recommends for finding affordable restoration materials, especially for historic homes like the Victorian in Ohio?
The article suggests checking out community salvage yards, local Habitat for Humanity ReStores, and neighborhood swap groups for affordable restoration materials. It also mentions that some historic preservation societies may offer resources or guidance specific to homes like the Victorian in Ohio.
Can you share more about using community resources during a home restoration? What kinds of resources do DIYers in the Midwest or South typically rely on?
DIYers in the Midwest and South often use local Habitat for Humanity ReStores, community tool libraries, and neighborhood swap groups for materials and tools. They also connect with local Facebook groups or community centers for advice, workshops, and sometimes free supplies.
If I have an older property with unique features, what’s a realistic timeframe to expect for a budget-friendly restoration based on these real-life strategies?
A budget-friendly restoration of an older property with unique features typically takes several months—often 3 to 12—depending on project size, your pace, and unexpected repairs. DIYers in the article recommend planning extra time for sourcing materials and working around original details.
What are some common cost traps that first-time DIYers should watch out for when restoring older homes like the ones mentioned in the article?
First-time DIYers often underestimate hidden issues like outdated wiring, water damage, or structural problems. Skipping proper inspections and buying cheap, low-quality materials can also lead to higher costs down the road. Budget for unexpected repairs.
Can you share more details on how the Watsons prioritized which restoration projects to tackle first to stay within their $15,000 budget?
The Watsons focused on urgent repairs first, like fixing leaky plumbing and damaged roofing. Next, they targeted projects that improved daily comfort, such as updating insulation and refinishing floors, always comparing costs and tackling the most essential updates within their budget.
Are there any resources or community programs mentioned that could help budget-minded parents source quality materials for historic homes?
Yes, the article highlights local salvage yards, community tool libraries, and neighborhood swap events as valuable resources for sourcing affordable, quality materials, especially for parents restoring historic homes on a budget.
What were some of the unexpected expenses during the Watsons’ restoration process, and how did they handle them without blowing their $15,000 budget?
The Watsons encountered unexpected plumbing issues and hidden mold during their restoration. They handled these by prioritizing essential repairs first, sourcing some materials secondhand, and doing more work themselves to keep expenses within their $15,000 budget.
For someone starting a budget restoration, what are a few initial steps you recommend to prevent overspending or running into unexpected costs early in the project?
Begin by setting a clear budget and listing your must-have repairs versus nice-to-have upgrades. Assess the condition of your home carefully to identify urgent issues. Get multiple quotes for materials and services, and build in a small contingency fund for surprises.
How did the Watsons decide which repairs to tackle themselves versus hiring out when restoring their Victorian on a budget?
The Watsons handled repairs themselves when they felt confident in their skills, like painting and refinishing floors, but chose to hire professionals for tasks like electrical and plumbing work that required expertise or permits.
Can you share more about how the Watsons prioritized which restoration projects to tackle first with such a limited budget?
The Watsons focused first on essential repairs that affected safety and livability, like fixing leaks and faulty wiring. After addressing these urgent needs, they moved on to cosmetic updates, always choosing projects that offered the biggest visual impact per dollar spent.
How did the Watsons decide which original features of their Victorian were worth restoring versus replacing, especially on a tight budget?
The Watsons prioritized restoring features that were structurally sound and had historical significance, like original wood trim and stained glass. They opted to replace elements that were too damaged or costly to repair within their budget, such as outdated plumbing and unsafe wiring.
I’m curious how you found affordable materials or community resources—are there tips on where to look locally or online when restoring on a budget?
Many DIYers recommend checking local Habitat for Humanity ReStores, salvage yards, and online marketplaces like Craigslist or Facebook Marketplace for discounted materials. Community boards and neighborhood groups can also be helpful for finding free or low-cost items and sharing resources.
What are some examples of leveraging community resources for cheap home repairs like the DIYers in the article did?
The DIYers in the article used community tool libraries, attended free local workshops, joined neighborhood swap groups, and teamed up with neighbors for group projects to share skills and materials, all helping reduce repair costs.
Can you share more about how community resources played a role in keeping costs down during home restoration? I’m interested in tapping into local help but don’t know where to begin.
Community resources like local tool libraries, neighborhood volunteer groups, and free DIY workshops helped many DIYers cut costs. Start by visiting your local library, community center, or checking social media groups for nearby events and lending programs.
Are there specific community resources or programs you mention that helped with material costs in these real-life cases?
Yes, the article mentions local Habitat for Humanity ReStores, community tool libraries, and neighborhood swap groups as resources some DIYers used to lower material costs in their restoration projects.
Did the article mention how the Watsons decided which original features of their Victorian to restore first, and how they balanced that with urgent repairs like the roof?
The article explains that the Watsons prioritized urgent repairs like fixing the roof to prevent further damage. After addressing those essentials, they chose original Victorian features to restore based on historical value and their budget, balancing necessity with preservation.
For someone with very limited DIY experience, what are some manageable first steps to take when restoring an older home on a budget?
Start by tackling simple tasks like painting walls, updating hardware on cabinets, or replacing light fixtures. These projects are budget-friendly, require minimal tools, and help build your confidence for bigger DIY work later on.
Did the article mention how the Watsons prioritized which renovation projects to tackle first on their Victorian house to stay within their $15,000 budget?
Yes, the article explained that the Watsons focused on essential repairs first, such as fixing the roof and addressing structural issues, before moving on to cosmetic updates. This approach helped them stay within their $15,000 budget.
How did the Watsons prioritize which repairs to tackle first while sticking to their $15,000 budget?
The Watsons focused on urgent repairs like fixing roof leaks and outdated electrical wiring first to prevent further damage. They then allocated remaining funds to cosmetic updates, ensuring essential safety issues were addressed before tackling aesthetic improvements.
I’d love tips on managing costs when unexpected repairs pop up mid-project, since it sounds like that happens often in these restorations.
Set aside a contingency fund—typically 10–20% of your budget—for surprises. Prioritize urgent repairs first, get multiple quotes to compare prices, and consider tackling smaller fixes yourself if you’re comfortable. This approach helps keep costs manageable.
How did the Watsons prioritize which repairs to tackle first with their $15,000 budget, especially with big issues like the roof and kitchen updates?
The Watsons focused on urgent repairs first, using most of their budget to fix the leaky roof to prevent further damage. Only after addressing structural issues did they allocate remaining funds to essential kitchen updates.
Did the Watsons do any of the work themselves, like restoring the woodwork or roofing, or did they have to hire professionals for certain jobs to stay within their $15,000 budget?
The Watsons handled most of the restoration themselves, including refinishing the woodwork. However, they did hire professionals for the roofing, which helped them stay within their $15,000 budget while ensuring safety and quality on the more complex tasks.