Introduction: Painting Your Home—A Satisfying DIY with Hidden Pitfalls
Few home improvement projects are as instantly transformative—and deceptively simple—as painting. Whether you’re freshening up a faded bedroom, updating kitchen cabinets, or giving your front door a burst of color, picking up a brush or roller is often the go-to DIY project for homeowners across the U.S. It’s budget-friendly, doesn’t require heavy machinery, and seems straightforward enough. However, as countless do-it-yourselfers have learned the hard way, painting projects come with a host of potential pitfalls. A flawless, professional-looking finish is often undermined by common mistakes that can lead to streaks, peeling, uneven coverage, or even costly do-overs.
In this comprehensive guide, we’ll walk you through the most frequent errors DIYers make when tackling painting projects at home. From preparation missteps to tool selection, from skipping crucial steps to choosing the wrong paint, we’ll break down exactly how to avoid these pitfalls. You’ll learn practical, step-by-step advice for everything from prepping your surfaces to the final coat, ensuring that your next painting project looks like it was done by a pro. Whether you’re a first-time painter or looking to up your game, these insights will save you time, money, and frustration—and help you achieve the stunning results your home deserves.
Common DIY Painting Mistakes and How to Avoid Them
1. Skipping Surface Preparation
The biggest mistake beginners make is underestimating the importance of surface prep. Paint adheres best to clean, smooth, and dry surfaces. Neglecting this step results in peeling, bubbling, or visible imperfections.
- Not cleaning walls: Dust, grease, and grime can prevent paint from sticking. Always wash walls with mild detergent and let them dry.
- Ignoring repairs: Fill holes, cracks, and dents with spackle or patching compound. Sand smooth after drying.
- Skipping sanding: Glossy or uneven surfaces should be lightly sanded to help paint adhere and to eliminate bumps.
- Neglecting primer: Priming seals porous surfaces, blocks stains, and creates a uniform base for paint—especially important on bare drywall, patched areas, or after drastic color changes.
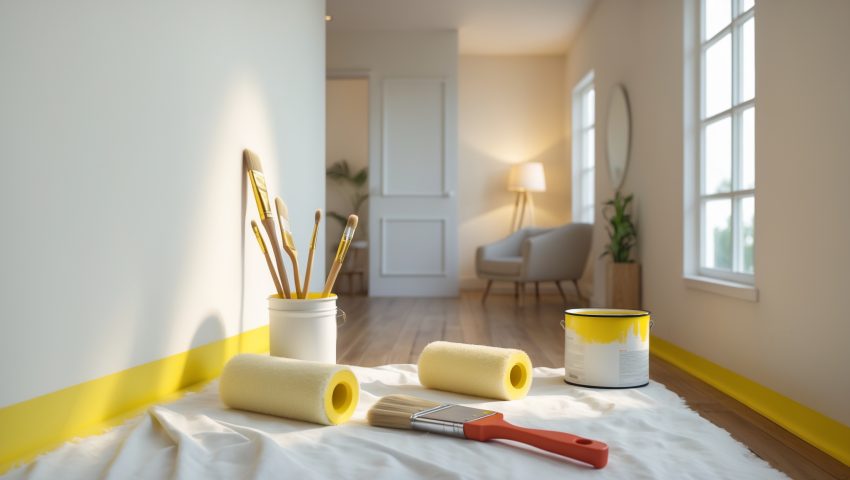
2. Underestimating the Power of the Right Tools
Quality tools make a dramatic difference. Cheap brushes shed bristles, and low-grade rollers leave lint or create uneven textures.
- Brushes: Use synthetic brushes for latex paint and natural bristle for oil-based. Invest in angled sash brushes for cutting in.
- Rollers: Match nap length to surface (short for smooth, longer for textured). High-density foam rollers work well for cabinets and doors.
- Painters’ tape: Use quality painter’s tape to mask off trim, windows, and outlets for sharp lines. Press edges firmly for a tight seal.
- Other essentials: Drop cloths, extension poles, paint trays, and grid screens make the process cleaner and more efficient.
3. Choosing the Wrong Paint
Not all paint is created equal. Selecting the wrong type, finish, or color can impact both appearance and durability.
- Type: Use interior paint for indoor projects and exterior paint for outdoor surfaces. Bathrooms and kitchens need mildew-resistant formulas.
- Finish: High-gloss highlights imperfections but is easier to clean; flat hides flaws but is harder to clean. Eggshell and satin are popular for living spaces.
- Color testing: Paint samples on your walls and observe them at different times of day. Lighting dramatically affects appearance.
- Quality: Premium paints offer better coverage and longer-lasting color, saving money and effort long-term.
4. Skipping the Tape or Removing It Incorrectly
Skipping painter’s tape or removing it at the wrong time can ruin crisp lines and damage your work.
- Apply tape properly: Press down firmly along the edges to prevent bleeding.
- Remove at the right time: Pull tape off while the paint is still slightly damp for the cleanest edge. If the paint has dried, score along the edge with a sharp blade before removing.
5. Painting in the Wrong Conditions
Humidity, temperature, and ventilation matter. Painting in harsh conditions can cause slow drying, bubbling, and uneven finish.
- Ideal temperature: Most paints work best between 50°F and 85°F. Too cold or too hot can prevent proper curing.
- Humidity: High humidity slows drying and increases the risk of drips. Avoid painting on rainy or excessively humid days.
- Ventilation: Open windows and use fans to circulate air and dissipate fumes.
6. Overloading or Underloading the Brush/Roller
Too much paint leads to drips and uneven texture; too little results in patchy coverage.
- Load evenly: Dip the brush about one-third of the way into the paint and tap off excess. Roll the roller in the tray until evenly coated, but not dripping.
- Don’t stretch paint: Reload often for consistent color and finish.
7. Ignoring the “Cutting In” Process
Failing to “cut in”—painting along edges and corners before rolling—results in visible lines and uneven coverage.
- Take your time: Use an angled brush to carefully paint around trim, ceiling lines, and corners before using the roller on large surfaces.
8. Rushing Between Coats
Impatience is the enemy of a smooth finish. Applying a second coat before the first is dry leads to streaks, peeling, or “pulling” up the paint underneath.
- Read the label: Follow manufacturer recommendations for drying times between coats.
- When in doubt, wait: If the surface feels tacky, give it more time to dry.
9. Neglecting Cleanup and Storage
Proper cleanup extends the life of your tools and prevents future headaches.
- Clean immediately: Wash brushes and rollers with warm, soapy water for latex paints (or appropriate solvent for oil-based) as soon as you’re done.
- Store properly: Hang brushes or store them in their original packaging to maintain shape. Seal leftover paint tightly and label with date and room for touch-ups.
Step-by-Step Guide to a Pro-Quality DIY Paint Job
Step 1: Gather Supplies and Prep the Room
- Move furniture out or to the center of the room and cover with drop cloths.
- Remove outlet covers, switch plates, and any wall hangings.
- Protect floors with heavyweight drop cloths (avoid plastic, which can be slippery).
Step 2: Repair and Clean Surfaces
- Fill holes, cracks, or dents with spackle. Sand smooth when dry.
- Clean surfaces with a damp sponge and mild detergent. Rinse and allow to dry completely.
Step 3: Tape and Prime
- Apply painter’s tape to trim, ceilings, windows, and any surfaces you want to protect.
- Prime bare, patched, or stained areas—entire walls if changing from dark to light colors.
Step 4: Cut In Edges
- Use an angled sash brush to paint a 2-3 inch border along ceiling lines, corners, and trim.
- Work in manageable sections to keep a wet edge.
Step 5: Roll the Main Surfaces
- Start with a “W” or “M” motion to distribute paint, then fill in with even, overlapping strokes.
- Don’t press too hard—let the roller do the work.
- Reload roller frequently for uniform coverage.
Step 6: Apply Additional Coats
- Wait for the first coat to dry completely before applying a second.
- Repeat the cutting in and rolling process for each coat.
Step 7: Remove Tape and Clean Up
- Remove painter’s tape while the final coat is still slightly damp.
- Clean brushes, rollers, and trays immediately.
- Label leftover paint for touch-ups.
Pro Tips for a Flawless Finish
- Maintain a “wet edge”: Always overlap freshly painted areas to avoid lap marks.
- Mind the lighting: Use portable work lights to spot missed areas or drips as you go.
- Don’t paint over wallpaper: Remove it first; paint won’t adhere properly.
- Use extenders: Paint additives like Floetrol help latex paint level out and reduce brush marks.
- Feather out edges: Lightly roll over edges where you stop and start to blend seamlessly.
Seasonal Considerations: When and Where to Paint
Timing your project can make a big difference in results, especially for exterior work.
- Spring/Fall: These are usually the best times for exterior painting—mild temperatures and moderate humidity help paint cure properly.
- Summer: Paint early in the day or in the shade to avoid quick drying and brush marks.
- Winter: Indoor projects are fine, but keep the area well-ventilated and maintain temps above 50°F.
Budget Breakdown: Getting the Most Value
DIY painting is cost-effective, but costs can add up if you’re not careful. Here’s how to budget smartly:
- Paint: Premium brands cost more upfront ($30–$60/gallon), but better coverage means fewer coats and longer life.
- Tools: Expect to spend $30–$80 on brushes, rollers, trays, and tape. Quality tools are reusable, so don’t skimp.
- Prep materials: Spackle, sandpaper, primer, and drop cloths ($10–$40).
- Miscellaneous: Unexpected repairs or extra primer can add to costs. Budget a 10–15% cushion.
Maintenance: Making Your Paint Job Last
Good maintenance extends the life of your work and keeps your space looking fresh.
- Clean gently: Use a soft sponge with mild soap for spot cleaning marks and stains. Avoid harsh abrasives.
- Touch up promptly: Save a small amount of paint for future touch-ups. Stir well before use, and feather out edges.
- Inspect annually: Look for peeling, bubbling, or mildew. Address issues early to prevent bigger problems.
- Control moisture: Use dehumidifiers or exhaust fans in damp areas to protect painted surfaces.
Conclusion: Painting Confidence—The Difference is in the Details
DIY painting projects are among the most rewarding—and visible—ways to refresh your home. While the basics may seem easy, the difference between a patchy, streaky wall and a flawless, professional-looking finish lies in the details. Surface prep, tool quality, product selection, and patience at each step all play crucial roles in the outcome. By understanding and avoiding the most common mistakes, you’ll save yourself time, money, and frustration—not to mention the embarrassment of uneven lines or peeling paint.
Remember: successful DIY painting is less about speed and more about thoroughness. Take time to prep, invest in good materials, and don’t rush the process. Each step—cleaning, taping, priming, cutting in, rolling, and waiting between coats—builds on the last to ensure durable, beautiful results. And when you do run into issues, don’t be discouraged. Even the best pros started as beginners, learning from each project.
With the right knowledge and approach, you can tackle any painting project with confidence and pride. Your home will not only look better, but you’ll also enjoy the satisfaction of a job well done—by your own hands. Happy painting!
Can you recommend the best way to prep cabinets for painting if they have years of greasy buildup, or should I just replace them instead?
You don’t need to replace greasy cabinets—just clean them thoroughly using a degreaser or a TSP substitute, rinse well, sand lightly, and prime before painting. This prep ensures paint adheres properly and gives a professional finish.
When prepping glossy surfaces for repainting, is it better to sand by hand or use a power sander? I want to avoid visible scratches but still get good adhesion.
For prepping glossy surfaces, sanding by hand with fine-grit sandpaper (like 220-grit) gives you more control and helps avoid visible scratches. Power sanders work faster but can leave marks if not used carefully. Aim for a light scuff to improve adhesion.
I always have trouble with sanding glossy surfaces before painting. Is there an easy way to tell when I’ve sanded enough, or can you recommend a specific grit for most interior walls?
For glossy surfaces, sand until the shine is completely dulled—this helps paint adhere better. Use 120- to 150-grit sandpaper for most interior walls. Wipe away dust after sanding before you start painting.
If I accidentally missed a patch when cleaning or repairing my wall before painting, is there any way to fix peeling or bubbling after the paint has dried?
Yes, you can fix peeling or bubbling by scraping off the damaged paint, cleaning and repairing the area properly, then priming and repainting. Make sure the wall is smooth and dry before applying paint again.
You mentioned skipping repairs is a common mistake. Is it okay to use spackle for larger wall cracks, or should I use something else for bigger damages?
For larger wall cracks, it’s better to use joint compound or patching plaster instead of regular spackle. Spackle works well for small holes and minor damage, but joint compound provides a stronger repair for bigger cracks.
Is it really necessary to use both spackle and patching compound for small holes, or will just one work for most minor repairs before painting?
For most small holes, using either spackle or patching compound is usually enough. Spackle works well for tiny nail holes and minor dents, while patching compound is better for slightly larger repairs. You don’t typically need both.
Do you have tips on prepping glossy surfaces in a retail space without creating too much dust or downtime?
To prep glossy surfaces with minimal dust and downtime, use a liquid deglosser or sanding pad instead of traditional sanding. Wipe down surfaces thoroughly before painting, and choose quick-dry primers to speed up the process.
If I’m painting over a wall that already has a glossy finish, do I just sand it lightly by hand, or should I use a specific type of sander or sandpaper?
For glossy walls, lightly sanding by hand with fine-grit sandpaper (around 220 grit) is usually enough to dull the shine and help new paint stick. An electric sander isn’t necessary unless the area is very large.
When prepping walls with existing paint that’s a little glossy, is sanding always necessary or are there specific primers that can help with adhesion instead?
You don’t always have to sand glossy walls completely, but lightly scuffing helps. Alternatively, you can use a bonding or adhesion primer specifically made for glossy surfaces, which allows new paint to stick better without extensive sanding.
If I’m working with a limited budget, are there affordable tools or techniques that still help avoid streaks and uneven coverage?
Yes, you can get good results with budget-friendly tools. Use a quality synthetic brush or a dense foam roller, and always prep surfaces by cleaning and priming. Applying paint in thin, even coats will help prevent streaks and uneven spots.
For small business owners on a tight schedule, how much drying time should we realistically plan between washing the walls and putting on the first coat of paint?
You should allow at least 24 hours for the walls to dry completely after washing, especially if the room is humid or poorly ventilated. This helps ensure the paint adheres properly and avoids peeling or bubbling.
Is there a big difference in how you prep walls versus kitchen cabinets before painting, or do you basically follow the same steps?
Prepping walls and kitchen cabinets is similar in basics—cleaning, sanding, and priming—but cabinets usually require more thorough cleaning to remove grease and a special primer for glossy surfaces. Attention to detail is key for a lasting, professional finish.
If I have a tight budget and limited weekend time, which prep step can I safely shorten, and which is the most critical to avoid mistakes?
If you’re short on time and budget, you can shorten wall washing if surfaces aren’t too dirty. However, never skip proper surface repair and taping edges—these steps are crucial for avoiding visible mistakes and achieving a clean, professional finish.
What can I do if I already see streaks or uneven coverage after my first coat—should I sand it down or just add more paint?
If you notice streaks or uneven coverage after the first coat, let it dry completely. Lightly sand any rough areas, then wipe away dust before applying a second coat. This helps achieve a smoother, more professional finish.
Do you have suggestions for affordable tools that still give a smooth, professional-looking finish for a first-time DIYer?
Foam rollers and angled synthetic brushes are budget-friendly and give a smooth finish, even for beginners. Use painter’s tape for clean edges and a paint tray with a liner to make cleanup easier. Sanding blocks also help prep surfaces for better results.
Is it better to patch up dents with spackle or joint compound if I’m trying to get that professional-looking finish on older drywall?
For small dents, spackle works well and dries quickly. For larger or deeper repairs, joint compound is better because it sands smoother and blends seamlessly for a professional-looking finish.
If you spot peeling or bubbling paint after finishing, is there a way to fix those areas without starting the whole project over?
You can fix peeling or bubbling paint by scraping off the affected area, sanding it smooth, cleaning off dust, then priming and repainting just that spot. There’s no need to redo the entire project.
You mention sanding glossy surfaces, but is there an easy way to tell if sanding is really necessary before painting kids’ bedroom walls?
If water beads up or slides off when you splash it on the wall, the surface is likely too glossy and should be sanded. Otherwise, if the paint is matte and feels rough, sanding may not be needed.
You mention using mild detergent to wash walls before painting—do you have a specific product you prefer, or is regular dish soap good enough for prepping surfaces?
Regular dish soap mixed with warm water works well for cleaning walls before painting. There’s no need for a special product—just make sure to rinse the surface thoroughly so no soap residue is left behind.
How do you know when a patched hole or crack is smooth enough after sanding so it will blend in perfectly once painted?
Run your hand gently over the patched area; it should feel level and as smooth as the surrounding wall. Also, shine a light across it—the patch should be invisible with no raised edges or dips before you start painting.
If I’m on a tight budget, which prep steps would you suggest I absolutely can’t skip to still get a professional-looking finish on older walls?
Be sure to clean the walls thoroughly, fill in any holes or cracks, and lightly sand rough areas. These steps are essential for a smooth, professional finish, even on a tight budget.
How do I know if I need to sand a surface or if just cleaning it is enough before I start painting?
If the surface feels rough, has old paint, gloss, or imperfections, sanding is necessary for good adhesion. If it’s already smooth, clean, and in good shape, thorough cleaning should be enough before painting.
You mention using spackle for filling holes—are there any quick-drying options that work well if I only have a weekend to get the painting done?
Yes, there are quick-drying spackles available that can be painted over in as little as 15–30 minutes. Look for products labeled ‘fast-drying’ or ‘patch and paint.’ Just be sure to follow the drying instructions on the packaging.
If I clean my kitchen walls with mild detergent, how long should I wait for them to dry before painting to avoid any peeling issues?
After washing your kitchen walls with mild detergent, wait at least 24 hours to ensure they are thoroughly dry before painting. This helps prevent peeling and ensures the paint adheres properly.
Can you suggest budget-friendly fillers or patching compounds that work well for covering small dents and holes before painting?
For small dents and holes, lightweight spackling paste or pre-mixed joint compound are affordable and easy to use. Brands like DAP or 3M offer budget-friendly options found at most hardware stores. Let them dry completely before sanding and painting.
If I accidentally peel paint while removing painter’s tape, is there a quick way to touch up or fix the spot without starting over?
If paint peels when removing tape, sand the area lightly to smooth rough edges, then carefully repaint just that spot. Let it dry completely before applying more tape or another coat.
When sanding glossy surfaces, is there a specific grit sandpaper you recommend to avoid scratching the wall but still get good paint adhesion?
For sanding glossy surfaces before painting, a fine-grit sandpaper like 220-grit works well. It dulls the surface enough for good paint adhesion without causing scratches that might show through the new paint.
Do you recommend a specific grit of sandpaper when prepping glossy surfaces, or does it depend on the type of paint I’m using?
For prepping glossy surfaces, a medium grit sandpaper like 120 to 150 is usually best. This creates enough texture for most paints to adhere well, regardless of the type. Always check your paint’s label for any specific prep instructions.
If I’m painting over kitchen cabinets that already have a glossy finish, do I really need to sand them down first, or can I just use a primer meant for slick surfaces?
Even with a primer designed for slick surfaces, lightly sanding glossy cabinets is still recommended. Sanding helps the primer adhere better, resulting in a smoother, more durable finish. Just a light sanding is usually enough.
If I’m repainting kitchen cabinets that already have a glossy finish, is sanding always necessary, or can I just use a special primer to help the new paint stick?
Sanding is usually recommended for glossy cabinets to help the primer adhere better, but if you use a high-quality bonding primer designed for slick surfaces, you may be able to skip sanding. Always clean thoroughly before priming.
You mention filling holes and sanding—should repairs be primed before painting, or can I go straight to the paint if I’m in a hurry?
It’s best to prime repaired areas before painting, even if you’re short on time. Primer helps paint stick evenly and prevents patched spots from showing through. Skipping primer can lead to uneven color and texture on your finished wall.
Could you explain in more detail what type of sanding tools are best for prepping glossy surfaces before painting?
For prepping glossy surfaces, use a fine-grit sanding sponge or 220-grit sandpaper to dull the shine without damaging the surface. A sanding block helps keep even pressure, especially on flat areas, while sanding sponges are great for curves and corners.
If I only have a few hours to paint a small room, are there any shortcuts for prepping the walls without risking issues like peeling later?
If you’re short on time, at least wipe down the walls to remove dust and spot-clean any stains. Avoid skipping surface cleaning entirely, as painting over dirt or grease is a common cause of peeling. Quick patching for small holes is also worth the extra few minutes.
Could you explain how to tell if a wall is dry enough after cleaning before starting to paint? I sometimes get confused about timing.
To check if your wall is dry enough after cleaning, lightly touch the surface with your hand. It should feel cool but not damp or tacky. Wait until there’s no visible moisture or streaks before you start painting.
If I’m on a budget, are there any shortcuts in the prep process that won’t totally ruin the final look?
You can save time and money by focusing on key prep steps: thoroughly clean your surfaces and patch any obvious holes. While skipping sanding or priming might seem tempting, these steps really help with a smooth, lasting finish.
For cleaning walls before painting, do you recommend any specific type of detergent, or is a basic dish soap good enough for most cases?
A basic dish soap mixed with warm water is usually sufficient for cleaning most walls before painting. For especially greasy or dirty areas, you might consider using a mild degreaser, but dish soap works well in most situations.
If I’m painting over kitchen cabinets that have a lot of grease buildup, is regular dish soap enough for cleaning or is there a stronger cleaner you recommend?
Regular dish soap can help, but for tough grease on kitchen cabinets, a degreaser like TSP (trisodium phosphate) or a dedicated kitchen cleaner is more effective. Be sure to rinse thoroughly and let the cabinets dry before painting.
For cabinets or doors with old glossy paint, do you recommend sanding by hand, using a sanding block, or should I invest in an electric sander for better prep?
For cabinets or doors with old glossy paint, an electric sander can save time and give more even results, especially on larger surfaces. For smaller areas or details, a sanding block or hand sanding works well to avoid damaging the edges.
For tackling kitchen cabinets, do you suggest a different cleaning or sanding method compared to regular walls to avoid peeling paint later on?
Yes, kitchen cabinets need more thorough cleaning than walls due to grease buildup. Use a degreaser before sanding. Sand cabinets lightly to remove gloss, but don’t over-sand. This prep helps paint stick and reduces peeling later.
When choosing between sanding by hand or with a power sander for surface prep, what situations call for each method?
Hand sanding is best for small areas, corners, or delicate surfaces where more control is needed. Power sanders are ideal for large, flat surfaces and speeding up the process, but be careful not to over-sand or damage the material.
If I’m repainting previously glossy cabinets, is sanding enough to ensure proper paint adhesion or should I use a separate primer as well?
For glossy cabinets, sanding helps but it’s also important to use a separate primer. The primer ensures the new paint adheres well and lasts longer, especially on slick or shiny surfaces.
Is there a big difference in results if you use a brush versus a roller on something like kitchen cabinets, or is one easier for avoiding streaks?
For kitchen cabinets, rollers usually create a smoother finish with fewer visible streaks compared to brushes. Brushes are better for edges and detail work, but rollers are generally easier for achieving an even, streak-free surface.
Do you have any tips for speeding up the surface preparation process without sacrificing quality, especially if I’m painting multiple rooms on a tight schedule?
To save time, tackle one step at a time across all rooms—patch all holes first, then sand, then clean. Use quick-drying spackle and a sanding pole for efficiency. Having all your prep tools ready before starting also prevents delays.
How can I tell if I’ve sanded a surface enough before I start painting, especially on glossy walls?
To check if you’ve sanded enough, run your hand over the surface—it should feel smooth, not slick or glossy. The shine should be gone, and the wall should look slightly dull, which helps paint adhere better.
Could you explain more about how to properly sand glossy surfaces before painting? I always worry I’m not doing it enough or using the wrong sandpaper.
To sand glossy surfaces, use medium-grit sandpaper (around 120 to 150 grit). Sand lightly and evenly until the shine is dulled; you don’t need to remove all paint. Wipe off dust before painting for best adhesion.
How can I tell if I need to sand a wall or if just cleaning is enough before painting?
Run your hand over the wall—if it feels rough, has bumps, or has peeling paint, sanding is needed. If the surface is smooth and just dirty, a thorough cleaning should be enough before painting.
Could you explain what kind of patching compound is best for fixing small holes versus larger cracks before painting?
For small holes, a lightweight spackling compound works well since it’s easy to apply and sand. For larger cracks, use a vinyl or acrylic patching compound, as these are more durable and flexible for bigger repairs.
When prepping walls for painting, how do you recommend dealing with stains that don’t come off with basic cleaning? Should I use a special primer or cleaner first?
For stubborn stains that basic cleaning can’t remove, it’s best to use a stain-blocking primer after cleaning. This will seal the stain and prevent it from bleeding through the paint, ensuring a smooth, professional finish.
If I accidentally painted over some small cracks without filling them first, is there a way to fix it without starting over completely?
Yes, you can fix those cracks without starting over. Lightly sand the painted area, fill the cracks with spackle or filler, let it dry, sand smooth, and touch up with matching paint.
I sometimes notice streaks after using a roller, even if I do all the prep steps. What can cause this, and how can I prevent it?
Streaks with a roller often happen when the roller is too dry or overloaded, or if you use too much pressure. Make sure to use even strokes, keep a wet edge, and back-roll gently for a smooth, streak-free finish.
Could you share specific tips for sanding glossy surfaces before painting, especially for areas like kitchen cabinets?
For glossy surfaces like kitchen cabinets, use a medium-grit sandpaper (120-150 grit) to dull the shine and create a surface the paint can grip. Sand evenly, wipe off all dust with a damp cloth, and let dry before priming.
If I skip sanding on old painted walls but still clean and patch them, how much will it affect the final look or durability?
Skipping sanding can lead to an uneven finish, poor paint adhesion, and visible imperfections. Even if you clean and patch, old paint may cause the new coat to peel or look rough over time. Light sanding helps achieve a smoother, longer-lasting result.
How long should I wait after cleaning and repairing the walls before I can start painting to make sure the paint sticks well?
After cleaning and repairing your walls, wait until everything is completely dry—usually 24 hours is enough. This helps the paint adhere properly and prevents issues like peeling or bubbling later on.
How much extra time should I budget for surface prep compared to the actual painting, especially if my walls have several small dents and holes?
For walls with dents and holes, plan to spend at least as much time on surface prep as on painting—sometimes even double. Filling, sanding, and priming can be surprisingly time-consuming but are key for a smooth, professional result.
Do you have any advice on selecting between rollers and brushes for large flat areas versus trim, especially to avoid uneven coverage?
For large flat areas, use a roller for even coverage and speed. Brushes are best for trim and edges. To avoid uneven coverage, use quality tools and apply paint in consistent, overlapping strokes.
When prepping surfaces, how do you know when sanding is necessary versus just cleaning the walls before painting?
Sanding is necessary when walls feel rough, have glossy finishes, or show visible imperfections like bumps or peeling paint. If surfaces are already smooth and matte, thorough cleaning is usually enough before painting.
If I’m painting kitchen cabinets, are there extra prep steps I should take beyond just cleaning and sanding compared to painting walls?
Yes, for kitchen cabinets, it’s important to remove all hardware and use a degreaser to eliminate cooking residue. Also, apply a high-quality primer designed for glossy or previously finished surfaces to ensure proper paint adhesion.
Do you recommend using a brush or a roller for beginners when painting kitchen cabinets to avoid streaks?
For beginners painting kitchen cabinets, a high-quality foam roller is usually best to avoid brush marks and streaks. You can use a brush for corners and details, but rollers give a smoother, more professional-looking finish on flat surfaces.
How much time should I budget for proper surface preparation compared to the actual painting, especially for a medium-sized bedroom?
For a medium-sized bedroom, surface preparation usually takes about as long as the painting itself, sometimes longer. Plan for 4–6 hours for prep work like cleaning, patching, and taping, and another 4–6 hours for painting, depending on your pace and technique.
Do you have any tips for prepping surfaces in older homes where the walls might have multiple layers of old paint or uneven textures?
For older homes, start by sanding to smooth rough areas and scrape off any peeling paint. Fill cracks or holes with patching compound, then sand again. Use a high-quality primer to seal and create an even surface before applying new paint.
If I need to paint over old glossy trim, how much sanding is actually necessary to help the new paint stick properly?
You only need to scuff-sand the glossy trim enough to dull the shine, not remove all the paint. This helps the new paint adhere better. Use medium-grit sandpaper and wipe down the surface afterward to remove dust.
Can you explain more about sanding glossy surfaces before painting? Is there a grit recommendation to avoid damaging the wall?
Sanding glossy surfaces helps paint adhere better. Use fine-grit sandpaper, like 220-grit, to lightly scuff the surface without damaging the wall. Be gentle and wipe away any dust before painting for the best results.
You mention sanding glossy surfaces—could you clarify what type of sandpaper works best and how much sanding is usually needed before painting cabinets?
Use a fine-grit sandpaper, like 220-grit, for sanding glossy cabinet surfaces. Lightly sand just enough to dull the shine and create a surface the paint can grip—usually a quick once-over is enough, not heavy sanding.
Do you recommend sanding glossy kitchen cabinets by hand or is it worth renting a power sander for better results?
For glossy kitchen cabinets, a power sander can save time and help achieve an even finish, especially if you have multiple cabinets. Hand sanding works for small areas or touch-ups, but a power sander is worth it for larger projects.
If I’m just painting over a light-colored wall, do I really need to sand and wash it first, or can I skip those steps to save time?
Even with a light-colored wall, sanding and washing help paint stick better and ensure a smooth finish. You could lightly sand and give a quick wipe-down if the wall is already clean, but skipping both steps may affect results.
If I want to repaint my kitchen cabinets, is there a specific type of primer or surface preparation you recommend to avoid peeling or chipping over time?
For kitchen cabinets, use a high-quality bonding primer after thoroughly cleaning and lightly sanding the surfaces. This helps paint adhere well and prevents peeling or chipping. Make sure cabinets are free of grease and completely dry before priming.
Is surface prep different for older walls versus newly built ones? Wondering if there’s a shortcut for newer drywall to save time.
Surface prep does differ. Older walls often need more cleaning, patching, and sanding to fix cracks or peeling paint. With new drywall, you can usually skip some repairs, but you still need to prime and sand for the best paint adhesion.
How can I tell if I need to sand a surface before painting, especially on older doors or cabinets?
Check if the surface feels rough, glossy, or has old paint peeling—these are signs sanding is needed. For older doors or cabinets, sanding helps paint adhere better and smooths imperfections, so it’s usually recommended before painting.
If walls have minor hairline cracks, how do you know if spackling is enough or if more extensive repairs are needed before painting?
For most minor hairline cracks, spackling is usually sufficient—just fill, sand, and prime before painting. If cracks reappear quickly or widen, you may need to address underlying structural issues or use joint compound and mesh tape for added reinforcement.
Does the type of patching compound matter for different sized holes or cracks, or can I just use the same product for all repairs before painting?
The type of patching compound does matter. Use lightweight spackle for small nail holes or minor cracks, and choose a heavier joint compound or patching plaster for larger holes to ensure durability and a smooth finish.
Is there a big difference between using a brush and a roller for cabinets, or is one method less likely to leave streaks for a beginner?
For cabinets, rollers tend to leave a smoother, more even finish and are less likely to leave streaks compared to brushes, especially for beginners. Use a small foam roller for flat surfaces and a brush for corners or details.
Can you recommend affordable tools for surface prep that still make a noticeable difference in avoiding peeling or bubbling paint?
A good putty knife, sanding block, painter’s tape, and a basic spackling compound are all affordable options. These tools help smooth surfaces and seal imperfections, which is key to preventing paint from peeling or bubbling.
Is there a big difference in outcome if I use a brush versus a roller for painting kitchen cabinets, or is the tool less important than surface prep?
The tool does matter—rollers tend to give a smoother finish on flat cabinet surfaces, while brushes can leave visible strokes. However, proper surface prep is even more crucial for a professional result regardless of which tool you use.
Do you recommend using a paint and primer combo for first-timers, or is it better to use separate products for a more professional finish?
For a truly professional finish, especially on previously painted or stained surfaces, using separate primer and paint is usually best. Paint and primer combos can work for quick updates, but separate products offer better coverage and durability.
Can you clarify whether using higher-quality brushes or rollers really makes a noticeable difference for DIYers, or is the prep work more important?
Both are important, but higher-quality brushes and rollers do make a noticeable difference in the smoothness and coverage of your paint job. Proper prep work is still essential, but using better tools helps achieve a more professional-looking finish.
You mention the importance of cleaning and sanding—does that apply to previously painted cabinets too, or just bare wood?
Cleaning and sanding are important for both previously painted cabinets and bare wood. For painted cabinets, sanding helps create a smooth surface and ensures the new paint adheres properly. Always clean thoroughly to remove grease or residue first.
Can you recommend an efficient way to prep kitchen cabinets for painting without shutting down my whole bakery for days?
To prep kitchen cabinets efficiently, clean them thoroughly, remove hardware, lightly sand, and use a fast-drying primer. Work on sections at a time so parts of your bakery stay open while you paint.
How do I know if I’ve sanded enough before painting, especially if I can’t see obvious imperfections on the wall?
If you run your hand over the wall and feel a smooth, even surface without bumps or rough patches, you’ve likely sanded enough. Even if imperfections aren’t visible, a consistent texture ensures the paint will adhere well and look professional.
Do you have tips on how to tell if walls are clean enough after washing, or is there a risk of over-washing before painting?
After washing, your walls should feel smooth and free of dust or grease when you run your hand over them. If a white cloth wiped on the wall stays clean, that’s usually a good sign. Avoid scrubbing too hard to prevent damaging the surface.
Is it worth investing in higher-quality brushes and rollers for a first-time project, or can I get good results with budget options?
Investing in higher-quality brushes and rollers can make a noticeable difference, even for a first project. They help with smoother coverage and fewer streaks, making the painting process easier and the results more professional-looking.
How much time should I wait between sanding repairs and starting to paint to make sure everything is really dry?
After sanding repairs, it’s best to wait at least 24 hours to ensure any filler or compound is completely dry before painting. Make sure the surface feels dry to the touch and free of dust before you begin.
When patching dents and holes before painting, is there a drying time guideline to follow before sanding and painting over them?
Yes, after applying patching compound or spackle, you should let it dry completely before sanding—usually 1–2 hours for small holes, or up to 24 hours for deeper patches. Check the product instructions for the most accurate drying times.
Does the article recommend a specific type of primer for high-traffic areas where walls might get dirty or scuffed more often?
Yes, the article suggests using a high-quality, stain-blocking primer for high-traffic areas. This type of primer helps protect walls from dirt and scuffs, making them easier to clean and maintain a professional look.
How can I tell if my surface has been sanded enough before I start painting to avoid issues like peeling?
To check if your surface is sanded enough, run your hand over it; it should feel smooth and even without rough or glossy spots. Visual inspection for dull, uniform appearance also helps ensure paint will adhere properly.
Is it really necessary to sand every wall even if they don’t feel that glossy, or are there cases where skipping sanding is okay?
While not every wall needs heavy sanding, lightly sanding is helpful even if the surface doesn’t feel glossy. It helps paint stick better and smooths small imperfections. For new, already smooth drywall, you might get away with just a quick dust-off.
If I’m painting kitchen cabinets that already have a glossy finish, what’s the best way to sand or prep them so the new paint actually sticks?
To prep glossy kitchen cabinets, first clean them thoroughly to remove grease. Then, sand the surface with medium-grit sandpaper (around 120-150 grit) until the gloss is dulled. Wipe away dust and apply a bonding primer before painting for best adhesion.
If my painted walls started peeling a few months after I finished, is it usually from skipping the sanding step or could it be a paint quality issue?
Peeling paint a few months after painting is often due to poor surface preparation, like skipping sanding, but low-quality paint can also contribute. Both factors matter, so be sure to sand and use good-quality paint for best results.
The article mentions cleaning with mild detergent before painting—are there any homemade cleaning solutions you recommend for people sensitive to chemical cleaners?
For those sensitive to chemical cleaners, a simple mix of warm water and a small amount of baking soda works well for cleaning walls. You can also use a solution of white vinegar and water for tougher spots.
When you mention washing walls with detergent, is dish soap okay or should I buy something specific from the hardware store?
Dish soap mixed with warm water works well for washing walls before painting. There’s no need to buy a special cleaner unless your walls have heavy grease or stains—then a degreaser from the hardware store can help.
If there are old patches or spackle spots on my walls from previous repairs, do I need to prime those separately before painting, or is a single coat of primer enough for the whole surface?
It’s best to spot-prime the old patches or spackle spots first, then apply a coat of primer to the entire wall. This helps prevent uneven absorption and ensures a smooth, uniform finish.
Could you explain how to tell if you’ve sanded enough before painting? I’m always worried about overdoing it and damaging the wall.
You’ve sanded enough when the wall feels smooth to the touch and any glossy or rough spots are gone. Be gentle—stop once you have an even surface, and avoid pressing too hard to prevent damaging the wall.
If I’m painting over old glossy paint, do I need to sand the entire surface or are there certain products that could help with adhesion instead?
You don’t have to sand the entire surface down to bare wood, but lightly sanding helps dull the gloss. Alternatively, using a bonding primer designed for glossy surfaces can improve adhesion and may reduce or eliminate the need for extensive sanding.
If I’m painting a busy hallway that gets a lot of fingerprints, is there a specific type of paint or surface prep I should use to help it last longer?
For busy hallways, it’s best to use a durable, washable paint like satin or semi-gloss, as these resist fingerprints and are easy to clean. Make sure to clean and prime the walls before painting for the best, long-lasting results.
Is there a big difference in paint finish quality between using a roller versus a brush for walls, especially in high-traffic areas like kids’ rooms?
Yes, rollers usually give a smoother, more even finish on walls compared to brushes, which can leave visible strokes. For high-traffic areas like kids’ rooms, a roller is best for durability and a professional look.
Do you have any tips on how to tell if I’ve sanded enough before painting, especially if I’m working with glossy walls?
A good sign you’ve sanded enough is when the glossy finish turns dull and feels smooth but not slick. Run your hand over the surface—if it feels even and matte, you’re ready to paint.
If I want to repaint my kids’ bedroom and there are old crayon marks on the wall, is washing with detergent enough or do I need something stronger before painting?
Washing with detergent is a good start, but crayon marks are often waxy and may resist regular cleaning. Use a degreaser or rubbing alcohol to fully remove the residue, then rinse, let dry, and apply a primer before painting.
If I need to paint high-traffic areas in my business, are there tips for avoiding peeling and wear over time beyond surface prep?
For high-traffic areas, use high-quality, durable paints like semi-gloss or enamel. Apply two coats, allow full drying time between coats, and consider a clear protective topcoat for extra durability. Regular cleaning also helps maintain the finish.
Can you recommend an affordable way to clean greasy kitchen walls before painting, or do I need a special cleaner?
You don’t need a special cleaner—mix warm water with a bit of dish soap or vinegar to cut through grease. Wipe the walls thoroughly, then rinse with clean water before painting for the best results.
You mentioned sanding glossy surfaces before painting; how do I know when I’ve sanded enough, and what grit sandpaper would you recommend for cabinets?
For cabinets, use 120- to 150-grit sandpaper. You’ve sanded enough when the glossy finish looks dull and feels evenly smooth, not shiny or slick anymore. Be sure to wipe away dust before painting for the best results.
How much time should I set aside for proper wall prep, especially for filling and sanding holes, if I only have the weekends free to work on this?
For weekend projects, plan to spend at least half a day prepping each room, including filling and sanding holes. Allow extra drying time between steps, so you might want to tackle prep on one day and painting on the next.
What’s the best way to choose the right paint finish for a front door to avoid visible streaks or peeling from weather?
For a front door, use a high-quality exterior paint with a satin or semi-gloss finish. These finishes resist weather and make streaks less noticeable. Always prep and prime properly to help prevent peeling over time.
I’m on a tight schedule—how much drying time do you recommend between cleaning, patching holes, and actually starting to paint?
After cleaning, allow surfaces to dry completely—usually about 1-2 hours. For patching holes, wait until the filler is fully dry, which can take 2-4 hours or longer. Only start painting once the surface feels dry and smooth to the touch.
If I accidentally missed a few spots while cleaning the walls, is it better to repaint those areas or will touch-ups be enough to prevent peeling?
If you only missed a few small spots, careful touch-ups after cleaning those areas should be enough. Just make sure the spots are clean and dry before painting to help prevent peeling.