Introduction: Why Garage Organization Matters More Than Ever
For many U.S. homeowners, the garage is more than just a place to park the car. It’s a workshop, storage hub, and sometimes even a multipurpose hangout. Yet, it often becomes a chaotic catch-all for seasonal gear, tools, sports equipment, and half-finished DIY projects. Disorganization not only wastes valuable space but also leads to lost tools, safety hazards, and unnecessary spending on duplicate items. If you’ve ever hesitated to open your garage door for fear of public embarrassment—or tripped over a pile of mystery boxes—you’re not alone. Tackling garage organization might seem daunting, but with a strategic plan, the right tools, and some practical, step-by-step guidance, you can transform your garage into a clutter-free, highly functional space that works for your lifestyle.
This in-depth guide breaks down a garage organization overhaul for U.S. homes. We’ll walk you through cost planning, essential tools, smart storage choices, a detailed setup process, and maintenance best practices. Whether your garage is a single-car nook or a sprawling three-car workspace, you’ll find actionable tips to reclaim square footage and peace of mind. Ready to roll up your sleeves? Let’s get started.
Section 1: Assessing Your Garage—Preparation is Key
1.1 Take Inventory
Before making any changes, take a complete inventory of everything in your garage. Group items into categories such as tools, automotive supplies, outdoor gear, holiday decorations, sports equipment, and household overflow. This helps you determine what you truly use, what can be donated, recycled, or trashed, and what needs better storage solutions.
- Set aside a full afternoon for this process.
- Use large tarps or boxes to sort items by category.
- Be ruthless—if you haven’t used it in the last two years, consider letting it go.
1.2 Evaluate Your Space
Measure your garage’s dimensions, including ceiling height, door clearance, and available wall space. Note any obstacles—water heaters, electrical panels, or windows—that might affect storage placement. Sketch a rough floor plan to visualize potential zones for different categories of items.
- Measure length, width, and height in feet and inches.
- Mark locations of outlets, switches, and fixed equipment.
- Check for moisture issues or signs of pests.
Section 2: Budgeting for Your Garage Organization Project
2.1 Cost Breakdown
Garage organization costs can vary widely, from under $200 for a DIY minimalist refresh to $2,000+ for high-end systems. Here’s what to consider:
- Shelving and Racks: $60–$500, depending on material and size.
- Wall Systems (Pegboards, Slatwall): $40–$300.
- Cabinetry: $150–$1,200, based on modular options or custom builds.
- Bins, Totes, and Storage Accessories: $50–$350.
- Workbench/Workspace: $100–$800.
- Flooring (Epoxy or Mats): $120–$1,000 (optional but impactful).
- Lighting Upgrades: $40–$250.
- Tools (if not already owned): $50–$300.
Most American DIYers complete a solid, functional garage overhaul for $400–$1,200, depending on square footage and material choices. Factor in disposal costs for junk removal if needed.
2.2 Budget-Smart Tips
- Repurpose sturdy household furniture for garage storage.
- Buy storage bins in bulk for discounts.
- Check local online marketplaces for gently used cabinets or racks.
- Tackle the project in phases to spread out costs.
Section 3: Essential Tools and Equipment for DIY Garage Organization
Having the right tools on hand ensures your garage setup is safe, sturdy, and easy to maintain. Here’s what you’ll need:
- Measuring Tape & Chalk Line: For precise layout and marking.
- Stud Finder: Critical for safely mounting shelves and wall systems.
- Level: Ensures installations are straight and secure.
- Power Drill & Screwdriver Set: For assembling racks and mounting accessories.
- Socket Wrench Set: Useful for assembling metal shelving and tightening bolts.
- Utility Knife & Scissors: For opening packaging and trimming mats.
- Heavy-Duty Wall Anchors: For securing shelves in drywall or masonry.
- Stud-Mounted Hooks/Hangers: For bikes, ladders, and lawn tools.
- Label Maker or Permanent Marker: For identifying bins and shelves.
- Safety Gear: Work gloves, dust mask, and safety glasses.
If you plan to upgrade flooring with epoxy, you’ll also need a paint roller, squeegee, and respirator mask.
Section 4: Step-by-Step Garage Organization Setup
4.1 Declutter and Clean
- Remove everything. Lay out items in the driveway or yard by category.
- Dispose of paint, chemicals, or electronics at local hazardous waste centers.
- Sweep and wash floors; wipe down walls and corners.
- Address any mold, leaks, or pest issues before installing storage.
4.2 Zone Planning
Divide your garage into functional zones based on your needs:
- Tool Zone: Near your workbench, with easy access to hand and power tools.
- Sports & Recreation Zone: Wall racks for bikes, balls, and seasonal gear.
- Automotive Zone: Storage for car care products and accessories near the garage entrance.
- Household Storage Zone: Shelves or cabinets for holiday decorations, bulk items, or infrequently used supplies.
Sketch your zones on your garage plan to visualize placement. Allow for clear traffic paths and car doors to open fully.
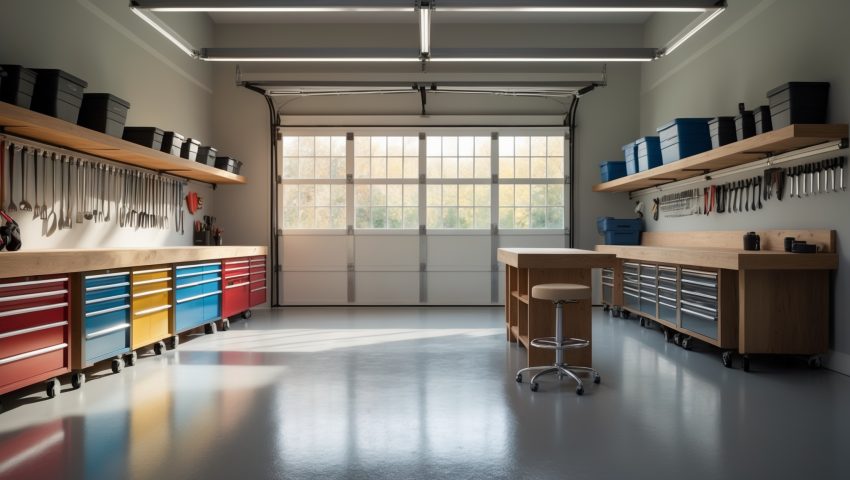
4.3 Install Shelving and Wall Systems
- Mount heavy-duty shelving on wall studs or use freestanding units for flexibility.
- Install pegboards or slatwall panels above workbenches for tools and small items.
- Add ceiling-mounted racks for lightweight, seasonal items like holiday décor or camping gear.
- Use adjustable shelving to accommodate changing storage needs.
When mounting anything heavy, always use stud finders and appropriate anchors. Test each installation for sturdiness before loading.
4.4 Optimize Storage with Bins, Cabinets, and Racks
- Choose clear plastic bins for easy visibility, or color-code by category.
- Label every bin and shelf. Include a date for items with expiration (e.g., paint, chemicals).
- Use lockable cabinets for hazardous materials or valuable tools.
- Install specialized racks (bike hooks, ladder hangers, fishing rod holders) as needed.
4.5 Upgrade Lighting and Flooring (Optional but Impactful)
Good lighting makes your garage safer and more usable. Consider bright LED fixtures for energy efficiency and longevity. If your floor is stained or cracked, epoxy coatings or modular floor tiles boost appearance and durability, making cleanups easier.
Section 5: Maintenance Best Practices for an Organized Garage
5.1 Schedule Regular Cleanouts
Plan quarterly or biannual reviews to purge unused items, sweep floors, and reorganize as needed. Set reminders on your phone or calendar.
5.2 Monitor for Safety and Pests
- Check for signs of rodents or insects around bins and corners.
- Ensure chemicals and paints are sealed and stored off the ground.
- Keep walkways clear to prevent trips and falls.
5.3 Keep a “Return to Home” Policy
Make it a habit for everyone in the household to return items to their designated spot after use. If storage is intuitive and labeled, this becomes second nature and prevents backsliding into clutter.
5.4 Seasonal Adjustments
- Rotate seasonal tools and gear—bring snow shovels forward in winter, lawnmowers in summer.
- Store winter tires or summer gear in overhead racks during the off-season.
Section 6: Real-Life U.S. Case Study—From Cluttered Chaos to Organized Oasis
Case: The Johnson Family, Ohio
Before: Their two-car garage was so packed with forgotten sports gear, stacked boxes, and paint cans that they hadn’t parked a car inside for three years. Tools were scattered on any flat surface, and finding a Phillips-head screwdriver meant a 10-minute search.
Process:
- The Johnsons spent a weekend decluttering and made three trips to local donation centers.
- They installed heavy-duty wall shelving, invested in a modular workbench, and used clear bins for holiday items.
- A wall-mounted bike rack and ceiling storage freed up floor space.
- They upgraded to bright LED lighting and added a low-cost epoxy floor coating.
After: The garage now accommodates both vehicles, and their kids can easily grab bikes or sports equipment. Tools are neatly organized and labeled, and the space stays manageable with quarterly checkups. The Johnsons report saving time, reducing stress, and feeling proud to show off their garage during neighborhood gatherings.
Section 7: Common Myths About Garage Organization—Debunked
- Myth: “You need expensive custom cabinets to stay organized.”
Fact: Modular shelving and DIY solutions can be equally effective for most households. - Myth: “A big garage means easy organization.”
Fact: More space often leads to more clutter unless you have a plan and stick to maintenance routines. - Myth: “Organizing takes weeks of hard labor.”
Fact: With clear steps and teamwork, most garages can be overhauled in a weekend.
Conclusion: Your Garage, Your Way—Maintaining Order Long-Term
Garage organization isn’t just about aesthetics; it’s about maximizing your home’s usable space, improving daily efficiency, and enhancing safety for your family. A well-organized garage streamlines your routines, protects your investments in tools and equipment, and even increases your home’s value. The process can be tackled in manageable phases: start with decluttering, invest in sturdy storage, and develop maintenance habits that work for your household. Remember, no two garages are identical—create zones and systems that reflect your interests, hobbies, and seasonal needs.
Once your garage is organized, enjoy the satisfaction of a space that supports your projects, passions, and family activities. Keep up with regular cleanouts, label everything clearly, and don’t be afraid to adjust your setup as your needs evolve. With a little planning and commitment, your garage can become one of the most functional and enjoyable parts of your home. Ready to reclaim your square footage? The transformation starts today.