Introduction: Why Crawl Space Encapsulation Matters
For many U.S. homeowners, the crawl space is out of sight and, unfortunately, out of mind. Yet, this often-overlooked area plays a critical role in the health, safety, and efficiency of your home. Crawl spaces are notorious for trapping moisture, fostering mold, and inviting pests. They can also become a hidden source of energy loss, driving up utility bills and affecting indoor air quality. Encapsulation—sealing your crawl space with a vapor barrier and controlling moisture—has surged in popularity for good reason. It can protect your foundation, reduce allergens, and even increase property value. But professional encapsulation quotes can be daunting, ranging from $5,000 to $15,000. The good news: with the right preparation, tools, and know-how, DIY crawl space encapsulation is achievable for motivated homeowners at a fraction of the cost. This comprehensive guide will walk you step by step through the process, from initial inspection and budgeting to material selection, installation, and ongoing maintenance. Whether you’re facing musty odors, humid summers, or simply want to add another layer of defense to your home, this article will give you the practical strategies, real-world tips, and detailed breakdowns needed for a successful DIY crawl space upgrade.
Understanding Crawl Space Encapsulation
What Is Crawl Space Encapsulation?
Encapsulation involves sealing the crawl space with a heavy-duty vapor barrier (usually 12-20 mil plastic sheeting), insulating walls, and managing humidity—often with a dedicated dehumidifier. The goal is to create a clean, dry environment that prevents moisture infiltration and its associated problems.
Benefits of Encapsulation
- Moisture Control: Stops groundwater and humid air from damaging your subfloor and insulation.
- Mold & Pest Prevention: Creates an inhospitable environment for mold, insects, and rodents.
- Energy Efficiency: Reduces heating and cooling loss through the floor, lowering utility costs.
- Home Value: A clean, dry crawl space can be a big selling point for future buyers.
Is DIY Encapsulation Right for You?
DIY encapsulation requires physical effort and attention to detail. If your crawl space has standing water, foundation cracks, or major structural issues, consult a professional first. For dry, accessible crawl spaces, DIY is a viable option—and a significant money saver.
Cost Breakdown: DIY vs. Professional Encapsulation
Professional Encapsulation Costs
- National Average: $7,500–$15,000
- Includes labor, materials, and sometimes minor repairs
DIY Encapsulation Costs
- Vapor Barrier (12–20 mil): $0.50–$1.00 per sq. ft.
- Seam Tape: $15–$30 per roll
- Foundation Insulation (Rigid Foam): $1.00–$2.50 per sq. ft.
- Dehumidifier (optional but recommended): $200–$1,000
- Miscellaneous Materials (fasteners, sealants, etc.): $100–$300
Typical DIY Total (1,000 sq. ft.): $1,500–$3,500 (significant savings compared to professional installation)
Budgeting Tips
- Measure your crawl space (length × width) for accurate material estimates.
- Factor in a 10% surplus for overlaps and mistakes.
- Prioritize quality vapor barrier and seam tape—these are non-negotiable for long-term performance.
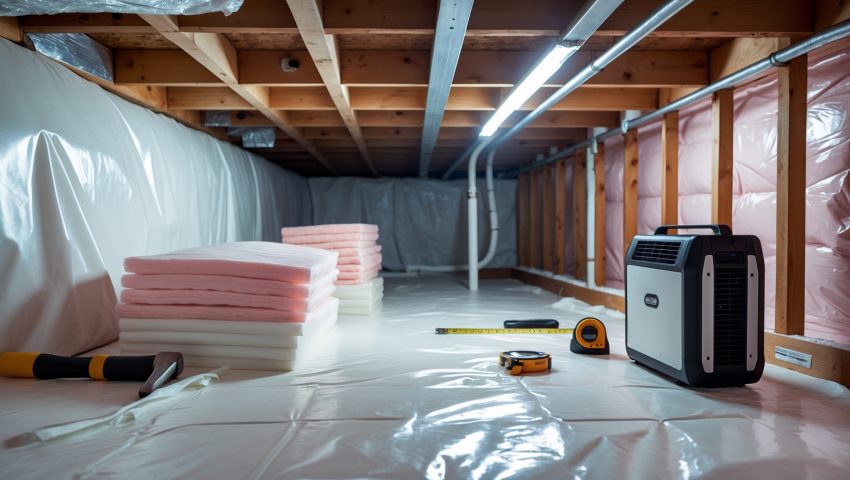
Essential Tools & Materials Checklist
- Utility knife or heavy-duty scissors
- Measuring tape and chalk line
- Knee pads and work gloves
- Safety goggles and dust mask
- Hammer drill or masonry bit (for rigid foam insulation anchors)
- Caulk gun and waterproof sealant
- Heavy-duty stapler
- Vapor barrier (12–20 mil, reinforced poly)
- Seam and foundation tape (butyl recommended)
- Rigid foam insulation boards (for foundation walls)
- Dehumidifier (crawl-space rated, if needed)
- Plastic fasteners or mechanical anchors
- Headlamp or portable work lights
- Garbage bags for debris removal
Step-by-Step DIY Crawl Space Encapsulation
1. Preparation and Safety
- Clear the crawl space of debris, old insulation, and any sharp objects.
- Check for existing moisture or standing water. Address drainage or plumbing issues before beginning.
- Wear protective gear—crawling under your home is dusty work.
2. Inspect for Structural or Moisture Issues
- Look for foundation cracks, signs of wood rot, or pest infestation.
- Check for existing insulation condition—remove any soggy or damaged material.
- If you find serious issues, pause and consult a professional.
3. Seal Vents and Gaps
- Close and seal exterior vents with rigid foam or vent covers.
- Use spray foam or caulk to seal small gaps around pipes and wires.
- Ensure all entry points are tightly sealed to keep outside air and moisture out.
4. Install Vapor Barrier on Ground
- Unroll vapor barrier sheets and cut to fit. Overlap seams by 12 inches.
- Use seam tape to seal overlaps securely—no gaps or wrinkles.
- Extend the barrier 6–12 inches up foundation walls and secure with tape or mechanical fasteners.
5. Insulate Foundation Walls (Optional but Recommended)
- Attach rigid foam insulation boards to foundation walls using anchors or adhesive.
- Seal the top edge with spray foam for air-tightness.
- Do not insulate the subfloor if HVAC or ductwork runs through the crawl space—focus on the perimeter walls instead.
6. Seal Seams and Penetrations
- Double-check tape at all seams and wall junctions.
- Seal around plumbing penetrations with butyl tape or spray foam.
- Inspect for missed gaps or loose edges and correct immediately.
7. Install Crawl Space Dehumidifier (If Needed)
- Choose a dehumidifier rated for crawl spaces (low-profile, automatic drainage preferred).
- Position it for maximum airflow, away from walls and insulation.
- Route drainage hose to sump pit or outdoors, ensuring gravity flow.
8. Final Inspection and Walkthrough
- Walk the entire crawl space to ensure continuous vapor barrier coverage.
- Press down on taped seams to verify adhesion.
- Check for any remaining debris or hazards.
Maintenance Best Practices for Encapsulated Crawl Spaces
Quarterly Inspection Routine
- Check vapor barrier for tears, punctures, or tape failures.
- Inspect walls and insulation for signs of moisture or mold.
- Ensure dehumidifier (if installed) is functioning and draining properly.
Humidity Monitoring
- Install a remote hygrometer to monitor humidity levels (target: below 60%).
- Adjust dehumidifier settings as needed, especially during seasonal changes.
Pest Control
- Look for new signs of insects or rodents. Reseal any fresh entry points promptly.
- Keep the area clear of cardboard, wood scraps, and standing water.
Recommended Annual Tasks
- Retape seams if adhesive weakens or peels.
- Replace or reinforce damaged vapor barrier sections.
- Clean and service dehumidifier (change filter, clear drain lines).
Common DIY Encapsulation Mistakes (and How to Avoid Them)
- Skipping Drainage Fixes: Encapsulation won’t stop water intrusion from flooding or poor exterior grading. Address drainage first.
- Using Thin Plastic: Standard 6-mil poly isn’t durable enough. Invest in reinforced 12–20 mil sheeting.
- Overlapping Barriers Inadequately: Always overlap by at least 12 inches and use high-quality tape.
- Neglecting Wall Insulation: Ground-only vapor barriers help, but wall insulation is key for energy savings in most climates.
- Improper Sealing: Small gaps defeat the purpose—seal everything meticulously.
- Forgetting Ongoing Maintenance: Even the best installation requires periodic checks to stay effective.
Case Study: DIY Encapsulation in the Southeast U.S.
Background: A homeowner in humid Atlanta, Georgia, faced musty odors and high summer cooling bills. After receiving a $12,000 encapsulation quote, they tackled the project themselves.
- Area: 820 sq. ft. crawl space
- Materials: 12-mil reinforced vapor barrier, butyl tape, rigid foam boards, crawl space dehumidifier
- Total DIY Cost: $2,200 (including tool rental)
- Time Required: 4 weekends (2 people)
- Results: Musty smells vanished, humidity dropped below 55%, and cooling bills fell by 15% the following summer.
This case highlights the real-world benefits and cost savings possible with careful planning and attention to detail.
Conclusion: Protecting Your Home from the Ground Up
DIY crawl space encapsulation is a transformative project that can deliver lasting returns—if executed with care. By sealing out moisture, adding insulation, and managing humidity, you’ll create a healthier living environment, boost energy efficiency, and safeguard your home’s structural integrity. The process does require upfront effort: thorough inspection, investment in quality materials, and meticulous installation are all essential. Yet, the satisfaction and savings are well worth it, especially when compared to the high cost of professional services. Remember, success doesn’t end at installation. Regular maintenance—inspecting seams, monitoring humidity, and servicing equipment—will keep your crawl space in top shape year after year. And if you encounter challenges along the way, don’t hesitate to seek advice from local experts or building inspectors. Every region in the U.S. comes with its own climate quirks and code requirements, so adapt these guidelines to fit your home’s specific needs. With patience, persistence, and this step-by-step guide, you’ll turn a once-forgotten space into a durable asset for your entire household. Ready to get started? Your crawl space—and your home—will thank you.
Does regular maintenance involve checking the dehumidifier only, or should I be inspecting the insulation and vapor barrier for issues too?
Regular maintenance should include checking the insulation and vapor barrier for damage or moisture issues, not just the dehumidifier. Inspect all components periodically to ensure your crawl space stays dry and efficient.
Can you provide any tips for choosing between different vapor barrier thicknesses, like 12 mil versus 20 mil, for a humid climate?
In a humid climate, a thicker vapor barrier like 20 mil is usually better because it provides more durability and moisture protection. Choose 20 mil if you expect heavy foot traffic or want long-term reliability; 12 mil works for lighter needs.
For the DIY approach, how do you determine if your crawl space really needs a dehumidifier, or can you skip that step in some climates?
To decide if you need a dehumidifier, measure the humidity in your crawl space. If it stays above 60% after encapsulation, a dehumidifier is recommended. In dry climates, you may not need one if humidity consistently remains low.
How does the cost of maintaining a DIY encapsulated crawl space over time compare to having it done professionally, especially regarding dehumidifier expenses and repairs?
Maintaining a DIY encapsulated crawl space usually costs less over time since you avoid professional service fees. However, you’ll cover all dehumidifier upkeep and any repairs yourself. Professionally installed systems may include warranties or maintenance plans, which can lower out-of-pocket repair costs.
Can I use regular plastic sheeting from a hardware store for the vapor barrier, or does it really need to be the 12-20 mil kind mentioned?
Regular plastic sheeting from a hardware store is usually thinner and less durable than the recommended 12-20 mil vapor barrier. For long-term protection against moisture and tears, it’s best to use the thicker, specifically designed material.
Could you break down the typical ongoing maintenance tasks after encapsulating a crawl space yourself, and how much time should I expect to spend on them each year?
After DIY crawl space encapsulation, plan to inspect the vapor barrier, check for moisture or pests, test the dehumidifier, and clear any debris. These tasks usually take 2–3 hours annually if done thoroughly.
The article says moisture control is important—if I notice mold after installing the vapor barrier, what should I do to fix the problem?
If you spot mold after installing the vapor barrier, remove and safely clean any visible mold using a cleaner designed for mold removal. Address any leaks or drainage issues, then let the area dry thoroughly before reinstalling the vapor barrier.
After installing a vapor barrier, how often should I inspect or replace it to ensure ongoing moisture control and mold prevention?
Inspect your vapor barrier at least once a year for tears, moisture buildup, or signs of mold. Replacement is typically needed only if damage or significant wear is found during inspections.
The article mentions doing this as a DIY project to save money. Are there certain steps in the process that really should be left to a professional for safety or code reasons?
Yes, certain steps are best handled by professionals, especially electrical work, dealing with mold remediation, or addressing structural issues. These tasks can pose safety risks or require code compliance that homeowners may not be equipped to manage.
You mentioned installing a dehumidifier as part of encapsulation—are there affordable models you recommend for smaller crawl spaces, and do they need special maintenance?
For smaller crawl spaces, compact dehumidifiers designed for tight areas are usually sufficient and budget-friendly. Look for models with automatic drainage and humidity controls. Regularly cleaning the filter and emptying the reservoir are the main maintenance tasks to keep them running smoothly.
Are there common mistakes homeowners make during DIY crawl space encapsulation that could lead to higher costs down the road?
Yes, skipping proper sealing, using the wrong vapor barrier, or neglecting drainage are common mistakes. These can trap moisture, cause mold, or damage materials, leading to expensive repairs later. Following each step carefully helps avoid these costly issues.
How much time should a typical homeowner expect to spend on the full encapsulation project, from initial inspection to final maintenance steps?
A typical homeowner can expect the full crawl space encapsulation project to take anywhere from 2 to 4 days. This includes the initial inspection, cleaning, installing the vapor barrier, sealing, and finishing up with any maintenance steps.
Do you have any tips for estimating exactly how much plastic sheeting and tape I’ll need, especially if my crawl space layout is irregular or has posts and pipes in the way?
Measure each wall, floor, and any irregular surfaces separately, noting extra needs for posts and pipes. Add 10–20% to your total for overlaps and mistakes. For tape, estimate at least one full perimeter plus seams, then add extra for tricky areas.
How do you determine if your crawl space needs just a vapor barrier or if adding wall insulation is also necessary for moisture and energy efficiency?
To decide, check if your crawl space walls get cold or damp, or if your home feels drafty above. If so, wall insulation along with a vapor barrier will improve moisture control and energy efficiency. Otherwise, a vapor barrier alone may be enough.
If I encapsulate my crawl space myself, how much time should I budget for the entire process from inspection to installation?
For most homeowners, DIY crawl space encapsulation typically takes 2 to 4 days. This includes time for inspection, cleaning, minor repairs, installing the vapor barrier, and sealing seams. Larger or more complex spaces may take longer.
For a busy homeowner, how many weekends should I realistically set aside to fully encapsulate a medium-sized crawl space myself?
For a medium-sized crawl space, you’ll likely need two to three full weekends if you’re working alone. This allows for cleaning, repairs, installing the vapor barrier, sealing, and any final touches without rushing.
The article mentions that professional encapsulation can be up to $15,000, but do you have a ballpark DIY cost for materials only if I have a 1,000 square foot crawl space?
For a 1,000 square foot crawl space, DIY encapsulation materials typically cost between $1,200 and $2,500. This includes vapor barrier, tape, sealant, and possibly a dehumidifier, but not labor or specialized tools.
Could you clarify if installing a dehumidifier is necessary in every climate, or are there certain regions where just a heavy-duty vapor barrier would suffice?
A dehumidifier isn’t always necessary. In drier or cooler climates, a heavy-duty vapor barrier may be enough. However, in humid regions, adding a dehumidifier helps control moisture and prevents mold.
The article mentions professional encapsulation can be up to $15,000, but what is a realistic total cost for all DIY materials and tools if you have a 1,200 square foot crawl space?
For a 1,200 square foot crawl space, most homeowners spend between $1,500 and $4,000 on DIY materials and tools. This includes vapor barrier, tape, sealant, insulation, dehumidifier, and basic tools. Costs vary based on material quality and your local prices.
How do I know if my crawl space needs extra insulation along with the vapor barrier, or if just encapsulation will be enough to solve moisture issues?
If you notice cold floors, high energy bills, or persistent humidity after adding a vapor barrier, extra insulation may help. Encapsulation alone often controls moisture, but insulation is beneficial for temperature control and efficiency. A professional assessment can confirm what’s best for your space.
For the vapor barrier, is there much difference in durability or moisture control between 12 mil and 20 mil plastic sheeting if you’re on a tighter budget?
A 20 mil vapor barrier is thicker and offers better durability and puncture resistance than 12 mil, which is helpful in high-traffic crawl spaces. However, 12 mil still provides good moisture control and is often adequate if you’re trying to save money.
How does the cost of installing a dedicated dehumidifier compare to just using a thicker vapor barrier in the crawl space?
Using a thicker vapor barrier is generally less expensive upfront than installing a dedicated dehumidifier. However, a dehumidifier offers ongoing moisture control, while a vapor barrier mainly blocks ground moisture. For best long-term results, many homeowners use both methods together.
You mention professional costs between $5,000 and $15,000, but what is a realistic total budget for someone doing this project entirely themselves using the materials you suggest?
If you DIY using the materials listed, most homeowners spend between $1,500 and $4,000 total. Costs depend on crawl space size, material quality, and any added features like sump pumps or dehumidifiers.
If I plan to install a dehumidifier as part of the crawl space encapsulation, do I need to upgrade my electrical system or add a dedicated outlet?
Most dehumidifiers for crawl spaces require a standard 120V outlet, but it’s important to ensure the circuit can handle the additional load. If your crawl space doesn’t have a grounded outlet nearby, you may need an electrician to install one.
Could you give a rough estimate of the total time commitment for a DIY encapsulation project in an average-sized crawl space?
For an average-sized crawl space, the entire DIY encapsulation process typically takes between 2 to 4 days, depending on your experience level, the crawl space condition, and whether you work alone or with help.
If you skip installing a dehumidifier, will the vapor barrier alone still control humidity well enough in humid climates?
In humid climates, a vapor barrier helps reduce moisture from the ground, but it usually isn’t enough on its own. A dehumidifier is recommended to effectively control overall humidity, especially if the crawl space tends to stay damp.
You mentioned a dehumidifier is often needed after encapsulation. How do I know what size or type would work best for my crawl space?
To choose a dehumidifier, measure your crawl space’s square footage and check the average humidity. Look for a unit rated for your space size, and make sure it’s designed specifically for crawl spaces—these are usually more compact and can handle lower temperatures.
If I want to keep my upfront costs low, which materials or steps in the encapsulation process could I prioritize without compromising too much on energy efficiency?
To keep costs down, focus on sealing all vents and gaps with caulk or foam, and install a quality vapor barrier on the floor. You can insulate the walls later if needed, as these first steps offer strong energy efficiency improvements.
If my crawl space has high humidity just in the summer, is a dehumidifier still necessary year-round after encapsulation?
After encapsulation, many homeowners find humidity stays low year-round, making seasonal dehumidifier use sufficient. Monitor your crawl space humidity; if it only rises in summer, running a dehumidifier just then is usually enough.
You mention that DIY is much more affordable than hiring a pro, but can you give a rough estimate of what the average homeowner actually spends if they do it themselves?
Most homeowners spend between $1,500 and $4,000 on DIY crawl space encapsulation. This covers materials like vapor barriers, tape, insulation, and dehumidifiers. Actual costs depend on your crawl space size and material choices.
Do you have any tips for managing humidity in the crawl space after encapsulation without installing a pricey dehumidifier?
To manage humidity without a dehumidifier, ensure all vents and openings are sealed, use a high-quality vapor barrier, and check for any plumbing leaks. Adding a passive vent or small exhaust fan can also help promote airflow and reduce moisture.
Once the crawl space is encapsulated, how often should I inspect the vapor barrier and dehumidifier to ensure everything remains effective?
Inspect the vapor barrier and dehumidifier at least twice a year, ideally in spring and fall. Also, check after heavy rains or if you notice increased humidity or musty smells to catch issues early.
If my crawl space already has some mold spots, should I address that separately before installing the vapor barrier, or can encapsulation itself resolve minor mold issues?
You should treat and remove any mold in your crawl space before installing the vapor barrier. Encapsulation helps prevent future mold growth, but it won’t get rid of existing mold spots.
If I run into existing mold while inspecting my crawl space, should I handle removal myself before starting the DIY encapsulation or call a professional?
If you find mold in your crawl space, it’s safest to contact a professional, especially if the area is large or the mold is extensive. Professionals ensure complete removal and help prevent health risks or future problems.
For a small business with a property that has a crawl space, how do ongoing maintenance costs compare if I do it myself versus hiring a professional crew?
If you do the maintenance yourself, costs mainly include materials and your time, making it more affordable. Hiring a professional crew is more expensive due to labor charges, but it ensures thorough inspections and expert repairs, which might prevent bigger issues long term.
You mentioned DIY encapsulation is way cheaper than hiring professionals. What specific tools or materials end up being the biggest costs in a DIY project like this?
The priciest items for DIY encapsulation are usually the heavy-duty vapor barrier sheets, sealing tape, and a dehumidifier. You may also need a moisture meter, sump pump, and safety gear, but the vapor barrier and dehumidifier are typically the biggest expenses.
When choosing between 12 mil and 20 mil vapor barriers, how do I decide which thickness is best for my crawl space situation?
A 12 mil vapor barrier works well for low-traffic crawl spaces or where cost is a concern. If your crawl space will be accessed frequently or you want extra durability and protection, the 20 mil option is better.
If I’m planning to encapsulate a crawl space below an older storefront, are there extra steps for dealing with existing mold or pest issues before installing the vapor barrier?
Yes, before encapsulating, you’ll need to address any existing mold by cleaning and treating affected areas with a fungicide. For pest issues, remove infestations and seal any entry points. These steps help ensure the vapor barrier is effective and long-lasting.
The article notes that professional jobs can cost up to $15,000—what would you estimate is a realistic DIY budget for a medium-sized crawl space, including a dehumidifier?
For a medium-sized crawl space, most homeowners spend between $1,500 and $4,000 on a DIY encapsulation, including a quality dehumidifier. Costs will vary based on the materials you choose and if any repairs are needed beforehand.
If I want to do DIY encapsulation, what are some unexpected costs or material upgrades that homeowners typically overlook when budgeting?
Homeowners often overlook costs for tools like heavy-duty sealants, specialized tapes, or a crawl space dehumidifier. Upgrading to thicker vapor barriers, extra insulation, and pest barriers can also raise expenses beyond basic material estimates.
Can you give a rough estimate of the total DIY material costs compared to the lowest end of professional quotes mentioned?
DIY material costs for crawl space encapsulation typically range from $1,500 to $4,000, depending on materials and size. The article notes that the lowest professional quotes usually start around $5,000, so DIY can save you a substantial amount.
If I don’t have a dehumidifier installed right away, will the crawl space still benefit from encapsulation, or does it defeat the purpose?
Encapsulation will still help by blocking moisture and outside air, but without a dehumidifier, humidity may still build up over time. For best results and long-term protection, adding a dehumidifier is strongly recommended.
You mention encapsulation can help with humid summers—about how often should I check for moisture or damage once the project is done?
After encapsulation, it’s best to check your crawl space for moisture or damage at least twice a year—ideally in spring and fall. If you live in a very humid area, checking every few months is even better.
How long does it typically take a first-timer to encapsulate a crawl space from start to finish, and is it realistic to do it over a couple of weekends?
For a first-timer, encapsulating a crawl space usually takes anywhere from two to four days of work. Spreading the project over a couple of weekends is realistic, especially if you plan and prepare your materials in advance.
If the professional cost is $5,000 to $15,000, what’s a realistic total budget for DIY including all necessary tools and materials?
A realistic DIY budget for crawl space encapsulation generally ranges from $1,500 to $5,000. This covers vapor barriers, insulation, tape, sealants, dehumidifier, and tool rentals or purchases, depending on the size and condition of your crawl space.
How do I know if my crawl space needs a dehumidifier after encapsulation, or can moisture control be handled just with the vapor barrier?
After encapsulation, check your crawl space humidity levels—ideally, they should stay below 60%. If you notice persistent dampness, odors, or humidity remains high even with the vapor barrier, a dehumidifier is recommended for extra moisture control.
Can you clarify whether the vapor barrier should also cover foundation walls, or is it mainly for the floor in the crawl space?
The vapor barrier should cover both the floor and the foundation walls in the crawl space. Extending it up the walls helps prevent moisture from entering through the walls as well as the ground.
Could you explain how to pick between different thicknesses of vapor barrier, like 12 mil versus 20 mil, and whether the cost difference is worth it?
Thicker vapor barriers like 20 mil offer better durability and puncture resistance, which is ideal for high-traffic or damp crawl spaces. If your crawl space is rarely accessed and moisture is moderate, 12 mil may suffice and save money.
Could you share more about the ongoing maintenance involved after a DIY encapsulation, especially regarding the dehumidifier?
After DIY encapsulation, check your dehumidifier’s filter monthly and clean or replace it as needed. Also, empty the water reservoir or confirm proper drainage. Inspect for leaks or malfunction every few months, and keep the crawl space generally clean and dry.
What are some common mistakes DIYers make when installing the vapor barrier that could lead to moisture problems later on?
Common mistakes include not overlapping the vapor barrier seams enough, failing to seal edges and seams properly with tape or adhesive, leaving gaps around piers or walls, and using a barrier that’s too thin or easily punctured. These errors can let moisture seep through.
If my crawl space already has some musty odors, do I need to treat for mold before starting the encapsulation, or will the vapor barrier alone solve that problem?
If your crawl space has musty odors, it’s important to address any mold or mildew before installing the vapor barrier. Encapsulation alone won’t remove existing mold; treating and cleaning the area first will ensure better results and prevent future issues.
For budgeting purposes, could you break down the main material costs if I use 12-mil versus 20-mil vapor barrier plastic?
Certainly! For a 1,000 sq ft crawl space, 12-mil vapor barrier plastic usually costs $250–$400, while 20-mil typically ranges from $400–$700. The thicker 20-mil offers more durability but at a higher price.
Does using a thicker vapor barrier like 20 mil really make a big difference compared to 12 mil for moisture and pest control?
Yes, a 20 mil vapor barrier is more durable and provides better protection against moisture and pests than 12 mil. It’s less likely to tear or puncture, making it a better long-term choice for crawl space encapsulation.
When budgeting for a DIY project, which material choices from the article offer the best balance of durability and cost savings for homeowners?
The article suggests using reinforced polyethylene vapor barriers and basic foam insulation boards. These materials provide a solid balance between durability and affordability, making them ideal for homeowners looking to encapsulate their crawl space on a budget.
How much time should I expect to spend on the full DIY encapsulation process for a 1,200 sq ft crawl space, from cleaning to installation?
For a 1,200 sq ft crawl space, you can expect the full DIY encapsulation process to take roughly 3 to 5 days. This timeline covers cleaning, prepping, installing the vapor barrier, sealing, and setting up any insulation or dehumidifiers.
Can you explain how to choose between 12 mil and 20 mil vapor barriers? Are there situations where the thicker option is really necessary?
Choose a 20 mil vapor barrier if your crawl space has high moisture, frequent foot traffic, or a rough floor, as it’s more durable and puncture-resistant. For dry, low-traffic areas with smooth surfaces, a 12 mil barrier is usually sufficient.
Is there a big difference in effectiveness between using 12 mil versus 20 mil vapor barriers, especially in a humid climate?
Yes, 20 mil vapor barriers are significantly more durable and resistant to punctures than 12 mil, offering better moisture protection in humid climates. If your crawl space is prone to high humidity, 20 mil is generally the safer, longer-lasting choice.
What ongoing maintenance tasks should I expect after installing a vapor barrier and dehumidifier in the crawl space?
After installing a vapor barrier and dehumidifier, you should check the barrier for tears or moisture, monitor humidity levels, clean or replace dehumidifier filters, and inspect for any water leaks or pests every few months.
Does the guide cover whether I need to disconnect or reroute any existing HVAC or plumbing lines before installing the vapor barrier?
The guide mentions checking for HVAC and plumbing lines but does not provide specific instructions on disconnecting or rerouting them. It recommends ensuring all utilities are accessible and protected before installing the vapor barrier.
If I’m budgeting for this project on my own, how do the material costs usually break down, and are there critical areas where it’s not worth trying to save money?
Material costs typically break down into vapor barrier sheets, tape or sealant, dehumidifier, insulation, and fasteners. Don’t cut costs on the vapor barrier and sealing products—these are crucial for moisture control and long-term effectiveness.
You mention using a dehumidifier—does a regular portable model work, or does it have to be a crawl-space-specific one?
A regular portable dehumidifier can help, but crawl-space-specific models are designed for the unique conditions and limited space. They’re more effective at handling moisture and can be installed permanently for continuous protection.
For budgeting purposes, could you break down the average costs for materials like the vapor barrier and insulation versus any special tools required?
Vapor barrier material typically costs $0.50 to $1.50 per square foot, while insulation runs about $1 to $3 per square foot. Special tools, like a crawl suit, utility knife, tape, and a staple gun, generally total $50–$100.
Does the article go into detail about how to properly size and install a dehumidifier in the crawl space as part of the DIY process?
The article touches on the importance of using a dehumidifier but does not provide detailed instructions on sizing or installation. It primarily focuses on encapsulation steps and basic maintenance tips.
For someone on a strict budget, are there any areas in the crawl space encapsulation process where it’s safe to economize, or should every step be followed exactly as described?
While it’s important to follow all critical steps for safety and moisture control, you can sometimes save by using less expensive vapor barrier materials or doing the labor yourself. However, don’t skip sealing vents, repairing leaks, or insulating as those are essential for effectiveness.
If I want to keep DIY costs as low as possible, are there certain materials or steps listed here where it’s okay to opt for more affordable options without risking effectiveness?
You can choose lower-cost vapor barrier plastic (around 10-12 mil) instead of premium thickness, as long as it is puncture-resistant. For tape and sealants, avoid the cheapest brands, but you don’t need top-of-the-line products. Always prioritize quality for insulation and drainage components.
When budgeting for materials, did you run into any surprise costs beyond the vapor barrier and dehumidifier, like special adhesives or tools?
Yes, unexpected costs can come up, such as seam tape, spray foam insulation, sealants, fasteners, and possibly a utility knife or heavy-duty stapler. These small items can add up, so it helps to include a buffer in your budget.
When selecting a vapor barrier for encapsulation, is there a big difference between using 12 mil versus 20 mil plastic sheeting in terms of durability and moisture protection?
Yes, there is a noticeable difference. A 20 mil vapor barrier is thicker, more durable, and offers better resistance to tears and punctures than 12 mil. It also provides superior moisture protection, especially in areas with higher humidity or rough crawl space surfaces.
Do you recommend any specific brands or thicknesses for vapor barrier plastic sheeting when doing a DIY encapsulation?
For DIY encapsulation, 12 to 20 mil polyethylene vapor barriers are commonly recommended for durability. Brands like Stego, Crawlspace Depot, and Americover are popular choices. Thicker barriers provide better protection and are more resistant to tearing.
Is there a big difference in effectiveness between using 12 mil and 20 mil vapor barriers for moisture control?
Yes, there is a noticeable difference. A 20 mil vapor barrier is much thicker and more durable than a 12 mil one, offering better resistance to punctures and tears, and providing superior long-term moisture control, especially in high-traffic or damp areas.
Can you share any tips for figuring out which thickness of vapor barrier is best, like 12 mil versus 20 mil, based on different climate conditions?
In humid or wet climates, a thicker vapor barrier like 20 mil is more durable and offers better moisture protection. For drier regions or low-traffic crawl spaces, 12 mil can be sufficient and easier to handle. Always consider potential foot traffic and local moisture levels.
For a tight budget, which materials in the crawl space encapsulation process are worth spending extra on, and where can I safely cut costs?
Prioritize spending on a high-quality vapor barrier and good sealing tape since they’re crucial for moisture control. You can save money by choosing basic insulation materials and doing the labor yourself instead of hiring professionals.
For DIY crawl space encapsulation, is there a big difference in results between using 12 mil versus 20 mil vapor barrier plastic?
Yes, there is a noticeable difference. A 20 mil vapor barrier is thicker and more durable, offering better protection against tears and moisture. It’s especially recommended for high-traffic or rough crawl spaces, while 12 mil may suffice for lighter use.
For budgeting, are there any less expensive yet reliable alternatives to the 12-20 mil vapor barrier mentioned?
You can consider using a 6-10 mil polyethylene vapor barrier, which is less expensive than the 12-20 mil options. While thinner barriers are not as durable, they can still provide reasonable moisture protection if handled carefully and installed properly.
Can you give some tips for budgeting the DIY process accurately if my crawl space is larger than average and has musty odors already present?
Start by measuring your crawl space to estimate material costs for vapor barriers and insulation. Plan for extra ventilation or a dehumidifier to address musty odors. Factor in cleaning supplies and consider higher-grade products for larger, problem-prone areas.
When picking out a vapor barrier for crawl space encapsulation, is 12 mil thick enough or should I go with 20 mil for better protection?
A 12 mil vapor barrier is suitable for most crawl spaces, especially if there’s little foot traffic. However, if you want maximum durability and protection—like in areas with frequent access or potential for damage—a 20 mil barrier is the better choice.
Does the guide include any advice on how to choose between a 12-mil or 20-mil vapor barrier for different climates or soil types?
The guide briefly mentions the differences between 12-mil and 20-mil vapor barriers, suggesting that thicker barriers like 20-mil offer more durability, especially for harsher conditions. However, it doesn’t go into detail about specific recommendations for different climates or soil types.
You mention that professional encapsulation can be very expensive—what are some common mistakes DIYers make that could lead to unexpected extra costs during the process?
Common DIY mistakes include poor sealing of vapor barriers, not fixing water leaks beforehand, inadequate insulation, and skipping a drainage system. These issues can lead to moisture problems or the need for costly repairs later, increasing your overall expenses.
If I’m on a tight budget, which materials or steps could I focus on first to get most of the benefits before upgrading the rest later?
Start by sealing obvious air leaks and installing a vapor barrier on the crawl space floor. These steps help control moisture and improve air quality. Later, you can add wall insulation and a dehumidifier when your budget allows.
When installing the vapor barrier for encapsulation, is it necessary to go up the crawl space walls or just cover the floor?
For effective encapsulation, the vapor barrier should cover both the crawl space floor and extend up the walls, typically 6 to 12 inches or even all the way to the sill plate, to prevent moisture intrusion.
How do I know if I need to insulate just the walls or the floor too when encapsulating my crawl space?
If your crawl space is vented, you usually insulate the floor above it. For unvented, encapsulated spaces, insulating only the walls is often recommended. Consider your climate and seek local code requirements to decide what’s best for your home.
Could you give a rough estimate of how many hours a motivated DIYer might need to fully encapsulate an average-sized crawl space after getting all the materials?
A motivated DIYer can typically expect to spend 20 to 30 hours encapsulating an average-sized crawl space. This includes cleaning, installing the vapor barrier, sealing seams, and setting up insulation and a dehumidifier if needed.
When selecting a vapor barrier, is there a specific mil thickness you recommend for humid climates, or is 12 mil generally sufficient?
In humid climates, a thicker vapor barrier is usually better. While 12 mil is often considered the minimum, many experts recommend 16 to 20 mil for extra durability and protection against moisture intrusion.
The article mentions needing a dehumidifier—are there lower-cost ways to manage humidity in the crawl space if I’m trying to keep my budget down?
You can help control crawl space humidity by improving ventilation, using vapor barriers, and sealing any leaks. Placing moisture-absorbing materials like desiccant packs or calcium chloride can also help, but these are less effective than a dehumidifier for larger spaces.
If I have a persistent musty odor after encapsulation, do you recommend upgrading my dehumidifier or checking for installation gaps first?
Check for any installation gaps or areas where moisture might be entering before upgrading your dehumidifier. Gaps in the vapor barrier or poor sealing are common causes of lingering odors even after encapsulation.
You mentioned adding a dehumidifier—are there specific models that work best for crawl spaces, or can I use a regular home dehumidifier for this job?
Crawl spaces often need specialized dehumidifiers designed for low, tight areas and continuous operation. Regular home dehumidifiers may not be effective or durable enough. Look for models labeled as crawl space or basement dehumidifiers for the best results.
If I’m budgeting for DIY crawl space encapsulation, are there certain materials or steps where it’s worth spending more rather than cutting costs?
Investing more in a high-quality vapor barrier and proper sealing tape is important, as these prevent moisture effectively. Also, don’t skimp on insulation and a good dehumidifier if needed, since these directly impact long-term comfort and moisture control.
If you’re managing humidity with a dehumidifier after sealing, how do you handle drainage and power access in a DIY setup?
For drainage, place the dehumidifier near a drain or use a hose to direct water outside or into a sump pump. For power, use a grounded extension cord rated for damp spaces and keep all connections elevated and away from moisture.
You mentioned professional quotes can be as high as $15,000. What are the biggest expenses in a DIY approach that I should budget for upfront?
The biggest DIY expenses are usually vapor barrier materials, insulation, a dehumidifier, sealing tape, and possibly tools like a utility knife and protective gear. Labor costs are avoided, but material quality and size of your crawl space affect the total budget.
You mention DIY being much cheaper than hiring a pro—about how much did your whole project end up costing in materials and equipment?
The total cost for materials and equipment in a typical DIY crawl space encapsulation project usually ranges from $1,500 to $3,000, depending on the size of your space and the quality of materials you choose.
If I want to do this project on a budget, are there certain materials or tools where it makes sense to save, and others where I definitely shouldn’t cut corners?
You can save by using standard tools you already own and opting for less expensive vapor barriers if local conditions allow. However, don’t cut corners on sealing tape, vapor barrier thickness (at least 12 mil), or proper dehumidification—these are crucial for long-term effectiveness.
You mentioned budgeting for materials—do you have any tips for where to find affordable insulation or vapor barriers that still meet quality standards for a DIY project?
Big-box home improvement stores often carry quality insulation and vapor barriers at reasonable prices. For additional savings, check local building supply outlets or online marketplaces, but always verify product ratings and building code compliance before purchasing.
Once the encapsulation is done, how often do you recommend checking the crawl space for issues like new leaks or tears in the vapor barrier?
It’s best to inspect your encapsulated crawl space at least twice a year, especially after heavy rain or seasonal changes. Check for any leaks, tears, or moisture buildup to address problems early and maintain effectiveness.
Could you give some examples of common mistakes homeowners make during DIY encapsulation that could end up costing more in repairs later?
Common mistakes include using the wrong type of vapor barrier, neglecting to seal seams and edges properly, skipping insulation, and not addressing existing moisture or mold before encapsulation. These errors can lead to persistent moisture issues and costly repairs.
For someone budgeting this as a DIY project, what are the most common hidden costs that tend to pop up during crawl space encapsulation?
Unexpected costs often include extra materials for mold or pest issues, additional insulation, repairing damaged joists, renting specialized tools, and disposing of debris. Also, small leaks or wiring problems can turn up once you start working under the house.
If my crawl space already has some mold, should I remove it before starting encapsulation, or will the vapor barrier be enough to prevent further issues?
You should remove any existing mold before starting encapsulation. Sealing over mold can trap moisture and lead to further problems. Cleaning and treating the area first ensures a healthier, longer-lasting result.
If you seal your crawl space with a vapor barrier, do you still need to insulate the walls, or is the barrier alone enough to stop energy loss?
A vapor barrier helps control moisture but doesn’t provide insulation. To reduce energy loss and improve comfort, you should still insulate your crawl space walls in addition to installing the vapor barrier.
If I have some minor mold on floor joists before starting, do I need to remove it all or will encapsulation stop it from spreading further?
It’s important to remove any visible mold from floor joists before encapsulation. Encapsulation helps prevent future mold growth, but existing mold can continue to spread if not properly cleaned beforehand.
If I’m on a tight budget, are there certain materials or steps in the encapsulation process that can be skipped or replaced without compromising results too much?
You can save costs by using thinner vapor barrier plastic (at least 6-mil thick) instead of premium brands and opting for DIY sealing with caulk or tape. However, don’t skip sealing vents and covering the ground—these are essential for effective encapsulation.
If I plan to do the encapsulation myself, how long should I realistically set aside for the full project including installation and cleanup?
For most homeowners, DIY crawl space encapsulation usually takes about 2 to 4 days, including installation and cleanup. The exact time depends on crawl space size, your experience, and whether you encounter any unexpected repairs.
Could you break down the main cost differences between DIY materials versus hiring a contractor, especially regarding the quality of vapor barriers?
DIY materials for crawl space encapsulation usually cost less, often $1–$3 per square foot, but may be thinner (6–10 mil) compared to higher-quality, contractor-grade vapor barriers (12–20 mil) that cost more and are included in professional quotes, which can total $5–$15 per square foot.
Do you have any tips for choosing between a 12 mil and 20 mil vapor barrier if my crawl space gets occasional standing water?
If your crawl space experiences occasional standing water, a 20 mil vapor barrier is more durable and resistant to tears and punctures than a 12 mil one. It offers better long-term protection in wet conditions.
Could you provide more details on the type of insulation recommended for crawl space walls during encapsulation?
For crawl space wall insulation during encapsulation, rigid foam board insulation is typically recommended. It resists moisture, offers good thermal performance, and is easy to install against concrete or block walls. Avoid fiberglass batts, as they can absorb moisture.
Can you explain how to choose between different thicknesses of vapor barrier, like 12 mil versus 20 mil, for a DIY crawl space encapsulation?
Thicker vapor barriers, like 20 mil, offer better durability and puncture resistance, making them ideal for high-traffic or uneven crawl spaces. A 12 mil barrier is sufficient for low-traffic areas with smoother surfaces and lower risk of damage.
You mention that materials are cheaper for a DIY job, but about how much should I realistically budget for the whole process if I already have basic tools?
If you already own basic tools, you should typically budget between $1,500 and $4,000 for DIY crawl space encapsulation. This covers vapor barriers, sealants, tape, insulation, and a dehumidifier depending on your crawl space size and materials chosen.
If mold is already present in the crawl space, should it be removed before starting DIY encapsulation, and what’s the safest way for a homeowner to handle this?
Yes, any existing mold should be removed before starting encapsulation. Homeowners can use protective gear, scrub affected areas with a mold remover, and ensure proper ventilation, but for extensive mold, it’s safest to consult a professional.
Does this process mean I need to remove my old insulation first, or can I encapsulate right over what’s already there?
It’s best to remove any old or damaged insulation before encapsulating your crawl space. Leaving existing insulation in place can trap moisture or hide issues. Starting fresh ensures better results and helps prevent future problems.
Is there a big difference in long-term effectiveness between using a 12 mil versus a 20 mil vapor barrier, or is the thicker option mostly overkill for typical homes?
A 20 mil vapor barrier is tougher and resists tears better, making it ideal for high-traffic or very damp crawl spaces. For most typical homes, though, a 12 mil barrier provides sufficient long-term protection.
You mention using a dedicated dehumidifier after encapsulation—are there affordable models you recommend for smaller crawl spaces, or is that an area where it’s better not to cut corners?
For smaller crawl spaces, there are compact dehumidifiers designed specifically for tight areas. While you don’t need the most expensive model, it’s important to pick one rated for crawl spaces and with automatic humidity controls to ensure reliable long-term performance.
For budgeting purposes, could you break down which materials usually cost the most in a DIY encapsulation project?
The most expensive materials in a DIY crawl space encapsulation are usually the vapor barrier (thick plastic sheeting), insulation, and a dehumidifier if needed. Sealing tape and sealants are also necessary but tend to cost less overall.
You mention dehumidifiers for moisture control after encapsulation. Is a dedicated crawl space dehumidifier necessary, or can a regular household one work effectively?
A dedicated crawl space dehumidifier is usually recommended because it’s designed to handle the unique conditions of crawl spaces, such as lower temperatures and higher humidity. Regular household dehumidifiers often aren’t powerful or durable enough for these environments.
When choosing a vapor barrier for encapsulation, is there much difference between 12-mil and 20-mil plastic in terms of durability for a humid Southern crawl space?
Yes, there is a notable difference. A 20-mil vapor barrier is much thicker and more resistant to tears and punctures, making it better suited for the high humidity and potential foot traffic in Southern crawl spaces compared to 12-mil plastic.
If I add a dehumidifier as recommended, what is the average electricity cost per month to run it in a standard-size crawl space?
For a standard-size crawl space, running a typical dehumidifier usually costs between $15 and $30 per month, depending on your local electricity rates and the unit’s efficiency. Energy-efficient models may keep costs on the lower end.
Is there a specific thickness of vapor barrier you’d recommend for humid climates, or is 12 mil generally enough?
For humid climates, a 12 mil vapor barrier is usually sufficient for most homes, but many professionals recommend going up to 16 or even 20 mil for added durability and moisture protection, especially if you expect a lot of foot traffic.
Do you have tips for budgeting materials for a smaller crawl space, or is there a big drop in cost compared to professional quotes?
For smaller crawl spaces, you can save by buying materials like vapor barriers and tape in smaller rolls or sets. DIY usually costs significantly less than professional quotes, but always measure your space carefully to avoid overbuying.
If I’m trying to keep my costs down, which materials or steps in the encapsulation process are worth spending a little extra on versus where it’s okay to save?
It’s smart to invest more in a quality vapor barrier and proper sealing products since these prevent moisture issues. You can save on labor by doing the work yourself and using basic insulation, as long as you cover all gaps thoroughly.
How long does a DIY crawl space encapsulation usually take for a beginner, and should I expect it to take more than one weekend?
For a beginner, DIY crawl space encapsulation often takes between two and four days, so it could extend over more than one weekend. The time depends on your crawl space size and how much prep or repair work is needed.
The article mentions using a dehumidifier after sealing the crawl space. About how much should I budget to buy and run a suitable dehumidifier for a typical-sized crawl space?
For a typical crawl space, a suitable dehumidifier usually costs between $200 and $800 to purchase. Running costs vary but expect to pay about $15 to $30 per month on electricity, depending on your local rates and the unit’s efficiency.
You mentioned saving money by doing it yourself, but how long does a typical DIY crawl space encapsulation project take for a beginner?
For a beginner, DIY crawl space encapsulation typically takes between two to four days, depending on the size of your crawl space and how many hours you work each day. Planning ahead and gathering all materials beforehand can help speed things up.
Could you break down which part of the DIY process tends to be the most expensive for homeowners, so I can budget better before starting?
The most expensive part of DIY crawl space encapsulation is usually purchasing the vapor barrier material and any necessary insulation. These materials often account for the largest portion of the total cost, so it’s wise to price them out first.
If I’m working with a tight budget, are there certain steps or materials in the encapsulation process that are most critical and others that can be done later?
Focus first on sealing vents, installing a quality vapor barrier on the floor, and addressing any standing water. Insulation and dehumidifiers are helpful but can often be added later if needed. Prioritize moisture control for immediate benefits.
For homes in particularly humid areas, do you recommend a specific type or brand of dehumidifier to use in the encapsulated crawl space?
In humid areas, look for a crawl space-specific dehumidifier with high capacity, like Santa Fe or Aprilaire models. Choose one rated for continuous operation and sized for your crawl space’s square footage for best results.
Does this guide cover whether it’s better to insulate just the walls or both the walls and floor when encapsulating a crawl space?
The guide explains the differences between insulating just the walls versus both the walls and floor. It discusses the pros and cons of each approach, helping you decide which method suits your specific crawl space needs.
Could you give a ballpark estimate of how much a typical DIY encapsulation project costs, including materials and any specialized tools?
Most DIY crawl space encapsulation projects cost between $1,500 and $4,000 for materials like vapor barrier, tape, sealant, and dehumidifier. You might also need tools such as a utility knife, caulking gun, and staple gun, which could add $100–$300.
When budgeting for DIY crawl space encapsulation, how can I estimate the total cost of materials and tools before starting, especially if my crawl space has uneven surfaces?
To estimate your total cost, measure the crawl space area and height, then list materials like vapor barriers, tape, sealant, insulation, and dehumidifiers. For uneven surfaces, add extra vapor barrier and adhesive, and consider specialized tools such as utility knives or caulking guns.
How long does the DIY encapsulation process usually take for an average-sized crawl space, and can most homeowners finish it over a weekend or should they plan for more time?
For an average-sized crawl space, DIY encapsulation typically takes two to three days, depending on your experience and the space’s condition. Most homeowners should plan for a full weekend, but complex areas or extra repairs may require more time.
For budgeting, does the article break down how much of the total DIY cost typically goes toward materials versus tools I might need to purchase?
The article does provide a breakdown of typical DIY costs, highlighting how much goes toward materials like vapor barriers and sealants versus tools you might need, such as utility knives and caulking guns. This should help with your budgeting.
You mention using a dedicated dehumidifier—are there specific features or sizes I should look for to make sure it keeps the crawl space dry year-round?
Choose a crawl space dehumidifier with automatic humidity control, a built-in pump for drainage, and coverage suited to your crawl space size—usually rated in square feet and pints per day. Make sure it’s designed specifically for crawl spaces for best performance.
Does the guide cover how to choose between installing a dehumidifier versus just relying on the vapor barrier for managing humidity?
The guide explains the role of both vapor barriers and dehumidifiers in managing crawl space humidity. It helps you understand when a vapor barrier alone might be enough and when adding a dehumidifier is recommended for optimal moisture control.
If I’m doing the encapsulation myself, how do I know if I need to insulate the crawl space walls or just use the vapor barrier?
If your crawl space is unheated and you want to keep floors warmer, insulating the walls is beneficial. If you’re only addressing moisture, just a vapor barrier might suffice. Check your local building codes for specific insulation requirements.
You mentioned using a dehumidifier as part of the encapsulation—are there specific models or features I should look for to handle really humid climates?
For very humid climates, choose a dehumidifier designed for crawl spaces with a high moisture removal capacity, an automatic pump, continuous drain option, and a built-in humidistat. Models from brands like Aprilaire or Santa Fe are often recommended.
If I’m doing this myself, what’s the typical time commitment for the entire encapsulation process, from inspection through ongoing maintenance?
For a typical DIY crawl space encapsulation, expect to spend 2–4 days on inspection, cleaning, repairs, installation, and sealing, depending on size and complexity. Ongoing maintenance usually takes a few hours each year to check for moisture and reseal any gaps.
How do you determine if your crawl space needs a dehumidifier after encapsulation or if just the vapor barrier will be enough?
To decide if you need a dehumidifier after encapsulation, monitor humidity levels in your crawl space. If humidity stays above 60% or you notice musty odors or dampness, adding a dehumidifier is recommended.
Does this guide cover how to choose between different thicknesses of vapor barriers, like 12 mil versus 20 mil, or is that mostly based on local climate?
The guide explains the differences in vapor barrier thicknesses, such as 12 mil versus 20 mil, and discusses factors to consider, including durability needs and local climate, to help you choose the best option for your crawl space.
If my crawl space sometimes floods after storms, is DIY encapsulation still a good idea or would I need extra steps before starting?
If your crawl space floods after storms, address the water intrusion first—like installing a sump pump or improving drainage—before attempting DIY encapsulation. Encapsulating a wet crawl space can trap moisture and lead to mold or structural problems.
How long should I expect the DIY crawl space encapsulation to take if I’m working on weekends only and have a small to medium-sized crawl space?
For a small to medium-sized crawl space, DIY encapsulation typically takes two to four weekends if you’re working alone. The exact time depends on your experience and any prep work needed, but most homeowners finish within this timeframe.
Is it necessary to install a dehumidifier if I use a thick 20 mil vapor barrier, or will that usually handle the humidity by itself?
A 20 mil vapor barrier does a great job reducing moisture, but it may not be enough if you have high humidity levels. A dehumidifier is often recommended to maintain optimal humidity, especially in damp climates or older homes.
What kind of maintenance should I plan for after finishing a DIY crawl space encapsulation to keep everything working properly?
After encapsulation, plan to check for moisture, inspect the vapor barrier for damage, clean vents and dehumidifiers, and look for signs of pests or mold every few months. Promptly repair any tears or leaks to maintain effectiveness.
How much does it typically cost to rent or buy the tools needed for DIY crawl space encapsulation compared to hiring a professional?
Renting or buying tools for DIY crawl space encapsulation usually costs between $200 and $500, depending on what you need. In contrast, hiring a professional typically ranges from $3,000 to $8,000, so DIY can save you a significant amount.
For budgeting, are there any hidden or unexpected costs you ran into with materials or tools that homeowners should plan for?
Homeowners often overlook costs like extra vapor barrier tape, heavy-duty sealant, or renting specialized tools for tight spaces. Unexpected repairs to joists or subflooring are also possible, so it’s wise to budget a bit extra for surprises.
The article mentions using a 12-20 mil vapor barrier—how do I decide what thickness is best for my home?
Choose a thicker vapor barrier, like 20 mil, if your crawl space is prone to moisture, heavy traffic, or possible punctures. A 12 mil barrier works for drier, low-traffic areas. Assess your crawl space conditions before deciding.
For budgeting purposes, can you break down which materials or steps in the DIY process typically cost the most, and where it might be okay to save?
The vapor barrier and insulation usually make up the largest expenses in DIY crawl space encapsulation. You can save by doing prep work yourself, but avoid cutting costs on barrier thickness or skipping sealing tape, as these are crucial for moisture protection.
When budgeting for a DIY crawl space encapsulation, are there any hidden costs homeowners often overlook, such as tools or disposal fees?
Yes, homeowners sometimes overlook costs like buying or renting specialized tools, purchasing safety gear, and paying for disposal of old insulation or debris. These can add up, so it’s wise to include them in your budget.
Can you recommend budget-friendly options for a vapor barrier, or is a higher-end 20 mil plastic always necessary for effective moisture control?
You don’t always need a 20 mil vapor barrier; many homeowners find 10–12 mil plastic sheeting sufficient for most crawl spaces. Just ensure the material is puncture-resistant and properly sealed at seams and edges for effective moisture control.
How do you figure out if your crawl space needs a dedicated dehumidifier, or is the vapor barrier usually enough to manage humidity?
After installing a vapor barrier, monitor your crawl space’s humidity with a hygrometer. If humidity consistently stays above 60%, a dedicated dehumidifier is recommended. Otherwise, the vapor barrier alone may be enough to control moisture levels.
What kind of ongoing maintenance should I expect after a DIY encapsulation, especially if I install a dehumidifier down there?
After DIY encapsulation, you should check the vapor barrier for damage or moisture monthly, ensure all seams remain sealed, and clean or replace the dehumidifier filter every few months. Also, monitor the dehumidifier’s water reservoir or drainage system regularly to prevent overflow.
For a DIY encapsulation, how much time should I realistically set aside for each step, especially if my crawl space is around 1,000 square feet?
For a 1,000-square-foot crawl space, plan about 2–3 hours for cleaning and prep, 3–4 hours for laying vapor barrier, 2–3 hours for taping/sealing, and 2–3 hours for installing a dehumidifier or insulation. It may take a weekend.
For budgeting purposes, what was the total DIY cost in your guide, including things like vapor barrier, insulation, and tools?
The total DIY cost detailed in the guide ranges from $1,000 to $3,000. This estimate covers vapor barrier materials, insulation, tape, sealant, and basic tools. Actual costs vary depending on crawl space size and material choices.
How do you decide if a dehumidifier is needed for ongoing maintenance after installing the vapor barrier, or are vents sometimes enough?
After installing a vapor barrier, monitor humidity levels in your crawl space. If humidity consistently stays below 60%, vents may be enough. If moisture or musty odors persist, a dehumidifier is likely needed for effective long-term control.
Does the guide cover how to choose between different thicknesses of vapor barrier, like 12 mil versus 20 mil, or when one is actually necessary for a typical crawl space?
The guide explains the differences between vapor barrier thicknesses and discusses factors for choosing between options like 12 mil and 20 mil. It also offers advice on which thickness is suitable for most crawl spaces and when a thicker barrier might be necessary.
Do you recommend insulating the crawl space walls as well as sealing with a vapor barrier, or is just the vapor barrier enough for most climates in the US?
In most US climates, it’s best to both seal with a vapor barrier and insulate the crawl space walls. This approach helps control moisture and temperature, improving energy efficiency and comfort compared to using just a vapor barrier.
The article mentions using a heavy-duty vapor barrier for encapsulation—how do you decide between 12 mil and 20 mil plastic sheeting for a typical crawl space?
Choose 12 mil plastic for low-traffic crawl spaces where durability isn’t a big concern. For areas with more foot traffic, storage, or rough surfaces, 20 mil is better since it’s thicker and more resistant to tears and punctures.
Can you give a rough estimate of how many weekends it might take for a typical homeowner to finish encapsulating a medium-sized crawl space by themselves?
For a medium-sized crawl space, most homeowners can expect the encapsulation process to take about two to three weekends. This estimate assumes you’re working solo and includes time for prep, installation, and cleanup.
Does the guide recommend a specific mil thickness for the vapor barrier if you have really high humidity, or is 12 mil generally enough for most climates?
The guide suggests that a 12-mil vapor barrier is generally sufficient for most climates. However, if you have extremely high humidity, it may be wise to consider a thicker option, such as 16 or 20 mil, for added durability and protection.
When budgeting for a DIY crawl space encapsulation, which steps or materials tend to surprise homeowners with unexpected costs?
Homeowners are often surprised by the cost of vapor barrier tape, heavy-duty plastic sheeting, and unexpected repairs to joists or insulation. Renting tools and addressing minor mold or pest issues can also add unplanned expenses.
How would I know if I need to add a dehumidifier to my crawl space after doing the DIY encapsulation, or is the vapor barrier usually enough?
After DIY encapsulation, check the humidity level in your crawl space with a hygrometer. If it stays above 60%, a dehumidifier is recommended. A vapor barrier usually helps, but persistent moisture may require extra control.
If I’m budgeting for a DIY encapsulation, are there any materials or steps that are often overlooked but add significant cost later on?
Homeowners often overlook the cost of sealing vents, installing a sump pump if needed, and buying quality tape or adhesives for seams. Don’t forget to account for tools like a moisture meter and safety gear, which can add up.
If I choose not to install a dehumidifier right away, would sealing with just the vapor barrier still offer most of the moisture control benefits?
Sealing the crawl space with a vapor barrier will significantly reduce moisture entering from the ground and walls, but without a dehumidifier, some humidity may still build up, especially in damp climates. The vapor barrier alone offers partial, not complete, moisture control.
Does encapsulating my crawl space myself usually impact my home insurance or property value compared to hiring a professional?
DIY encapsulation can sometimes affect insurance if not done to code or if issues arise later, while professional installation is often favored by insurers. For property value, professional work usually adds more value and buyer confidence than DIY projects.
Can you clarify how to choose between 12 mil and 20 mil vapor barriers for encapsulation, especially in regions with heavy humidity?
In regions with heavy humidity, a 20 mil vapor barrier is usually recommended because it offers greater durability and moisture protection. Choose 20 mil for long-term performance, especially if you expect frequent foot traffic or potential water exposure.
How often do you need to check or maintain the vapor barrier and dehumidifier after encapsulating the crawl space yourself?
Inspect the vapor barrier and dehumidifier every 6 months. Look for tears, moisture buildup, or mold on the barrier, and check that the dehumidifier runs smoothly, cleaning its filter as needed. Regular maintenance helps prevent future issues.
If I insulate the crawl space walls during encapsulation, do I still need to add insulation under the subfloor, or is that redundant?
If you insulate the crawl space walls as part of encapsulation, you typically do not need to insulate under the subfloor. Wall insulation, combined with proper sealing, is usually sufficient for energy efficiency.
If my crawl space already has some minor mold growth, is it necessary to address that before installing the vapor barrier, and what are the recommended steps for treatment?
Yes, you should address any mold before installing a vapor barrier. Clean affected areas with a mold remover or a bleach solution, let everything dry completely, and ensure proper safety measures like gloves and masks are used during cleanup.
Can you give an estimate of the cost breakdown for all the materials needed for a typical DIY crawl space encapsulation project, not just the vapor barrier?
For a typical DIY crawl space encapsulation, material costs often include the vapor barrier ($0.50–$0.75/sq ft), tape and sealant ($50–$100), insulation ($0.75–$1.50/sq ft), dehumidifier ($200–$1000), and possibly a sump pump ($100–$300).
You mentioned using a 12-20 mil vapor barrier—does the thickness make a noticeable difference for moisture control or durability in humid climates?
Yes, the thickness matters. A 20 mil vapor barrier offers greater durability and is more resistant to punctures, making it better for moisture control and longevity, especially in humid climates compared to a 12 mil option.