Introduction: Real Stories, Real Savings—The Heart of U.S. Home Restoration
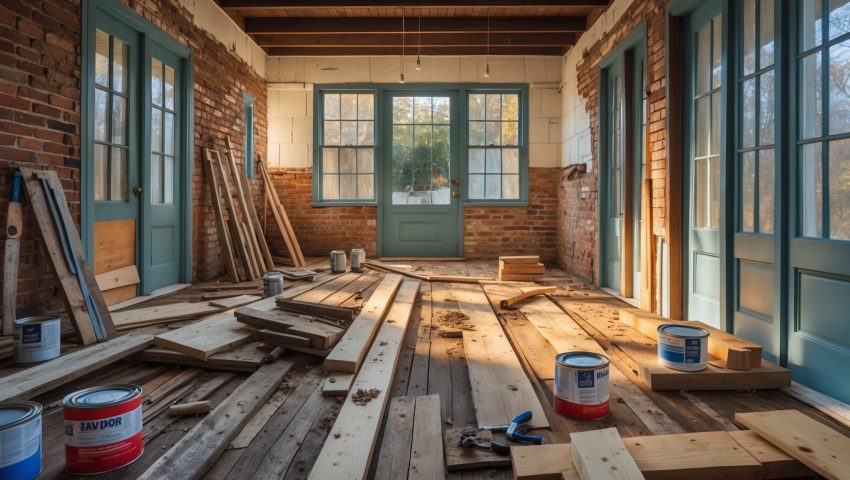
Home restoration can be an exhilarating journey—part detective work, part hands-on creativity, and all about reviving the character of America’s diverse housing stock. But for most homeowners, the reality of restoration is shaped by one critical factor: budget. Navigating the costs of materials, labor, and unexpected surprises can make or break a project. That’s why learning from real U.S. case studies is invaluable. In this post, we’ll dive into practical, detailed stories from homeowners across the country who have tackled restoration projects on tight budgets. We’ll break down what worked, what didn’t, and exactly how they saved money—without sacrificing quality or charm. Whether you’re eyeing a Victorian in the Midwest, a Craftsman bungalow in the Pacific Northwest, or a mid-century ranch in the South, these lessons apply. We’ll also arm you with cost-saving tactics, step-by-step budgeting guidance, and resourceful tips to ensure your own restoration journey is rewarding and affordable. Let’s get started!
Understanding the Budget Restoration Mindset
Why Restoration (Not Renovation) Matters
Restoration emphasizes returning a home to its original state or preserving its historic elements, rather than simply updating or modernizing. The difference is crucial: restoration often means working with what you have, embracing imperfections, and making strategic choices about where to save and where to splurge. This approach can yield significant savings if done thoughtfully.
Common Budget Challenges in U.S. Home Restoration
- Unpredictable Material Costs: Sourcing matching materials can be expensive and time-consuming.
- Hidden Damage: Older homes often harbor surprises, such as outdated wiring or concealed water damage.
- Compliance Hurdles: Restoring historic features may require special permits or adherence to preservation guidelines.
- DIY vs. Professional Help: Knowing where to draw the line between what you can tackle yourself and when to call in experts is key to maintaining your budget.
Case Study #1: Restoring a 1920s Craftsman Bungalow in Portland, Oregon
Project Scope
The Johnson family purchased a 1924 Craftsman bungalow that had suffered decades of neglect. Their goal: restore the original woodwork, repair plaster walls, and bring the kitchen back to its period-appropriate glory—all on a $20,000 budget.
Key Challenges
- Extensive rot in window sills and door frames
- Original kitchen cabinetry missing
- Plaster walls cracked and discolored
Cost-Saving Strategies Used
- Reclaimed Materials: Scoured local salvage yards and architectural reuse stores for period-appropriate wood, hardware, and fixtures, saving over $4,500 compared to buying new.
- DIY Plaster Repair: Watched tutorials and practiced on less-visible walls before tackling main living areas, reducing labor costs by $2,000.
- Phased Approach: Prioritized urgent repairs (windows and doors) and delayed non-essential upgrades (bathroom tile), helping to stay within budget.
Budget Breakdown
- Reclaimed materials: $3,200
- Plaster supplies: $450
- Tool rentals: $175
- Professional help (windows): $3,000
- Miscellaneous: $800
- Total spent: $7,625
Lessons Learned
- Invest the time to find matching salvaged materials—they can make or break a restoration’s authenticity and save money.
- DIY is effective for “sweat equity” tasks, but don’t skimp on safety for structural or window repairs.
Case Study #2: Revitalizing a Mid-Century Ranch in Dallas, Texas
Project Scope
After inheriting a 1950s ranch, the Morales family faced an outdated kitchen, worn hardwood floors, and a leaky roof. Their all-in budget: $15,000.
Key Challenges
- Mid-century tile and fixtures no longer manufactured
- Floor refinishing quotes exceeding $5,000
- Urgent roof leak requiring immediate attention
Cost-Saving Strategies Used
- DIY Floor Refinishing: Rented sanders and finished floors themselves, saving $3,200 over contractor quotes.
- Creative Tile Solutions: Used reproduction tiles from online marketplaces and incorporated original tiles as accents, cutting $1,000 from tile costs.
- Roof Patch Kit: Used a temporary roof patch kit and scheduled full replacement for the following year to spread out expenses.
Budget Breakdown
- Floor refinishing materials & rental: $600
- Tile (mix of new & vintage): $1,200
- Roof patch kit: $180
- Paint and supplies: $350
- Professional help (electrical): $1,500
- Total spent: $3,830
Lessons Learned
- Mixing new and old materials can create a cohesive look and save money.
- Some problems (like a full roof replacement) can be safely delayed with temporary fixes if you prioritize correctly.
Case Study #3: Saving a Queen Anne Victorian in Upstate New York
Project Scope
Rachel, a first-time homeowner, purchased a 1895 Victorian in urgent need of exterior paint, porch repairs, and period-appropriate hardware. Budget: $10,000, with a focus on curb appeal and weatherproofing before winter.
Key Challenges
- Lead paint concerns
- Porch railings rotted and unsafe
- Missing gingerbread trim
Cost-Saving Strategies Used
- Volunteer Help: Enlisted friends and joined a local historic preservation group for weekend work parties, saving over $2,000 in labor costs.
- DIY Lead Encapsulation: Used EPA-approved encapsulation paint (after proper testing) instead of full abatement, reducing costs by $1,500.
- Custom Trim from Local Mill: Ordered unfinished wood trim and painted/stained it herself instead of buying pre-finished, saving $800.
Budget Breakdown
- Lead-safe paint & supplies: $950
- Porch lumber & hardware: $1,400
- Custom trim: $900
- Paint/stain: $350
- Volunteer food & supplies: $200
- Total spent: $3,800
Lessons Learned
- Community resources and teamwork can dramatically reduce costs and make large projects feasible.
- Lead paint doesn’t always require full removal—safe encapsulation is a budget-friendly, code-compliant option.
Step-by-Step Guide: Building a Realistic Home Restoration Budget
Step 1: Define Your Project Scope
List every feature you want to restore. Prioritize by urgency (roof leaks, structural issues) versus aesthetics (trim, paint, hardware).
Step 2: Research Local Material Costs
- Check salvage yards, reuse centers, and online marketplaces for reclaimed or period-appropriate materials.
- Request free samples or visit in person to compare quality and price versus new items.
Step 3: Get Multiple Quotes for Skilled Tasks
For specialized work (electrical, roofing, structural repairs), get at least three quotes—even if you plan to DIY most of the project. This gives you a benchmark for potential savings and helps you spot red flags.
Step 4: Calculate Tool and Equipment Needs
- List every tool required—then check local rental centers, tool-lending libraries, or community tool shares.
- Buy only tools you’ll use repeatedly; rent or borrow the rest.
Step 5: Add a Contingency Buffer
Unexpected costs are inevitable. Add 10-20% to your total estimate as a contingency fund.
Step 6: Track Costs Rigorously
- Use a spreadsheet or budgeting app to log every expense in real time.
- Keep receipts and take before/after photos for insurance and resale value.
Expert Tips for Stretching Your Restoration Dollars
- Join Local Preservation Groups: Many offer grants, discounted materials, or volunteer labor for qualifying restoration projects.
- Plan Projects Seasonally: Off-season work (like painting in early spring or late fall) may yield lower contractor quotes and better availability.
- Negotiate and Bundle: Ask suppliers about bulk discounts or free delivery when purchasing multiple materials at once.
- Apply for Tax Credits: Some states and municipalities offer tax incentives for restoring historic properties. Research eligibility.
- Document Everything: Photos, invoices, and a log of your work can help with permit compliance, insurance, and future resale.
Common Budget-Busters—And How to Avoid Them
- Skimping on Prep: Rushing through demolition or surface prep can lead to costly rework. Invest the time up front.
- Over-customization: Custom millwork and finishes look stunning, but can double or triple costs. Use custom touches sparingly.
- Ignoring Permits: Unpermitted work can result in fines or forced do-overs. Always check with your local building department.
- Underestimating Labor: Even DIY projects take longer than expected—factor in your own time and plan for help on heavy or complex tasks.
Budget Restoration Success: Pro Tips from Homeowners
What They Wish They’d Known
- “Track every penny. Little expenses add up fast.”
- “Don’t be afraid to barter skills or services with neighbors.”
- “Take progress photos—they’re motivating and essential for tax credits.”
- “If you find a great deal on materials, buy extra—you may not get a second chance.”
Conclusion: Restoring on a Budget—A Path to Lasting Value
Restoring a home on a budget is about more than saving money—it’s about honoring the past, building skills, and creating spaces that reflect your values. The real-world examples explored in this post highlight the ingenuity, perseverance, and resourcefulness required to bring historic homes back to life without breaking the bank. By learning from these case studies, you can approach your own restoration project with realistic expectations, a clear financial plan, and smart strategies for stretching every dollar. Remember: the key isn’t to achieve perfection or replicate magazine spreads, but to make thoughtful choices that preserve your home’s character while staying true to your financial goals. With careful planning, community support, and a willingness to learn, you can transform even the most daunting restoration project into a source of pride—and savings—for years to come. Happy restoring!
When dealing with unexpected issues like hidden water damage during a restoration, how did the case studies suggest homeowners adjust their budgets without compromising on essential repairs?
The case studies recommend setting aside a contingency fund within your budget for surprises like hidden water damage. They also suggest prioritizing essential repairs first, postponing cosmetic upgrades if needed, and negotiating bulk rates with contractors to manage costs.
When restoring on a budget, how do you decide whether to splurge on original materials or find cheaper alternatives that look similar but aren’t historically accurate?
It helps to prioritize areas that are most visible or structurally important for original materials, like entryways or main rooms. For less noticeable spots, quality alternatives can keep costs down while preserving the overall historic feel.
When budgeting for restoration, how did folks in the article decide which projects to DIY versus hiring a professional, particularly with things like old wiring or structural fixes?
Homeowners in the article usually did DIY work on cosmetic updates like painting or flooring, but chose to hire professionals for technical tasks such as electrical wiring or structural repairs, prioritizing safety, code requirements, and areas where mistakes could be costly.
Have any of the case studies mentioned how they handled surprise costs like hidden water damage without going over budget?
Yes, several case studies mention handling surprise costs like hidden water damage by setting aside a contingency fund and prioritizing repairs. Some homeowners postponed less urgent updates or did some work themselves to stay within budget.
How did homeowners in your case studies manage hidden damage like outdated wiring without blowing their budgets?
Homeowners typically prioritized urgent repairs first, like outdated wiring, and sourced multiple quotes from electricians. Many also tackled smaller tasks themselves or bundled electrical work with other renovations to get better rates, helping them manage hidden costs without overspending.
How do you figure out if you should try restoring old plaster walls yourself or if it’s worth hiring a pro, especially when you’re on a tight budget?
Consider factors like the wall’s overall condition, your repair skills, and available time. Small cracks or holes can often be tackled yourself, but extensive damage, water issues, or historic features might be best left to professionals, even on a budget.
What steps should I take to prepare for permit or compliance issues before starting a restoration on a historic property?
Start by researching local and state regulations for historic properties. Contact your city’s planning department early to understand required permits and approvals. Gather all necessary documentation about your property’s history and proposed work before applying to avoid delays.
I’m curious if any of the homeowners managed to source matching vintage materials at a discount and how they handled situations when the original materials were just too expensive or unavailable.
Yes, some homeowners found discounted vintage materials at salvage yards and online marketplaces. When originals were too costly or hard to find, they often chose high-quality replicas or refinished existing pieces to maintain the home’s character without overspending.
When restoring older homes on a budget, how do you handle hidden damage like outdated wiring without blowing the budget or sacrificing authenticity?
A good approach is to prioritize essential safety updates, like wiring, and look for cost-effective solutions such as partial rewiring or using surface-mounted conduits that can blend with the home’s style. Preserve authenticity by matching visible fixtures to the era.
I’m curious how you recommend budgeting for hidden damages in older homes, like wiring or water issues, when those surprises tend to be so unpredictable.
When budgeting for older homes, it’s wise to set aside an extra 10–20% of your total budget specifically for unforeseen issues like wiring or water damage. A thorough inspection before starting also helps minimize surprises.
When working with historic features that need permits, what are some cost-effective ways to handle compliance without delaying the project?
To avoid delays and manage costs, consult your local permitting office early, gather all needed documentation in advance, and work with contractors experienced in historic renovations. Streamlining submissions and clear communication can help keep your project on schedule and budget.
For those restoring homes in areas with strict preservation guidelines, what are some realistic strategies to speed up the permit process and avoid unexpected delays?
To speed up permitting in areas with strict guidelines, prepare detailed plans that clearly meet all regulations, consult early with local officials, and consider hiring a permit expeditor. Keeping thorough documentation and promptly addressing any feedback can also prevent delays.
Could you expand on the step-by-step budgeting guidance mentioned—what are some first steps a beginner should take to avoid unexpected expenses?
Start by listing all the areas needing restoration and prioritizing them. Get multiple quotes for each task, then add at least a 10–20% buffer for unforeseen costs. Research material and labor prices in advance to set a realistic budget.