Introduction: Why DIY Crawl Space Encapsulation Matters in U.S. Homes
Crawl spaces are often the most overlooked part of the American home. Yet, they play a crucial role in your property’s health, energy efficiency, and structural integrity. Across the U.S., homeowners are increasingly tackling crawl space encapsulation as a DIY project—both to save on professional labor costs and to take proactive control over moisture, mold, and air quality issues. But what does it really take to encapsulate a crawl space yourself? What are the true costs, which materials matter, and how can you ensure lasting results? This comprehensive guide walks you through every stage of a DIY crawl space encapsulation, from planning and budgeting to hands-on installation and long-term upkeep. Whether you’re battling musty odors, high humidity, cold floors, or pest invasions, encapsulation can be a transformative upgrade. Read on for practical, step-by-step advice tailored for U.S. homes—no fluff, just actionable expertise.
Understanding Crawl Space Encapsulation: What, Why, and When
What Is Crawl Space Encapsulation?
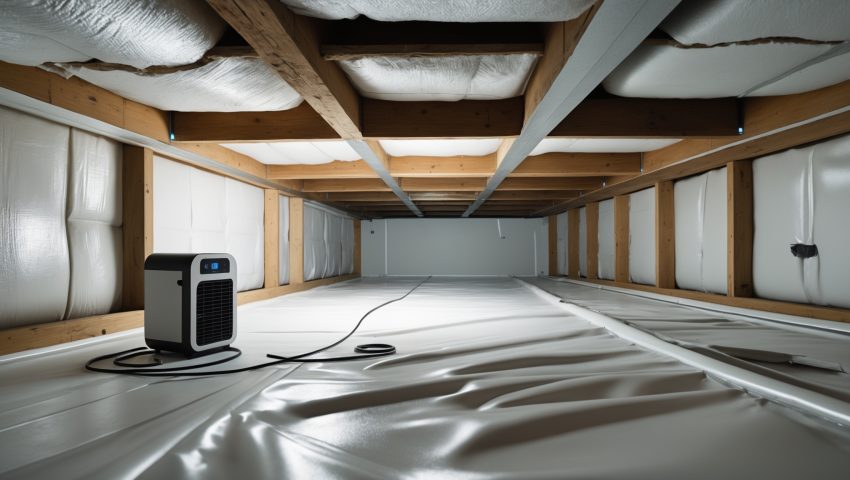
Encapsulation is the process of sealing your crawl space with a heavy-duty vapor barrier, insulating the perimeter, and controlling moisture through drainage and dehumidification. The aim is to create a dry, clean, energy-efficient environment beneath your home, reducing the risk of mold, wood rot, and pest infestations.
Why Encapsulate? Key Benefits
- Moisture Control: Prevents ground moisture from entering your home, combating mold and wood decay.
- Improved Air Quality: Reduces allergens and musty odors that often circulate from crawl spaces to living areas.
- Enhanced Comfort: Warmer floors in winter, less humidity in summer.
- Energy Efficiency: Can lower heating and cooling bills by stabilizing indoor conditions.
- Pest Deterrence: Eliminates the damp, dark environment preferred by insects and rodents.
- Structural Longevity: Protects joists, subfloors, and foundation from moisture damage.
When Should You Encapsulate?
Anytime you notice high humidity, condensation, visible mold, musty smells, or cold floors, it’s time to consider encapsulation. Homes in humid U.S. climates (Southeast, Midwest, Pacific Northwest), or those with persistent crawl space moisture, benefit most—but encapsulation is increasingly standard nationwide.
DIY vs. Professional Encapsulation: What to Expect
Can You Really DIY?
Yes—with careful planning, clear safety protocols, and the right tools, most U.S. homeowners can encapsulate their own crawl spaces. The biggest challenges are physical access, working in tight or damp spaces, and handling materials safely. If your crawl space has standing water, major structural damage, or asbestos insulation, consult a professional first.
DIY Advantages
- Significant cost savings (often 50–70% less than hiring out)
- Full control over material quality and installation pace
- Hands-on knowledge for future maintenance
When to Call in a Pro
- Extensive mold or rot requiring remediation
- Complex drainage or structural repairs
- Low-clearance or hazardous crawl spaces
- Asbestos, lead, or wiring concerns
Budgeting and Cost Breakdown for U.S. DIYers
Major Cost Factors
- Vapor Barrier: 12–20 mil reinforced polyethylene sheeting
- Seam Tape and Fasteners: Heavy-duty butyl tape, mechanical anchors
- Insulation: Rigid foam board or closed-cell spray foam (as applicable)
- Dehumidifier: Crawl-space rated, energy-efficient unit (optional but recommended)
- Drainage Solutions: Sump pump, French drain, or perimeter drains if needed
- Tools and PPE: Gloves, knee pads, goggles, utility knife, caulk gun, etc.
Typical DIY Costs (2024 U.S. Estimates)
- Vapor barrier (1,000 sq ft): $250–$600
- Tape, anchors, sealants: $100–$200
- Rigid foam insulation: $300–$700 (optional, for walls)
- Dehumidifier: $250–$1,200
- Drainage (if needed): $400–$1,500
- Basic tools/PPE: $50–$150
- Total DIY cost (no drainage): $600–$2,000
- Total DIY cost (with drainage): $1,000–$3,500
- Professional installation: $5,000–$15,000 (for comparison)
Tip: Measure your crawl space accurately and source materials online or at local building supply stores for the best pricing. Many suppliers offer DIY kits tailored to U.S. code requirements.
Compliance, Permits, and Local Codes
Do You Need a Permit?
Most U.S. jurisdictions do not require a permit for basic encapsulation (vapor barrier and insulation), but drainage modifications, electrical work, or adding a dehumidification system may. Always check with your local building department—especially if your home is in a flood zone or historic district.
Key U.S. Code Considerations
- Vapor barrier must cover all exposed soil and be sealed to foundation walls/piers
- Minimum 6 mil thickness, but 12–20 mil is strongly recommended for durability
- Fire-rated insulation required if walls are insulated
- Access doors must be insulated and weather-stripped
- Dehumidifier condensate must drain outside or to a sump (not under barrier)
Tools and Materials: U.S. DIYer Checklist
- 12–20 mil reinforced vapor barrier (enough to cover floor and 6–12″ up walls/piers)
- Butyl seam tape and mechanical fasteners (masonry screws or anchors)
- Utility knife and tape measure
- Caulk gun and crawl space sealant
- Rigid foam board or closed-cell spray insulation (walls, if insulating)
- Heavy-duty scissors or shears
- Drill/driver and masonry bit (for anchors)
- Respirator, gloves, goggles, knee pads, coveralls
- Dehumidifier (crawl space rated, optional but ideal)
- Portable lighting (headlamp or work light)
- Sump pump/drainage system (if persistent water issues)
Step-by-Step DIY Crawl Space Encapsulation
1. Prep and Inspection
- Remove debris, old insulation, and sharp objects from the crawl space.
- Inspect for leaks, standing water, pest evidence, or mold. Address these before starting.
- Repair any damaged joists or subflooring.
- Ensure all wiring and plumbing are in good shape—call professionals for any concerns.
2. Addressing Drainage and Moisture
- If water pools after rain, install a French drain, perimeter drain, or sump pump before encapsulation.
- Sloped dirt floors can be leveled with sand or gravel, but ensure new moisture channels don’t develop.
3. Sealing Vents and Gaps
- Seal all exterior vents with foam board and caulk unless local code requires venting.
- Weather-strip and insulate the crawl space access door.
- Seal plumbing/electrical penetrations with expanding foam or caulk.
4. Installing the Vapor Barrier
- Lay out sheets of vapor barrier, overlapping seams by 12 inches.
- Secure seams with butyl tape on both sides.
- Run the barrier up walls/piers at least 6–12 inches and mechanically fasten with masonry screws and sealing washers.
- Seal all edges and penetrations with tape or caulk to create an airtight envelope.
5. Insulating Walls (Optional, Highly Recommended)
- Install rigid foam board insulation (polyiso or XPS, minimum R-10) on foundation walls above the vapor barrier.
- Seal all seams with tape or spray foam for maximum air-tightness.
- Do NOT insulate between floor joists if walls are insulated; this creates a thermal short-circuit.
6. Installing a Dehumidifier (Optional, Often Essential)
- Choose a unit sized for your crawl space (check cubic footage and local climate humidity averages).
- Position the dehumidifier on concrete blocks or pads to prevent water exposure.
- Route the condensate line outdoors or to a sump—not under the vapor barrier.
- Set the unit to maintain 45–55% relative humidity.
7. Final Checks and Clean-Up
- Inspect all seams, edges, and penetrations for gaps.
- Check insulation coverage and barrier attachment to walls/piers.
- Test dehumidifier and drainage systems for proper operation.
- Photograph the finished crawl space for future reference or home resale.
Maintenance and Long-Term Best Practices
Regular Crawl Space Checks
- Inspect annually (or after major storms) for tears, water intrusion, or pest entry.
- Check dehumidifier filter and drain lines every 3–6 months.
- Repair any barrier damage promptly with matching tape or replacement sheeting.
- Look for signs of condensation or mold on joists—address source immediately.
Seasonal Tips
- Spring: Check for water intrusion after thaw/rain; clean dehumidifier filters.
- Summer: Confirm humidity stays below 60%; adjust dehumidifier as needed.
- Fall: Inspect for pest activity before winter nesting season.
- Winter: Ensure access door seals tightly to prevent heat loss.
Common DIY Mistakes to Avoid
- Using thin vapor barrier (less than 12 mil): Tears easily, won’t last.
- Not sealing all seams/edges: Allows moisture and pests to enter.
- Forgetting to address drainage first: Traps water under barrier, makes things worse.
- Poor insulation placement: Don’t double-insulate floor and walls—choose one method based on your climate and code.
- Improper dehumidifier setup: Condensate must drain outside, not into crawl space soil.
- Ignoring access safety: Always wear PPE and ensure proper venting when using sealants or adhesives.
Real-World Encapsulation Stories from Across the U.S.
Case Study: North Carolina Homeowner
After years of musty odors and high summer humidity, a Raleigh homeowner tackled DIY encapsulation over two weekends. Total cost: $1,450 for vapor barrier, tape, insulation, and a mid-range dehumidifier. Result: Immediate improvement in air quality, lower energy bills, and zero mold regrowth after one year.
Case Study: Pacific Northwest Challenges
In Portland, a homeowner faced persistent crawl space flooding. After adding French drains and a sump pump (DIY with rental equipment), they encapsulated the space with 20 mil barrier and R-15 foam. Total outlay: $3,200. Bonus: Resale value increased, and pest issues vanished.
Case Study: Midwest Winterization
A Milwaukee DIYer used foam board insulation on crawl space walls and sealed all vents, resulting in noticeably warmer floors and a 20% drop in heating costs. Maintenance: Simple annual checks and minor tape touch-ups.
Conclusion: Is DIY Crawl Space Encapsulation Right for You?
DIY crawl space encapsulation is one of the most substantial, cost-effective improvements a U.S. homeowner can make—especially if you’re dealing with dampness, mold, cold floors, or poor air quality. While the job requires careful planning, attention to detail, and a willingness to work in tight spaces, most motivated DIYers can achieve professional-quality results. The upfront investment pays off in lower energy bills, healthier indoor air, increased home value, and fewer pest problems. Just as importantly, you’ll have hands-on knowledge to spot issues and maintain your encapsulated crawl space for years to come.
Remember: Success depends on choosing durable materials, sealing every seam, and prioritizing drainage before you lay down any barrier. Check local codes, source your materials wisely, and never hesitate to call in a pro for major water or structural problems. With the right approach, your crawl space can go from a hidden liability to a fortress against moisture, pests, and energy waste. Ready to reclaim the forgotten space beneath your feet? Your healthier, more efficient home starts now.