Introduction: Unlocking Hidden Potential—DIY Attic Storage for U.S. Homes
Every homeowner knows the struggle of running out of storage space. As families grow and hobbies accumulate, closets overflow and garages become cluttered. But there’s a solution hiding just above your head: the attic. With a strategic, well-executed DIY attic storage project, you can transform this underutilized area into a safe, organized, and highly functional space. Whether you’re storing seasonal decorations, keepsakes, or simply decluttering your living areas, an attic storage revamp can add real value, both in convenience and property appeal. However, it’s not as simple as tossing boxes under the rafters—proper planning, budgeting, material selection, and safety awareness are critical. In this comprehensive guide, we’ll walk you step-by-step through designing, building, and maintaining attic storage solutions tailored for U.S. homes. From assessing your attic’s structural capacity and choosing the right materials, to budgeting realistically and avoiding common safety pitfalls, you’ll gain the know-how to make the most of your home’s hidden potential.
Assessing Your Attic: Suitability and Safety First
Understanding Your Attic’s Structure
Before you start planning shelving or storage platforms, it’s essential to evaluate your attic’s structural integrity and design. U.S. homes typically have one of two attic types:
- Rafter-framed attics: Sloped beams (rafters) support the roof, often providing more open space for storage.
- Truss-framed attics: Engineered wood trusses create a web of supports, which can limit usable space and require extra care not to cut or overload them.
Never remove or alter structural elements without a professional’s input—doing so can compromise your home’s safety.
Weight Limitations: Know Before You Load
Most attics are designed to support only the weight of the ceiling below and some insulation—not heavy loads. Exceeding this can lead to sagging or even collapse. As a rule of thumb, attic floors in U.S. homes safely support 10–20 lbs per square foot unless reinforced. If you’re unsure, consult a structural engineer before proceeding.
Check for Hazards and Access Issues
- Electrical wiring: Watch for exposed wires or junction boxes. If present, consider hiring an electrician to reroute or protect them.
- Insulation: Disturbing insulation can reduce energy efficiency or release irritants. Wear proper protective gear and avoid compressing insulation beneath storage platforms.
- Ventilation and moisture: Look for signs of water leaks, mold, or inadequate venting. Address these issues before installing storage.
- Access: Ensure your attic ladder or stairs are sturdy, safe, and code-compliant. If upgrading, refer to manufacturer instructions and your local building codes.
Budgeting Your Attic Storage Project
Typical Cost Breakdown
- Materials: Plywood or OSB panels for platforms ($25–$60 per sheet), 2×4 or 2×6 lumber ($4–$8 per 8-foot length), fasteners, brackets, and hardware ($30–$100 total depending on size).
- Tools (if not already owned): Circular saw ($60–$150), drill/driver ($40–$120), safety gear ($30–$70), and a stud finder ($15–$40).
- Optional upgrades: Shelving kits ($30–$100 per set), storage bins ($7–$20 each), attic lighting fixtures ($25–$80), and pull-down ladder replacement ($150–$400).
For a typical 8×10-foot attic storage platform, expect a total project cost of $250–$700, depending on choice of materials and whether you need to buy new tools. Modular shelving and bins can add another $100–$300, but often improve organization and safety.
Budgeting Tips
- Plan your layout and materials list carefully to avoid waste.
- Buy lumber and panels in standard sizes to minimize cuts and offcuts.
- Look for sales at home centers or consider reclaimed materials for cost savings (ensure they are structurally sound).
- Prioritize safety upgrades (like lighting and sturdy ladders) over cosmetic touches.
Essential Tools & Materials
Must-Have Tools
- Measuring tape and carpenter’s pencil
- Circular saw or handsaw
- Cordless drill/driver and drill bits
- Hammer or nail gun
- Stud finder (to locate joists beneath insulation)
- Level
- Safety goggles, dust mask, and gloves
- Utility knife (for insulation or vapor barrier adjustments)
Recommended Materials
- 3/4″ plywood or oriented strand board (OSB) for decking
- 2×4 or 2×6 lumber for support framing
- Deck screws or construction nails
- Metal brackets or joist hangers (for reinforcing supports where needed)
- Plastic storage bins with lids (clear bins help with visibility)
- LED attic lights or battery-powered work lights
Step-by-Step DIY Attic Storage Setup
1. Planning Your Layout
Begin by sketching your attic’s dimensions and marking joist locations. Identify areas with sufficient headroom and avoid blocking HVAC, vents, or electrical panels. Consider:
- Walkways for safe movement
- Zones for different storage types (holiday decor, luggage, archival boxes, etc.)
- Areas to avoid (e.g., directly over recessed lighting or where wiring is present)
2. Preparing the Attic
- Clear out any debris or existing items.
- Check insulation for damage; repair or replace as needed.
- Inspect for pests or water damage and resolve issues before proceeding.
3. Installing Storage Platforms
For most attics, adding a raised platform above the joists is safest. Follow these steps:
- Use a stud finder to locate joists beneath insulation. Mark them clearly.
- Cut 3/4″ plywood or OSB panels to fit your planned platform areas. Avoid over-spanning between joists (16–24″ on center is standard).
- Lay panels perpendicular to joists for maximum strength. Leave a 1/4″ gap at walls for expansion.
- Fasten panels to joists using 2.5″ deck screws every 8–12″ along each joist.
- If insulation is thicker than the joists, build a simple 2×4 frame atop the joists to raise the platform, preventing insulation compression.
- Do not block soffit or ridge vents—maintain airflow to prevent moisture buildup.
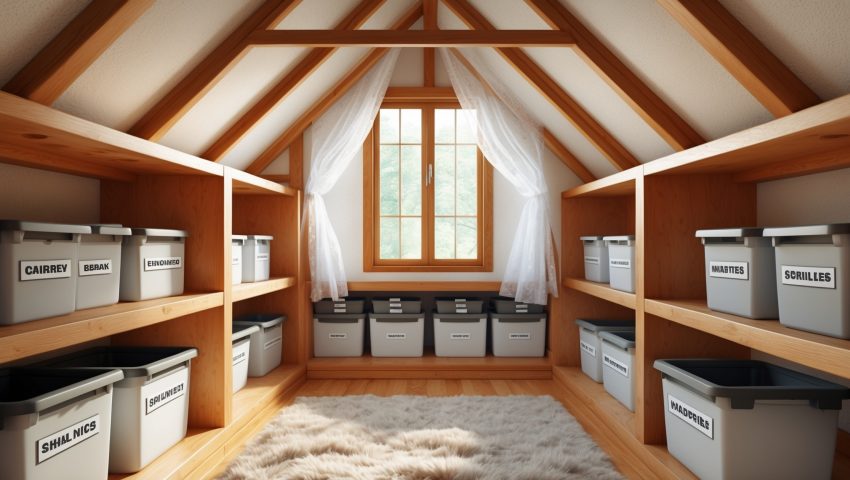
4. Adding Shelving and Storage Accessories
- Install free-standing or wall-mounted shelving units on top of your platform, securing them to joists or rafters where possible for stability.
- Use clear plastic bins with lids for smaller items, labeling each bin for easy retrieval.
- Consider hanging hooks or racks from rafters for lightweight, bulky items (e.g., artificial wreaths, suitcases).
5. Improving Lighting and Access
- Install battery-powered or hardwired LED lights for visibility; avoid halogen or incandescent bulbs, which can become fire hazards in enclosed, insulated spaces.
- If your attic lacks adequate access, upgrade to a code-compliant folding ladder or staircase. Ensure it is properly installed and rated for your expected load.
Safety Checklist for DIY Attic Storage
- Wear long sleeves, pants, gloves, goggles, and an N95 mask to prevent irritation from insulation or dust.
- Use only stable, properly installed ladders. Never overreach or carry heavy loads up a ladder without assistance.
- Step only on joists or finished platforms—stepping between joists can result in a dangerous fall through the ceiling below.
- Keep electrical wiring visible and accessible; do not bury or crush wires under platforms or bins.
- Do not store flammable materials (paint, solvents, propane tanks) in the attic due to heat and fire risk.
- Maintain clear pathways to attic access points and ventilation equipment for emergencies and maintenance.
Compliance and Insurance Considerations
Building Codes and Permits
Most U.S. municipalities don’t require permits for non-habitable attic storage platforms under a certain size, but some areas have strict rules regarding load-bearing modifications, electrical work, or stair installations. Always check with your local building department before making structural changes. If you’re planning to install permanent stairs or electrical wiring, permits may be required.
Insurance Impacts
Increasing storage in the attic may affect your homeowner’s insurance coverage, especially if your upgrades alter the home’s value or involve electrical work. Document your project with photos and receipts, and notify your insurer about the improvements to ensure continued coverage. Improper installations or overloaded attics may result in denied claims for related damages—so follow best practices and code requirements.
Maintenance Best Practices
- Inspect the attic every 6–12 months for signs of water leaks, pest activity, or insulation displacement.
- Rotate stored items seasonally to ensure nothing is forgotten or damaged by temperature fluctuations.
- Check fasteners and platform stability; tighten or reinforce as needed.
- Clean up dust and debris regularly to reduce fire risk.
- Replace or upgrade lighting as needed for clear visibility.
Real-Life Case Study: A Midwest Attic Transformation
Jane and Mark, homeowners in Indiana, faced an overflowing garage and cluttered closets. After considering various options, they embarked on a weekend DIY attic storage project. With a $500 budget, they reinforced joists with sistered 2x6s, installed two 4×8-foot plywood platforms, added LED lighting, and purchased ten clear storage bins. The project took two weekends, eliminated three closets’ worth of clutter, and improved the home’s resale appeal. Crucially, they documented their process and checked with their local building department, ensuring both safety and compliance. Their advice: “Measure twice, plan for more storage than you think you need, and don’t skip on safety gear.”
Conclusion: Making the Most of Your Attic, the Smart and Safe Way
Creating attic storage isn’t just about gaining square footage—it’s about enhancing the organization, safety, and efficiency of your home. With careful planning, a clear understanding of your attic’s structure and limitations, and a commitment to safety, even novice DIYers can transform a dusty, forgotten space into a reliable storage hub. By following the steps outlined above—assessing suitability, budgeting realistically, selecting the right materials, and adhering to best safety practices—you can avoid costly mistakes and maximize your investment. Remember to consult local codes, document your work for insurance purposes, and maintain your new storage area for years of trouble-free use. Whether you’re storing family heirlooms, holiday decorations, or simply clearing the clutter, a well-designed attic storage system is a home improvement project that pays dividends in convenience and peace of mind. Your attic’s hidden potential is just a few careful steps away—embrace the opportunity and enjoy the benefits of a more organized, efficient home.
If my attic has truss framing and not rafters, are there specific types of lightweight shelving you’d recommend that won’t stress the structure?
For attics with truss framing, use freestanding plastic or wire shelving designed for lightweight storage. Avoid attaching shelves to the trusses themselves to prevent structural stress. Opt for shelves that distribute weight evenly across the attic floor.
Could you give a rough estimate for the total cost of materials if I want to add basic shelving and flooring to a small attic?
For a small attic, basic shelving and flooring materials typically cost between $300 and $700. This range covers plywood or OSB boards for flooring and basic lumber for shelves, but prices may vary by region and material choices.
How do I find out the specific weight limits for my attic if I don’t have the original home plans?
To find your attic’s weight limits without original plans, consult a local structural engineer or building inspector. They can assess your attic’s joists and structure to determine safe storage loads based on their size, spacing, and condition.
What’s a realistic budget range to expect for a basic DIY attic storage setup, assuming I’ll need to reinforce the floor?
A basic DIY attic storage setup with floor reinforcement typically costs $500 to $1,500. This covers plywood, 2×6 or 2×8 lumber, fasteners, and basic tools. Costs can vary depending on attic size and local material prices.
You mention budgeting for materials—what are the most cost-effective options for attic flooring that still meet safety standards?
Plywood is one of the most cost-effective and widely used attic flooring materials that meets safety standards. Choose at least 3/4-inch thick, exterior-grade plywood for strength and durability. Always ensure proper support beams underneath for safe, stable flooring.
You mentioned budgeting realistically for attic storage—what are some unexpected costs I should factor in before starting the project?
Some unexpected costs can include reinforcing attic flooring, upgrading insulation, adding ventilation, addressing electrical wiring, and pest control. You might also need specialty tools or permits depending on your local building codes.
Can you explain how to accurately figure out my attic’s weight limits before adding heavy storage bins, especially if my house has truss framing?
With truss framing, it’s best to avoid placing heavy loads without checking first. Look for any builder specs or consult with a structural engineer to determine your attic’s safe weight capacity, as overloading trusses can cause damage or sagging.
You mention assessing structural capacity and budgeting—can you give an idea of typical costs for materials and any professional evaluations needed?
Material costs for attic storage, like plywood flooring and basic shelving, usually range from $200 to $1,000, depending on attic size and quality. A professional structural evaluation typically costs $200 to $500. Actual costs can vary by region and attic condition.
Is there an affordable way to reinforce a rafter-framed attic if I need to store heavier items like holiday decorations or sports gear?
Yes, you can add inexpensive sister joists or plywood panels across the rafters to distribute weight more evenly. Just be sure to check for wiring or insulation first, and avoid overloading the structure beyond its original design.
I’m worried about overloading the attic floor since you mentioned most aren’t designed for heavy storage. Are there guidelines for how much weight is safe in a typical U.S. home attic?
You’re right to be cautious. Most attic floors in U.S. homes can safely support about 10-20 pounds per square foot. It’s smart to store only lightweight items and avoid stacking heavy boxes or furniture.
If my attic has exposed insulation and no flooring yet, should installing a subfloor be my first step before adding shelves or storage bins?
Yes, installing a subfloor should be your first step. It provides a stable, safe surface for walking and supports any shelves or storage bins you add, while also protecting the insulation underneath.
If my attic seems a little humid, are there any budget-friendly ways to deal with moisture before adding storage solutions?
Yes, you can improve attic ventilation with affordable vents or fans, use moisture-absorbing products like silica gel or charcoal, and seal any leaks. These steps help reduce humidity before installing storage solutions.
If my attic has limited structural support, are there safe ways to increase its load capacity without a full renovation?
You can reinforce your attic by adding sister joists alongside existing ones, installing additional support beams, or using stronger plywood. Consulting a structural engineer first is important to ensure safety and compliance with building codes.
What kinds of materials would you recommend for attic flooring if I’m on a tight budget but still want it to be safe for storage?
For a budget-friendly and safe attic floor, consider using 3/4-inch plywood or oriented strand board (OSB). These materials are sturdy, affordable, and commonly used for attic storage. Ensure you secure the panels to joists for safety.
Once I’ve budgeted for materials, how much extra should I plan for unexpected expenses or safety upgrades in a typical DIY attic storage project?
It’s wise to set aside an extra 10–20% of your total budget for unexpected costs or safety upgrades. This cushion helps cover things like additional hardware, insulation, or safety gear you might need as the project progresses.
If I have a truss-framed attic, what are some safe storage options that won’t risk damaging the trusses or overloading the structure?
For a truss-framed attic, use lightweight storage like plastic bins for seasonal items and avoid placing heavy boxes between trusses. Consider installing shelving attached to the truss sides or using hanging storage, but never cut or modify the trusses.
If my attic has truss framing, what storage options are safest that won’t risk damaging those supports?
For truss-framed attics, use lightweight shelving or storage platforms that span across several trusses, but never cut or drill into the trusses themselves. Store only light boxes and avoid overloading any section to protect the structural integrity.