Introduction: Why Crawl Space Encapsulation Matters for U.S. Homeowners
If you’ve ever noticed musty odors, uneven floors, or persistent humidity in your home, chances are your crawl space might be the culprit. Crawl space encapsulation—a process of sealing the ground and walls with vapor barriers—has become a game-changer for American homeowners seeking to protect their property from moisture, pests, and energy loss. While often overlooked, an unsealed crawl space can lead to mold growth, wood rot, poor indoor air quality, and increased utility bills. These problems don’t discriminate by region: from the humid South to the damp Pacific Northwest and the dry Southwest, crawl spaces across the U.S. pose unique challenges and opportunities for improvement.
Encapsulating your crawl space as a DIY project is entirely achievable for motivated homeowners with basic skills and a willingness to work in tight spaces. This comprehensive guide will walk you through every step of the process, from initial inspection to finishing touches. We’ll dive into the actual costs you can expect, highlight the essential tools and materials, and address key regional considerations—ensuring your encapsulation job is tailored to your local climate. Our aim: to empower you to tackle this project safely, efficiently, and cost-effectively, while reaping long-term benefits for your home’s comfort and durability.
Understanding Crawl Space Encapsulation
What Is Crawl Space Encapsulation?
Crawl space encapsulation involves sealing the exposed earth and often the walls of your crawl space with a heavy-duty vapor barrier, addressing moisture intrusion, and sometimes adding insulation and dehumidification. This goes beyond basic ground covers—encapsulation creates a controlled environment that helps prevent moisture, pest, and air quality issues from ever starting.
Benefits of Encapsulation
- Moisture Control: Stops ground moisture from entering your home, reducing mold and rot risks.
- Improved Air Quality: Limits allergens and musty odors from entering living spaces.
- Energy Efficiency: Reduces drafts and heat loss, helping to lower energy bills.
- Pest Prevention: Seals out insects and rodents that thrive in damp, exposed crawl spaces.
- Structural Protection: Prevents wood rot and foundation damage caused by persistent dampness.
Planning Your DIY Crawl Space Encapsulation
Is DIY Encapsulation Right for You?
Encapsulating a crawl space is a labor-intensive project, requiring comfort with confined spaces, some manual dexterity, and basic safety awareness. If your crawl space is excessively low (less than 2 feet high), contains standing water, or shows signs of significant structural issues, consult professionals first. For most dry or mildly damp spaces, DIY is feasible and cost-effective.
Assessing Your Crawl Space
- Size and Accessibility: Measure length, width, and height. Note obstacles such as pipes, wiring, or HVAC equipment.
- Moisture Levels: Check for visible water, condensation, or musty smells. Use a moisture meter for accuracy.
- Existing Insulation: Examine any insulation for dampness or mold—damaged material should be removed.
- Pest Activity: Look for droppings, nests, or chewed materials.
- Foundation Condition: Note any cracks or structural concerns that may require repair before proceeding.
Budgeting: What Does DIY Crawl Space Encapsulation Cost?
Typical Cost Ranges
Professional encapsulation often ranges from $5,000 to $15,000, but tackling the project yourself can bring costs down to $1,000–$3,000, depending on crawl space size and materials chosen. Here’s a breakdown of the main expenses:
- Vapor Barrier (Heavy-Duty Polyethylene, 12–20 mil): $0.50–$1.00 per sq. ft.
- Tape and Sealant: $50–$200 total, depending on crawl space size.
- Insulation (Optional): $0.50–$2.00 per sq. ft. for rigid foam board or spray foam.
- Dehumidifier (Optional but recommended in humid regions): $200–$1,000.
- Miscellaneous Tools and PPE: $100–$200 (if not already owned).
- Drainage System (If needed): $500–$2,000 for sump pump and French drains.
Money-Saving Tips
- Buy vapor barrier rolls in bulk for larger spaces.
- Rent specialty tools (like rotary hammers or commercial staplers) instead of purchasing.
- Shop local building supply auctions or surplus stores for insulation or liner material.
Regional Considerations: Tailoring Your Approach
Humid Southeast and Gulf Coast
Persistent high humidity and flooding risks mean moisture control is paramount. Opt for a thicker vapor barrier (at least 20 mil) and budget for a crawl space-rated dehumidifier. Consider adding a sump pump and perimeter drainage if water intrusion is common.
Pacific Northwest
Frequent rainfall and mild temperatures demand meticulous seam sealing and perimeter checks. Pay special attention to addressing any foundation wall seepage before encapsulation.
Northeast and Midwest
Cold, damp winters mean you’ll benefit from insulating crawl space walls with rigid foam board (always over the vapor barrier). Seal vents and ensure the vapor barrier extends partially up the walls for best performance.
Southwest and Arid Regions
Moisture is less of a threat, but encapsulation still offers pest and dust control. A thinner vapor barrier (12–15 mil) may suffice, and insulation needs are minimal unless you’re seeking energy efficiency improvements.
Tools and Materials Checklist
- Heavy-duty vapor barrier (polyethylene, 12–20 mil)
- Double-sided butyl tape and specialized seam tape
- Utility knife and scissors
- Measuring tape and permanent marker
- Hammer and masonry nails (if attaching to concrete)
- Commercial-grade staple gun and staples
- Rigid foam board insulation and adhesive (if insulating walls)
- Caulk or spray foam (for air sealing gaps)
- PPE: respirator, gloves, knee pads, coveralls, safety glasses
- Crawl space dehumidifier (as needed)
- Shovel or rake (for grading soil, if needed)
Step-by-Step DIY Crawl Space Encapsulation
1. Prep and Clean the Crawl Space
- Remove all debris, old insulation, and any items stored under the house.
- Check for signs of active water leaks—address these before proceeding.
- If the soil is uneven or slopes toward the foundation, use a shovel to grade it away from the walls for better drainage.
- Ventilate the area well before starting work, and wear full PPE to protect yourself from dust and mold spores.
2. Inspect for and Address Moisture Issues
- Check for standing water after rainfall. If present, install a French drain or sump pump system.
- Seal all obvious cracks in the foundation with hydraulic cement or caulk.
- Repair or replace any damaged plumbing immediately.
3. Air Seal the Crawl Space
- Use spray foam or caulk to seal gaps where pipes or wires penetrate the foundation.
- Seal crawl space vents unless local code requires them to remain open (check with your municipality).
- Use rigid foam insulation to block off rim joists and sill plates for added draft control.
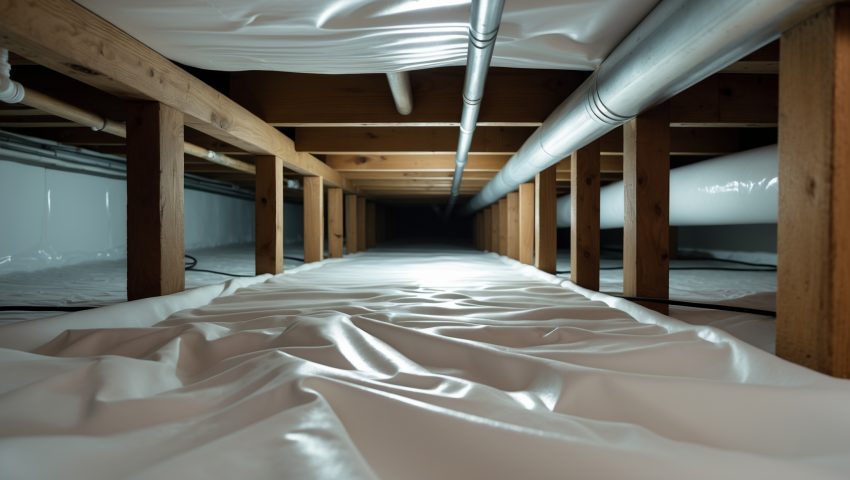
4. Install the Vapor Barrier
- Roll out the vapor barrier, starting at one corner and working your way across the floor. Overlap seams by at least 12 inches.
- Use double-sided butyl tape along the edges to secure the barrier to the foundation walls and piers.
- Seal all seams with specialized vapor barrier tape, pressing firmly to ensure a watertight bond.
- Extend the barrier 6–12 inches up the walls and secure with tape and masonry nails or a commercial-grade staple gun (for wood or foam surfaces).
- Cut carefully around support piers, wrapping and taping the barrier tightly around each one.
5. Wall Insulation (Optional but Recommended in Cold Regions)
- Cut rigid foam board insulation to fit between joists or along walls, securing with adhesive or mechanical fasteners.
- Seal joints with tape or spray foam to prevent air gaps.
6. Install a Dehumidifier (As Needed)
- If your region is humid or your crawl space tends to retain moisture, install a crawl space-specific dehumidifier.
- Ensure drainage from the dehumidifier runs to an exterior location or sump pump basin.
7. Final Walkthrough and Inspection
- Double-check that all seams are sealed, edges are secure, and there are no exposed areas of soil.
- Test dehumidifier operation and monitor humidity levels over several days (aim for 45–55% relative humidity).
- Document the finished job with photos for your records and insurance purposes.
Maintenance Best Practices
- Inspect the crawl space at least twice a year for tears, loose seams, or signs of moisture intrusion.
- Check dehumidifier filters and drainage monthly.
- After heavy storms, look for pooling water or new leaks.
- Keep vents and access doors sealed unless otherwise required by code.
- Address rodent or pest activity promptly to prevent damage to the vapor barrier.
Common DIY Mistakes to Avoid
- Skipping Moisture Repairs: Encapsulation won’t resolve active leaks or flooding—address these first.
- Using Inadequate Tape or Sealant: Standard duct tape won’t last; always use tapes rated for vapor barriers.
- Not Overlapping Seams Enough: Less than 12-inch overlap can allow moisture to seep through.
- Ignoring Regional Needs: Failing to insulate in cold climates or neglecting dehumidification in humid areas reduces effectiveness.
- Neglecting Safety: Always wear PPE—crawl spaces are notorious for dust, mold, and sharp debris.
Compliance, Permits, and Insurance Tips
- Check with your local building department—some municipalities require permits for major crawl space modifications, especially if electrical or structural changes are involved.
- If you’re adding a dehumidifier, ensure all wiring meets code.
- Document the process for your homeowner’s insurance, particularly if you’ve had moisture or pest claims in the past.
- Retain receipts for all materials and equipment in case of future claims or home resale disclosures.
Conclusion: The Payoff of a Well-Encapsulated Crawl Space
Tackling crawl space encapsulation as a DIY project isn’t just about saving money—it’s an investment in your home’s health, efficiency, and long-term durability. By following a methodical, regionally-informed approach, you’ll proactively eliminate the root causes of many common household headaches, from mold to drafts to pest incursions. The up-front effort is significant: expect to spend a full weekend (or two) on the job, depending on the size and complexity of your crawl space. But the rewards—lower energy bills, fewer repairs, and peace of mind—are lasting.
Remember, success hinges on careful prep, attention to detail, and ongoing maintenance. Don’t cut corners with low-quality materials or skip critical steps like moisture repair or seam sealing. Instead, view encapsulation as a chance to truly understand and improve a part of your home that’s often neglected. Not only will you gain practical DIY experience, but you’ll also protect your family’s health and your property’s value for years to come.
Whether you’re in the muggy Southeast, rainy Northwest, or chilly Midwest, a well-encapsulated crawl space is within reach for most handy homeowners. With the right tools, regional know-how, and this step-by-step guide, you’ll transform your crawl space from a hidden hazard into a reliable asset—one that supports a safer, more comfortable, and efficient home.
Could you give more specifics about budgeting for tools and materials? I’m worried unexpected costs might come up once I start the DIY process.
To help you budget, list out all essentials: vapor barrier ($0.50–$0.70/sq ft), tape, sealant, dehumidifier, insulation, and tools like utility knives and safety gear. Add 10–20% extra for unforeseen needs, as small fixes and additional materials often arise.
Do you have any tips for estimating the total cost if my crawl space is unusually large or has obstacles, like ducts or pipes, that might complicate the project?
For large crawl spaces or those with obstacles, measure the total area and note any challenging spots. Add 20-30% to your material estimate for extra vapor barrier, tape, and labor. Complex layouts may also increase the time and potential professional costs.
For a beginner, what kind of basic skills are needed before starting crawl space encapsulation, and are there any tricky steps I should watch out for?
Before starting crawl space encapsulation, you should be comfortable with basic measuring, sealing gaps, cutting materials, and using hand tools. Pay extra attention to moisture barriers and sealing vents—these steps can be tricky if not done thoroughly.
If my crawl space already smells musty, should I address that before starting encapsulation or will the process itself take care of the odor?
It’s best to address the musty odor before encapsulation. Remove any mold, standing water, or sources of moisture first, as encapsulation can trap existing problems and odors inside the crawl space.
Do you have any tips for choosing the right type or thickness of vapor barrier material depending on whether you live in a really humid versus a dry region?
In very humid regions, choose a thicker vapor barrier—10 to 20 mil—since it offers more moisture protection and durability. In drier areas, a thinner barrier of 6 to 10 mil is usually sufficient for effective encapsulation.
You mentioned actual costs—could you give a ballpark estimate for materials for a medium-sized crawl space in the Midwest?
For a medium-sized crawl space in the Midwest, expect material costs to range from $1,500 to $3,000. This covers vapor barrier, tape, sealant, insulation, and a dehumidifier if needed. Prices vary based on quality and local suppliers.
The article mentions different regional challenges—are there specific extra steps I should take for encapsulation if I live in the humid South?
If you’re in the humid South, be sure to use a thicker vapor barrier, fully seal all seams, and consider adding a dehumidifier to control moisture. Pay extra attention to sealing vents and gaps to keep humid air out.
I see you mention regional differences for crawl spaces. Are there specific types of vapor barriers or insulation you recommend for homes in the humid South compared to the dry Southwest?
In the humid South, use thicker vapor barriers (at least 12-20 mil, reinforced) and closed-cell spray foam insulation to block moisture. In the dry Southwest, a standard 6-10 mil vapor barrier and rigid foam board insulation usually suffice.
For homes in the humid South, do you recommend adding a dehumidifier as part of the DIY process, or is the vapor barrier alone usually enough?
In the humid South, adding a dehumidifier is usually recommended along with a vapor barrier. High humidity levels can still cause moisture issues even after installing a vapor barrier, so a dehumidifier provides extra protection.
How much of the total budget should I allocate to vapor barriers compared to insulation materials in a typical DIY crawl space project?
For a typical DIY crawl space project, about 50-60% of your materials budget often goes to vapor barriers, while 30-40% is for insulation materials. The exact split depends on your crawl space size and insulation type.