Introduction: Why DIY Radiator Restoration Matters
Radiators are more than just a source of warmth—they’re often architectural centerpieces in historic American homes and apartments. Over decades, these cast iron or steel units can accumulate rust, peeling paint, and mineral deposits, causing them to lose efficiency and charm. While many homeowners consider full replacement, restoring an original radiator can be a rewarding, cost-effective alternative that preserves your home’s history and character. However, radiator restoration isn’t as simple as grabbing a brush and a can of paint. It requires careful planning, the right tools, and a focus on safety—especially when dealing with high heat, heavy metal, and sometimes even lead-based paint. In this comprehensive guide, we’ll break down everything you need to know to successfully restore your radiator. From choosing the right tools and budgeting for materials, to navigating safety concerns and step-by-step restoration, this article is your expert companion for a successful DIY radiator project anywhere in the U.S.
Understanding Your Radiator: Types, Materials, and Common Issues
Types of Radiators in U.S. Homes
- Cast Iron Radiators: Common in pre-1950s homes, valued for durability and heat retention.
- Steel Panel Radiators: Found in mid-century and newer homes, lighter and more modern in design.
- Baseboard Radiators: Long, low-profile units, typically steel, running along baseboards.
Common Issues Needing Restoration
- Rust and Corrosion: Especially on older, neglected radiators.
- Peeling or Chipped Paint: Sometimes containing lead in pre-1978 homes.
- Clogged Fins or Internal Buildup: Reduces heating efficiency.
- Leaky Valves or Section Joints: Can cause water stains and further rust.
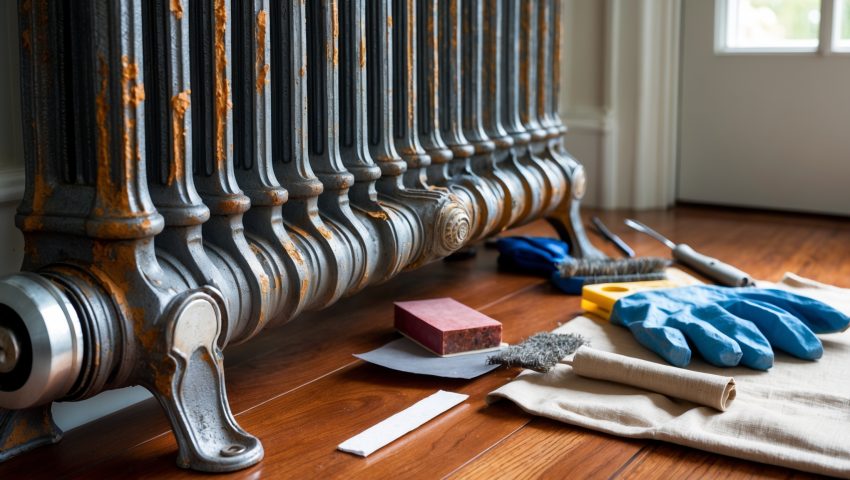
Essential Tools and Equipment for DIY Radiator Restoration
The right tools make a dramatic difference in efficiency, results, and safety. Here’s what you’ll need for a typical cast iron radiator restoration:
- Heavy-duty drop cloths or plastic sheeting
- Wire brushes (manual and drill-attached options)
- Scrapers (metal and plastic)
- Shop vacuum (with HEPA filter if working with old paint)
- Respirator mask (NIOSH-approved, especially for old paint)
- Protective goggles and gloves
- Heat gun or infrared paint remover (for stubborn paint)
- Sandpaper (coarse 60–80 grit and fine 120–180 grit)
- Rust converter or inhibitor
- Degreasing cleaner and rags
- High-heat primer and paint (rated 450°F or higher)
- Paint brushes (angled sash and radiator-specific) and/or HVLP paint sprayer
- Wrenches for valve removal
- Bucket for drained water
Optional but helpful: handheld steam cleaner (for interior cleaning), lead paint test kit, and a dolly for moving heavy units.
Budgeting Your Radiator Restoration: Cost Breakdown
Restoring a radiator is usually far less expensive than replacing it, but costs can vary depending on tools you already own and the extent of the work required.
- Materials:
- High-heat paint (1–2 quarts): $20–$40
- High-heat primer: $15–$25
- Rust converter/inhibitor: $10–$20
- Degreaser and cleaning supplies: $10–$15
- Sandpaper and brushes: $10–$30
- Lead test kit (if needed): $10–$20
- Equipment:
- Wire brush attachments: $10–$20
- Respirator and safety gear: $20–$50
- Rental HVLP sprayer (optional): $30–$50/day
- Drop cloths and plastic sheeting: $10–$15
- Total Estimated DIY Cost: $100–$300 per radiator (more if you need to purchase larger tools or rent specialized equipment).
Compare this to professional restoration, which can range from $400–$1,000 per radiator, not including removal and reinstallation.
Safety Essentials: Protecting Yourself and Your Home
Assessing for Lead Paint
Many radiators in homes built before 1978 are coated with lead-based paint. Before scraping or sanding, use a lead paint test kit on several areas. If positive, follow EPA guidelines for lead-safe work practices—wear a certified respirator, contain dust with plastic sheeting, and never dry-sand or use high-heat guns on lead paint. For extensive lead removal, consider hiring a certified abatement professional.
Handling Heavy Metal Safely
- Radiators can weigh 100–400 pounds. Always use proper lifting techniques and get help when moving units.
- Protect floors with thick drop cloths or plywood sheets to prevent gouging during removal or repositioning.
Working With Heat and Water
- Turn off the heating system and let the radiator cool completely before starting.
- Drain water from the radiator into a suitable container; have towels ready for spills.
- When using heat guns or paint removers, keep a fire extinguisher nearby and monitor for smoldering debris.
Ventilation and Dust Protection
- Work in a well-ventilated area—open windows and use fans to direct dust outside.
- Seal off nearby rooms with plastic sheeting to prevent dust spread.
- Wear a NIOSH-approved respirator when sanding, scraping, or spraying paint.
Step-by-Step DIY Radiator Restoration
Step 1: Preparation and Setup
- Shut off the heating system and allow the radiator to cool.
- Protect floors and walls with drop cloths and plastic sheeting.
- Test for lead paint and prepare safety gear as needed.
- Disconnect the radiator from valves if removal is necessary—label all hardware for easy reassembly.
Step 2: Cleaning and Degreasing
- Vacuum all surfaces and crevices to remove loose dust and debris.
- Wipe down the radiator with a degreasing cleaner and rags; focus on greasy spots near valves.
- For internal buildup, use a steam cleaner or flush the unit with water (if removed from the system).
Step 3: Paint and Rust Removal
- Scrape away loose or flaking paint with a metal scraper.
- Use a wire brush to remove rust and any remaining paint; drill-attached brushes speed up the process for large sections.
- For stubborn paint, carefully use a heat gun or infrared remover, but avoid high heat on lead paint.
- Hand-sand with coarse sandpaper to smooth out rough spots, then finish with finer grit for a clean surface.
Step 4: Treating Rust and Priming
- Apply rust converter or inhibitor to any bare metal areas where rust was present, following product instructions.
- Allow to dry thoroughly before proceeding.
- Apply a coat of high-heat metal primer, using a brush for crevices or a sprayer for a smoother finish. Allow to dry completely.
Step 5: Painting
- Use only paints rated for high temperatures (450°F or higher); regular paint can blister or off-gas when the radiator heats up.
- Apply paint in thin, even coats—start with hard-to-reach spots and work outward.
- Multiple thin coats are better than one thick coat to avoid drips and ensure durability.
- Allow full curing time as recommended on the paint label before reconnecting or turning on the heat.
Step 6: Reinstallation and Leak Testing
- Carefully reposition the radiator and reconnect all valves and fittings. Use fresh thread sealant if needed.
- Refill the system and check for leaks at all connection points.
- Bleed the radiator to remove trapped air (open the bleed valve until water flows steadily).
- Monitor for leaks or odd noises over the first heating cycle.
Advanced Tips: Maximizing Efficiency and Longevity
Insulating Behind Radiators
Install foil-faced insulation panels behind wall-mounted radiators to reflect heat into the room, reducing energy costs by up to 10%.
Upgrading Valves for Better Control
Consider replacing old manual valves with modern thermostatic radiator valves (TRVs) for zoned temperature control and added comfort.
Regular Maintenance Checklist
- Check for leaks and corrosion at the start of each heating season.
- Bleed radiators annually to maintain optimal heat output.
- Touch up paint chips promptly to prevent rust from returning.
Common Myths About DIY Radiator Restoration
- Myth: “Radiator paint can be any old latex paint.”
Fact: Only high-heat paint is safe and durable. - Myth: “Rust means the radiator is ruined.”
Fact: Surface rust is usually fixable; deep internal rust may need a pro assessment. - Myth: “Radiators can’t be removed without a plumber.”
Fact: Most homeowners can disconnect and move radiators safely with basic plumbing tools and help for heavy lifting. - Myth: “DIY restoration is always cheaper.”
Fact: If you need to buy many tools or deal with serious lead paint, professional help may be more cost-effective.
Case Study: Restoring a 1920s Cast Iron Radiator in Chicago
When Emily purchased her 1927 bungalow in Chicago, its ornate radiators were caked with layers of yellowed paint and rust. Using the process above, she tested for lead (result: negative), set up dust containment, and spent a weekend stripping, sanding, and cleaning. After applying rust converter and two coats of high-heat paint, her radiators looked brand new. Material costs were just $140 for two units, compared to the $1,000+ estimate for replacement. The project improved both the efficiency and historic charm of her home—and gave her the confidence to tackle further DIY upgrades.
Conclusion: Is DIY Radiator Restoration Right for You?
Restoring a radiator is a project that blends practical skill with a respect for your home’s history. Whether you’re working in a 19th-century brownstone or a mid-century ranch, the process requires careful planning—especially when safety concerns like lead paint and heavy lifting are involved. The good news? With the right tools, safety gear, and methodical approach, most homeowners can achieve professional-looking results in a single weekend. Along the way, you’ll not only save hundreds of dollars but also extend the life of your heating system and preserve a piece of American craftsmanship.
Before you start, weigh the costs, assess the condition of your radiator, and don’t hesitate to call in professionals for lead abatement or major plumbing work. But for most cases, DIY radiator restoration is well within reach, offering both immediate savings and long-term satisfaction. With each brush stroke, you’re not just restoring metal—you’re reviving warmth, character, and a unique story within your home. So, gather your tools, gear up for safety, and let your radiator shine again—efficient, beautiful, and built to last.
If my radiator has some peeling paint and rust but I’m not sure if it contains lead, what steps should I take to check for lead and stay safe during restoration?
For safety, use a lead test kit from a hardware store to check the paint first. If it tests positive, wear a mask and gloves, avoid sanding, and consider consulting a professional for removal. Always keep the area well-ventilated during any work.
How much should I realistically budget for a full DIY restoration if I have multiple radiators to tackle—does the cost per unit drop much when buying supplies for several at once?
When restoring several radiators, buying supplies in bulk often lowers your cost per unit—expect to spend $80–$150 per radiator if you have multiple, versus $120–$200 for just one. Larger quantities of paint, primer, and tools make this more cost-effective overall.
How much should I budget for all the required restoration tools if I’m tackling a typical cast iron radiator in an older apartment?
For a typical cast iron radiator project, expect to budget $100 to $250 for essential tools like wrenches, wire brushes, sandpaper, safety gear, primer, and paint. Costs can vary based on tool quality and if you already own some items.
Do you recommend different restoration steps for steel panel radiators compared to cast iron ones, especially when dealing with rust and efficiency issues?
Yes, steel panel radiators usually require gentler cleaning and rust treatment since they’re thinner than cast iron. For cast iron, you can use heavier tools and abrasives, but always check for leaks on both types before repainting or restoring.
Are there certain issues where DIY restoration won’t be enough and I should really call in a professional, like with major leaks or severe internal buildup?
Yes, for major leaks, severe internal buildup, or extensive rust, it’s best to call a professional. DIY methods are great for minor issues, but bigger problems can lead to safety risks or costly damage if not handled properly.
The article mentions mineral deposits and internal buildup—are there specific products or techniques you recommend to clean the inside of an old radiator?
To clean inside an old radiator, use a radiator flush solution available at auto parts stores. Fill the radiator with the solution, let it circulate as directed, then flush with clean water. A mixture of distilled vinegar and water also works for mineral deposits.
How much should I realistically budget for materials and tools if I want to restore multiple baseboard radiators in my house?
For restoring multiple baseboard radiators, budget between $100 and $300 for materials like paint, primer, brushes, sandpaper, and rust remover. Basic tools such as screwdrivers, wrenches, and protective gear may add $50–$100 if you don’t already have them.
When budgeting for a full DIY restoration on multiple radiators, what unexpected costs should homeowners watch out for aside from basic tools and paint?
Unexpected costs can include replacement parts like valves or fittings, specialty cleaning agents, disposal fees for old materials, and potential rental charges for heavy-duty equipment. You might also encounter costs for repairing wall or floor damage during removal and reinstallation.
If my old radiator has a lot of peeling paint and I suspect it’s lead-based, what’s the safest way to remove it without risking contamination?
If you suspect lead paint, avoid dry sanding or scraping. Wet-scrape carefully while wearing a mask and gloves, and seal off the area. Collect debris in plastic bags. Consider hiring a certified lead abatement professional for the safest removal.
How can I tell if my old radiator has lead-based paint before I start stripping it, and what are the safest ways to deal with it if it does?
To check for lead paint, use a lead test kit from a hardware store or consult a professional. If lead is present, wear protective gear and use a chemical paint remover instead of sanding, or consider hiring a certified lead abatement specialist.
If my house was built before 1978 and my radiator paint might have lead, what are the best safety practices for stripping and repainting it myself?
If lead paint is present, always wear a certified respirator, gloves, and disposable coveralls. Use a chemical stripper instead of sanding to avoid dust, and seal off the work area. Clean thoroughly and safely dispose of all debris when finished.
How much should I budget for all the essential tools listed if I’m restoring multiple radiators in a pre-1950s home?
For restoring multiple pre-1950s radiators, budget around $200 to $400 for essential tools like wrenches, wire brushes, safety gear, paint supplies, and sealants. Costs may vary based on tool quality and whether you need specialty items for older radiators.
Do you have any rough cost estimates for restoring a steel panel radiator versus replacing it entirely in a typical mid-century home?
Restoring a steel panel radiator usually costs between $150 and $400, depending on rust and labor needed. Replacing it can range from $500 to $1,200 including the new unit and installation. Costs vary by region and radiator size.
You mention older radiators might have lead-based paint—what’s the safest way to test for lead before starting the restoration, and are there common at-home kits you recommend?
The safest way to test for lead is to use EPA-recognized lead test kits, which are widely available at hardware stores. Follow the instructions carefully, and always wear gloves and a mask while testing to avoid any exposure.
If my radiator has a lot of peeling paint and I suspect it’s pre-1978, what’s the safest way to remove the old layers without risking lead exposure?
If your radiator may have lead paint, avoid sanding or scraping. Use a chemical paint stripper labeled safe for lead paint and wear protective gear (respirator, gloves). Work in a well-ventilated area and carefully contain and dispose of paint debris.
How much should I budget for materials and basic tools if I’m restoring a standard-sized cast iron radiator in my apartment?
For a standard-sized cast iron radiator, budget around $100 to $200 for materials and basic tools. This includes paint, primer, wire brushes, rust remover, drop cloths, safety gear, and possibly a paint sprayer or brushes.
How much should I expect to budget for materials and tools if I want to restore two large cast iron radiators in a 1920s house?
For two large cast iron radiators, you should budget around $100–$200 for materials like paint, primer, and cleaning supplies. Essential tools such as wire brushes, sandpaper, and protective gear may add another $50–$150, depending on what you already own.
If my radiator has a lot of internal buildup, is there a specific tool or method you recommend for clearing it out without damaging the unit?
For clearing internal buildup in your radiator, use a radiator flush solution and flush kit, which are designed to remove debris safely. Avoid using sharp tools inside the radiator, as they can cause damage. Always follow the product instructions carefully.
If I encounter minor leaks at the valve joints during restoration, do you recommend tackling that myself, or should I call in a professional at that point?
If the leaks are minor and you’re comfortable working with plumbing, you can often fix valve joint leaks yourself by tightening fittings or replacing washers. However, if the leak persists or you’re unsure, it’s safer to call a professional.
If my radiator has a small leak at the valve, is it safe to tackle that repair myself during restoration, or should I call a professional?
If the leak at the valve is minor and you’re comfortable turning off your heating system, you can usually replace washers or tighten fittings yourself. However, if you’re unsure or the leak persists, it’s safest to call a professional.
What safety precautions are most important if I need to move a heavy radiator for cleaning and painting, especially in an older home?
Wear sturdy gloves to protect your hands from sharp edges and rust. Use proper lifting techniques or get help to avoid injury, since old radiators are very heavy. Check for any loose fittings or leaking pipes before moving the radiator, and make sure to turn off the heating system first.
Is there a way to tell if replacing leaky valves is something a DIYer can handle or if that’s a job better left to a plumber?
If your radiator valves are easy to access and you have basic plumbing tools, a DIYer can often replace them. However, if the valves are corroded, stuck, or if you’re unsure how to isolate the system, it’s safer to call a plumber.
If my radiator has both rust and leaking valves, should I repair the leaks before tackling the surface restoration, or does the order not matter?
It’s best to repair any leaks, including valve issues, before starting surface restoration. Fixing leaks first ensures you won’t undo your surface work with water damage or require further disassembly later.
Do you have any tips specifically for safely handling potential lead-based paint when restoring older cast iron radiators?
When dealing with potential lead-based paint, wear a certified respirator, gloves, and goggles. Work in a well-ventilated area, use plastic sheeting to catch debris, and never sand or dry-scrape—wet methods are safer for containing lead dust.
Is there a big difference in the restoration process or tools needed for cast iron versus steel panel radiators?
Yes, there are some differences. Cast iron radiators are heavier and may require stronger lifting tools, and old paint removal can be tougher. Steel panel radiators are lighter and often have more delicate surfaces, so use gentler cleaning tools to avoid damage.
How do costs typically compare between fully restoring a cast iron radiator yourself versus just replacing it with a new steel panel model?
Restoring a cast iron radiator yourself is usually less expensive upfront, especially if you already have tools, but it does take more time and effort. Replacing with a new steel panel model generally costs more due to purchase and installation.
If my older cast iron radiator has peeling paint and I’m worried about lead, what’s the safest way to remove it myself before repainting?
If you suspect lead paint, wear a respirator, gloves, and goggles. Use a chemical paint stripper labeled safe for lead instead of sanding or scraping. Keep the area well-ventilated and clean up thoroughly with a HEPA vacuum after removing paint.
Do you have any tips on budgeting for tool rentals versus buying, especially for a one-time cast iron radiator project?
For a one-time cast iron radiator project, renting tools usually saves money, especially for expensive, heavy-duty items. Compare rental costs to purchase prices, and consider buying only frequently used or inexpensive tools. Always factor in potential late fees or deposits when renting.
What’s the best way to check if the valves or section joints are leaking before I start cleaning and painting my radiator?
To check for leaks, dry the radiator completely, then run your hand around the valves and section joints. Look for any moisture or corrosion. You can also wrap tissue or paper towel around suspected areas and watch for damp spots.
If my home has radiators with peeling paint and it was built before 1978, what’s the best way to test for and safely deal with potential lead paint during restoration?
Since your home was built before 1978, it’s wise to assume the paint may contain lead. Use a lead test kit from a hardware store to check first. If lead is present, wear protective gear, seal off the area, and use wet sanding or a HEPA vacuum—avoid dry scraping. Consider hiring certified lead abatement professionals for safest results.
Do you have any tips for estimating the total cost of materials and tools for a standard-sized cast iron radiator restoration project?
Start by listing all needed tools and materials, like paint remover, wire brushes, primer, paint, and safety gear. Check local hardware store prices, and add about 10-15% for unexpected expenses. This approach gives a realistic cost estimate.
If my radiator has leaky valves along with rust, should I address the leaks before starting the restoration or can I tackle everything in one go?
It’s best to address the leaky valves first, as leaks can interfere with the cleaning and restoration process. Once the leaks are fixed, you can safely tackle rust removal and other restoration steps.
When dealing with clogged fins or internal buildup in a baseboard radiator, are there any recommended cleaning solutions or tools that are safe for home use?
For cleaning clogged fins, use a soft brush or vacuum with a brush attachment. For internal buildup, flush the radiator with plain water or a mild vinegar solution, but avoid harsh chemicals. Always turn off the system and let it cool before starting.
Do you recommend removing the radiator completely for restoration, or is it possible to do a thorough job while it stays connected in place?
For the most thorough restoration, removing the radiator is best, as it allows full access to clean, strip, and repaint all surfaces. However, for minor touch-ups or cleaning, you can work with it in place, though results may not be as comprehensive.
After dealing with rust and mineral deposits on a steel panel radiator, what are the best practices to prevent these issues from coming back?
To prevent rust and mineral deposits, make sure the radiator is painted with a rust-resistant primer and paint, check for leaks regularly, use distilled water if topping up, and consider installing a water softener if you have hard water.
When estimating a budget for restoring a steel panel radiator, what are the most expensive supplies or tools I should anticipate buying?
For a steel panel radiator restoration, the most expensive items are typically high-quality paint or coatings designed for radiators, a good sander or wire brush for surface prep, and possibly a quality respirator for safety.
You mention budgeting for materials—can you give an estimate for restoring a typical cast iron radiator, including tools and safety gear?
For a typical cast iron radiator restoration, expect to spend about $100–$200 on materials, tools, and safety gear. This includes wire brushes, paint stripper, high-heat paint, sandpaper, protective gloves, goggles, and a mask.
How do the restoration steps differ between cast iron radiators and newer steel panel models mentioned in the article?
Cast iron radiators often need more thorough cleaning, rust removal, and heavy-duty paint, while newer steel panel models usually require less aggressive cleaning and lighter sanding. Steel panels are lighter and easier to handle, but are more prone to dents during the process.
Do you have any tips for estimating the total cost of materials and tools before getting started with a DIY baseboard radiator project?
Start by listing every material and tool you’ll need—paint, primer, brushes, sandpaper, drop cloths, safety gear, and any specialty tools. Check local prices online or at hardware stores to total everything, and add 10–15% for unexpected expenses.
How much should I realistically budget for a DIY cast iron radiator project if I already have basic tools but need to buy paint and safety gear?
If you already have basic tools, expect to spend around $50 to $100 for quality radiator paint and about $30 to $60 for essential safety gear like gloves and a respirator, totaling roughly $80 to $160 overall.
About how much should I budget for a basic restoration of an old cast iron radiator, including tools and materials, if I don’t already own any of the equipment?
For a basic restoration, plan to spend around $150 to $300. This covers safety gear, wire brushes, paint stripper, primer, paint, and possibly a rental for a power tool. Prices vary with radiator size and paint quality.
Once I finish removing rust and old paint, do I need a specific type of paint that can handle high heat, or will regular interior paint suffice?
You’ll need to use a high-heat, radiator-safe paint rather than regular interior paint. Standard paint can peel or discolor from heat, so look for products labeled for high temperatures or specifically designed for radiators.
If my radiator is leaking at a section joint, does that mean restoration is pointless or is it usually repairable during the process?
A leak at a section joint is usually repairable during restoration. Many DIY kits and professionals can reseal or replace gaskets and address leaks, so restoration is still a practical option.
You mentioned budgeting for materials—roughly how much should I expect to spend on tools and supplies for restoring a medium-sized cast iron radiator?
For a medium-sized cast iron radiator, you can expect to spend about $80 to $200 on tools and supplies. This includes paint, brushes, rust remover, primer, protective gear, and basic hand tools. Prices may vary based on quality and local availability.
Once I strip the old paint and remove rust from a steel panel radiator, what kind of primer and paint would be best to handle the heat without peeling?
After cleaning your steel panel radiator, use a high-heat metal primer followed by a heat-resistant enamel paint. These products are designed to withstand radiator temperatures and help prevent peeling or flaking over time.