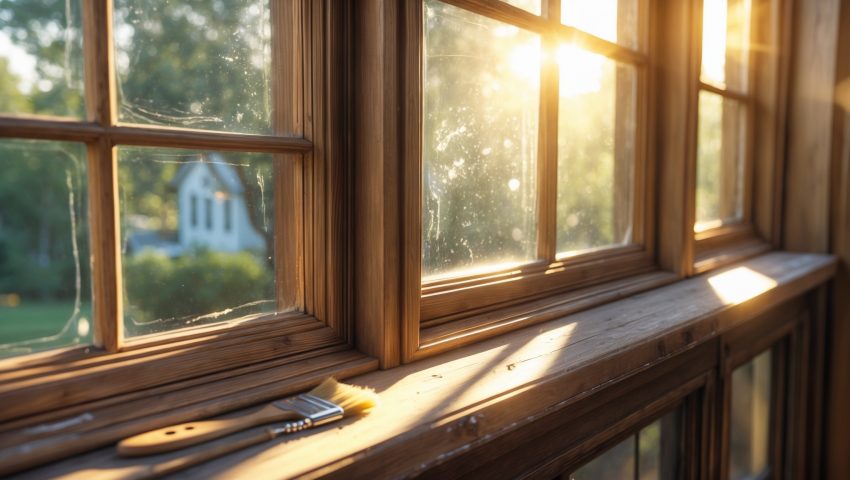
Introduction: Bringing Vintage Windows Back to Life
Across the United States, vintage homes—whether classic Victorians in San Francisco, charming Colonials in New England, or Craftsman bungalows in the Midwest—share one beautiful, vulnerable feature: old wood windows. These windows are often the soul of a home, offering craftsmanship and character that modern replacements rarely match. Yet, time and weather can wreak havoc on sashes, frames, and glazing, leading many homeowners to consider costly replacements. But what if you could restore those windows yourself, preserving history and saving money?
DIY window restoration isn’t just about aesthetics; it’s about sustainability, energy efficiency, and honoring the craftsmanship of earlier generations. Done right, restoring your own windows can result in stunning, functional results and long-term savings. This guide will walk you through a practical, detailed approach to restoring vintage wood windows in U.S. homes. We’ll cover a realistic cost breakdown, the tools you’ll need (and how to choose between budget and pro-grade), step-by-step restoration strategies, and must-know maintenance tips for longevity. Whether you’re tackling a single sticky sash or all the windows in your home, you’ll gain the confidence and know-how to make your restoration project a success.
Understanding Window Restoration: What’s Involved?
Why Restore Instead of Replace?
Old wood windows aren’t just charming; they’re built from dense, old-growth lumber that resists rot and holds up for centuries when properly maintained. Replacement windows, while sometimes more energy-efficient out of the box, often lack the fit, finish, and lifespan of historic originals. Restoration lets you:
- Preserve architectural integrity and curb appeal
- Reduce landfill waste and environmental impact
- Potentially improve energy efficiency with proper upgrades
- Save money over full replacement (especially on multiple windows)
Common Issues in Vintage Windows
- Peeling paint and failed glazing putty exposing wood to moisture
- Broken sash cords or balances causing sticky or non-functioning windows
- Rotting or damaged sills and frames
- Drafts or rattling glass from poor fit or worn weatherstripping
Cost Breakdown: Budgeting Your Restoration
Typical DIY Costs for a Single Window
- Basic Supplies: $50–$120 (paint, glazing putty, primer, sandpaper, caulk, cleaning agents)
- Tools (purchased, not rented): $100–$300 (heat gun, putty knife, sash saw, screwdrivers, paintbrushes, utility knife, respirator, safety goggles)
- Replacement Parts: $10–$50 (sash cords, pulleys, weatherstripping)
- Optional Glazing/Glass: $20–$60 (if panes are broken or missing)
- Total per window: $180–$530 (significantly less if you already own tools or restore multiple windows)
Compare this to professional restoration, which can run $400–$1,200 per window, or full replacement at $600–$2,000 per window for high-quality wooden units.
Budgeting Tips
- Buy supplies in bulk for multi-window projects to save per-unit costs.
- Look for gently used or refurbished tools at local hardware stores or online marketplaces.
- Prioritize essential repairs (rot, broken glass, failed cords) if your budget is tight. Cosmetic upgrades can follow.
Tools & Equipment: What You Really Need
Must-Have Tools
- Putty knife & glazing tool: For removing old putty and applying new.
- Heat gun or infrared paint remover: Safely softens old paint and putty without damaging wood.
- Sandpaper & sanding block: For smoothing surfaces.
- Screwdrivers (flat and Phillips): For removing and reinstalling hardware.
- Utility knife: For clean cuts on glazing and caulk.
- Hammer and small pry bar: For careful disassembly.
- Small saw (sash saw or backsaw): For minor wood repairs.
- Respirator and safety goggles: Essential for lead paint and dust safety.
Optional/Advanced Tools
- Oscillating multi-tool: For precise trimming and sanding in tight spots.
- Vacuum with HEPA filter: To safely remove dust and debris.
- Paint sprayer: For even coats on multiple windows.
Materials Checklist
- Exterior-grade primer and paint
- Glazing putty or compound
- New glass panes (if needed)
- Sash cords, chains, or balances
- Weatherstripping
- Wood filler or epoxy for rot repair
Step-by-Step Window Restoration
1. Preparation and Safety
- Test for lead paint if your home was built before 1978. Use EPA-approved test kits—and always use a respirator and gloves if lead is present.
- Lay down drop cloths and gently remove window stops and sashes. Photograph the process for reference during reassembly.
2. Paint and Putty Removal
- Use a heat gun or infrared tool to soften old paint and glazing putty. Avoid open flame torches—they can crack glass or ignite dust.
- Gently scrape away softened materials with a putty knife. Take extra care around glass and wood details.
3. Glass Repair or Replacement
- If glass is cracked, remove glazing points and carefully lift out the pane.
- Clean the rabbet (the groove the glass sits in), apply a thin bed of glazing compound, and set the new glass.
- Press in glazing points to hold the pane, then apply a smooth bead of new putty.
4. Wood Repair and Sash Cord Replacement
- Inspect for rot—probe with a screwdriver. Small areas can be patched with a two-part wood epoxy. For extensive rot, consider splicing in new wood.
- Replace worn sash cords or balances. Access the weight pockets (usually behind side panels), thread in new cord, and knot securely to sash weights.
5. Sanding and Priming
- Sand all bare wood smooth, feathering paint edges. Wipe away dust.
- Apply exterior-grade primer to all bare, repaired, or previously painted surfaces for moisture protection.
6. Painting and Finishing
- Use a high-quality exterior paint, following manufacturer instructions for dry times between coats.
- Paint slightly onto the glass for a weather-tight seal (remove any over-paint with a razor blade).
7. Reassembly and Weatherstripping
- Reinstall sashes, hardware, and stops. Check for smooth operation.
- Add new weatherstripping (felt, silicone, or spring bronze) to reduce drafts and rattling.
Maintenance Best Practices for Restored Windows
Annual and Seasonal Care
- Inspect paint and putty annually for cracking or peeling. Touch up as needed to prevent water intrusion.
- Clean tracks and lubricate pulleys or balances with a light silicone spray before each heating/cooling season.
- Ensure weatherstripping remains intact; replace if compressed or torn.
Dealing with Condensation and Drafts
- Condensation inside panes often means indoor humidity is too high; use dehumidifiers or improve ventilation.
- Drafts can often be solved with new weatherstripping or minor adjustments to stops.
When to Call a Pro
- Extensive rot requiring major reconstruction
- Severely bowed or warped sashes
- Suspected lead paint hazards you’re not equipped to handle
Case Study: Restoring Double-Hung Windows in a 1920s Bungalow
In Des Moines, Iowa, homeowner Sarah B. faced 12 stuck, drafty windows in her 1927 Craftsman. She budgeted $1,200 for supplies and tools after getting a $9,000 quote for full replacement. Working weekends over a summer, she tackled three windows at a time—removing sashes, stripping paint, reglazing, and repainting. Total outlay per window: about $100 (tools, paint, putty, glass, cords). The result: beautifully smooth, easy-to-operate windows that preserved her home’s character. Annual maintenance now takes a few hours each spring, and her heating costs dropped by 15% thanks to new weatherstripping and tighter seals.
Myths About DIY Window Restoration Debunked
- “Old windows can’t be energy efficient.” — False. With weatherstripping, storm windows, and proper glazing, restored windows can match or exceed the performance of many new units.
- “DIY restoration is too complicated for beginners.” — Not true. The process requires care and patience, but most steps are accessible with basic tools and thorough guidance.
- “Replacing is cheaper.” — Rarely the case, especially for multiple windows. DIY restoration often costs less than a third of replacement, even factoring in tools and supplies.
Conclusion: Restoring More Than Just Windows
DIY window restoration is more than a weekend project—it’s an act of stewardship, preserving your home’s heritage while boosting comfort and efficiency. For vintage homes across the U.S., restored windows can become a conversation piece and a point of pride, blending beauty with practicality. While the process demands patience and a willingness to learn, the payoff is enormous: lower long-term costs, reduced environmental impact, and the satisfaction of hands-on accomplishment.
By understanding the real costs, assembling the right tools, and following a proven step-by-step process, you can transform drafty, neglected windows into bright assets for your home. Regular maintenance ensures your hard work endures through every season. And by debunking the myths around DIY restoration, you’ll join a growing community of homeowners who value craft, sustainability, and smart investment.
No matter your region or skill level, giving vintage windows a second life puts you in touch with your home’s history—and with the practical know-how to care for it for years to come. So gather your tools, set aside a weekend, and see just how rewarding DIY window restoration can be.
When estimating the overall cost, does your breakdown include hidden expenses like lead paint mitigation or emergency sash repairs?
The cost breakdown in the article covers common restoration expenses, but hidden costs like lead paint mitigation or unexpected sash repairs aren’t always included. It’s wise to budget extra for these potential issues during your planning.
Once I’ve restored the windows, how often should routine maintenance be done to keep energy efficiency and prevent issues from coming back?
After restoring your windows, plan on inspecting and performing routine maintenance every 6 to 12 months. This includes checking seals, repainting as needed, cleaning tracks, and making sure weatherstripping is intact for continued energy efficiency and durability.
When deciding between budget and pro-grade tools for window restoration, is it worth spending more for specialized tools as a first-timer, or will basic ones do the job well enough?
For a first-timer, basic tools are usually enough for most window restoration tasks. Specialized, pro-grade tools can make certain steps easier and faster, but you can achieve good results with standard tools and patience.
If a sash is sticking or hard to move, what are the most common causes and fixes you encounter when restoring vintage wood windows?
Sticking sashes are often caused by paint buildup, swollen wood from moisture, or misaligned hardware. Fixes usually include carefully scraping excess paint, sanding swollen areas, lubricating tracks, and adjusting or replacing sash cords and pulleys if needed.
Does restoring original windows improve energy efficiency enough to see lower heating costs, or would I still need to add storm windows afterwards?
Restoring original windows can improve energy efficiency, especially by sealing gaps and adding weatherstripping. However, adding storm windows often provides extra insulation, so you’ll likely see the best reduction in heating costs if you use both methods together.
If a sash is stuck and the glazing is crumbling, what’s the best sequence of repairs to get started without making things worse?
Start by gently freeing the stuck sash—carefully cut any paint seals and check for damaged hardware. Once it moves, remove crumbling glazing compound, then repair or replace it before repainting. Always support the glass to avoid breakage during work.
Could you break down the typical costs for tools if I want to do a single window versus a whole house myself?
For a single window, expect to spend $80–$150 on basic tools like a heat gun, putty knife, glazing points, and paintbrushes. For an entire house, you may need sturdier tools and quantities, raising costs to $200–$400, but tools are reusable.
I’m curious how the ongoing maintenance costs compare to the initial restoration expenses over time, especially for older wood windows.
Ongoing maintenance costs for older wood windows are usually much lower than the initial restoration, especially if you perform simple upkeep like repainting and sealing every few years. Restoration is a larger upfront investment, but regular maintenance can extend window life and reduce future major expenses.
How much can I realistically expect to spend per window if I only use budget tools for restoration rather than professional-grade ones?
If you stick to budget tools, you can expect to spend roughly $40 to $80 per window, mainly on materials like glaze, paint, and sandpaper. Professional-grade tools would increase that, but with basic tools, your main cost is materials.
Does restoring old wood windows help with energy efficiency as much as replacing them, especially in colder climates like New England?
Restoring old wood windows can significantly improve energy efficiency, especially if you add weatherstripping and storm windows. While new windows may offer slightly higher efficiency, a well-restored original window performs nearly as well, particularly in colder climates like New England.
Could you break down the typical costs for tools if I want to use mainly budget-friendly options for window restoration?
For budget-friendly window restoration, expect basic tools like putty knives, scrapers, sandpaper, and brushes to total around $40–$70. Add about $20–$40 for a heat gun and $10–$20 for glazing compound. Altogether, you can start for roughly $70–$130.
How do I know if my old window sash is worth restoring or if it’s too damaged to save? Any quick checks before I start?
Check if the wood is solid by pressing a screwdriver into different spots; soft or crumbling wood means major rot. Also, look for cracked glass, missing putty, or broken joints. If most issues are minor, restoration is usually worth it.
After I finish restoring, how often should I plan on doing maintenance to keep my old wood windows in good shape?
Plan to inspect and maintain your restored wood windows at least once a year. Check for peeling paint, damaged putty, and any moisture issues, and touch up as needed to keep them in top condition.
How much of a difference does using pro-grade versus budget tools actually make during restoration, especially for beginners tackling their first window?
Professional-grade tools usually make tasks faster and deliver cleaner results, especially when scraping or sanding. However, for beginners, budget tools can work well if you take your time and follow safety tips. Upgrading key tools like scrapers or putty knives can help.
If a window frame has minor rot, is it better to repair it myself or should I call in a pro for that part?
If the rot is minor and you feel comfortable using wood filler and basic tools, you can usually repair it yourself. For deeper or widespread rot, calling a pro is safer to ensure structural integrity.
When choosing between budget and pro-grade restoration tools, how much of a difference does it actually make for beginners hoping to do a decent job?
For beginners, budget tools can handle most basic restoration tasks and are fine for a decent DIY result. Pro-grade tools may last longer and work faster, but you can achieve good outcomes with careful technique and patience using affordable options.
After restoring the windows, what kind of regular maintenance do you recommend to keep them energy efficient and avoid repeat issues?
To keep your restored windows energy efficient, regularly inspect weatherstripping, repaint or reseal wood as needed, clean tracks and glass, and address any cracks or gaps promptly. Annual check-ups ensure they stay in great condition.
Could you expand on the cost breakdown—what’s the typical price range if you go for budget tools versus pro-grade for a set of five windows?
For five windows, budget tools could cost around $75 to $150, covering basics like scrapers, putty knives, and sandpaper. Pro-grade tools might run $300 to $600, including higher-quality sanders, glazing points, and specialized equipment for efficiency and durability.
You mention that restored old wood windows can be more energy efficient with proper upgrades. What specific upgrades would you recommend for someone restoring windows in a cold climate?
For cold climates, consider weatherstripping to eliminate drafts, adding interior or exterior storm windows, using insulated or low-E glass panes if possible, and ensuring all gaps are sealed with caulk or glazing putty for improved energy efficiency.
Are there certain situations where replacing a vintage window actually ends up being cheaper or easier than restoring it yourself?
Yes, if a window is severely rotted, missing key structural parts, or has extensive damage, replacement can be less costly and less labor-intensive than restoration. Also, specialty shapes or leaded glass may tip the balance toward replacement for convenience.
If old wood windows can last for centuries with proper care, what maintenance steps should I focus on after finishing the restoration to make them last?
After restoration, focus on regular cleaning, repainting every few years, checking and repairing glazing putty, lubricating hardware, and inspecting for moisture or rot. Address issues promptly to prevent damage and keep your wood windows in top condition.