Introduction: Why DIY Tool Storage Matters in Every Workshop
Every DIYer, from the novice weekend tinkerer to the seasoned home restoration enthusiast, knows the frustration of searching for a misplaced tool. An organized workshop is more than just visually appealing—it’s the backbone of safe, efficient, and enjoyable home improvement projects. Yet, many U.S. homeowners overlook the impact that smart tool storage can have on productivity, project costs, and even personal safety. Whether your workspace is a full-sized garage, a basement corner, or a shed, effective tool organization can transform your DIY experience. This comprehensive guide digs deep into practical, affordable, and customizable DIY tool storage solutions tailored for American homes. We’ll cover everything from essential planning and budgeting, regional considerations (think humidity in the South, temperature swings in the Midwest), material choices, step-by-step builds, safety, and long-term maintenance. Get ready to reclaim your workspace, protect your investment in tools, and create a workshop that works as hard as you do.
Assessing Your Workshop: Needs, Space, and Climate
Inventory: Know What You Own
Start by taking a complete inventory of your tools. Lay everything out and group items by type: hand tools (hammers, screwdrivers), power tools (drills, sanders), fasteners, and specialty equipment. This step not only clarifies your storage needs but often reveals duplicates or rarely used items you can donate or sell.
Measuring and Mapping Your Space
Measure your available workshop area. Sketch a floor plan, noting doors, windows, and existing fixtures. Consider vertical space—walls, ceilings, even above-door areas are often underutilized. Mark electrical outlets and lighting to ensure your storage doesn’t block access or create hazards.
Climate and Regional Factors
- Humidity: In southern states or coastal areas, moisture can cause rust. Opt for sealed storage or moisture absorbers for metal tools.
- Temperature Swings: In the Midwest or Northeast, fluctuating temps can warp wood. Use metal or composite shelving in unheated spaces.
- Dust and Pests: Rural and desert locations may require sealed bins or cabinets to keep out critters and debris.
Budget Planning: Tool Storage Without Breaking the Bank
Cost Breakdown of Popular Storage Options
- Pegboards: $20–$50 for a 4’x8’ sheet, plus hooks ($10–$30).
- Wall-Mounted Shelves: $30–$100, depending on material and size.
- Custom Cabinets: $100–$500+ for materials; pre-built units can cost more.
- Rolling Tool Chests: $75–$600, depending on size and features.
- DIY Storage Bins/Racks: $10–$50 per unit when built from plywood or lumber.
Consider starting small—build or buy one storage solution at a time, prioritizing high-traffic tools. Shop sales at hardware stores, repurpose old furniture, or browse local online marketplaces for bargains.
DIY vs. Store-Bought: Pros and Cons
- DIY Solutions: Fully customizable, often cheaper, but require time and basic carpentry skills.
- Store-Bought Options: Quick and uniform, but may not fit unique spaces or tool collections.
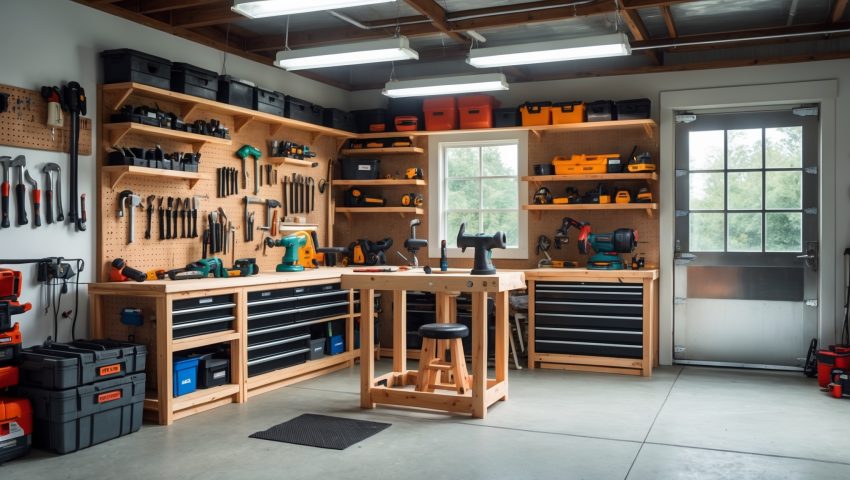
Tool Storage Solutions: From Simple to Advanced
Pegboards: The Versatile Classic
Pegboards are a staple for organizing hand tools. Mount them on any sturdy wall—studs are best for heavy tools. Arrange hooks and holders for hammers, pliers, wrenches, and screwdrivers. Use labeled outlines (drawn with a marker) to help return tools to their spots. For moisture-prone regions, choose metal pegboards to resist warping.
Wall-Mounted Shelves and Cabinets
Shelves keep power tools, paint cans, and bulk hardware off the floor and in easy reach. Use adjustable brackets for flexibility. Enclosed cabinets protect sensitive tools from dust and moisture. For DIY builds, use plywood or MDF sealed with exterior-grade paint for durability. Add magnetic strips inside cabinet doors for small metal tools or bits.
Drawer Systems and Tool Chests
Drawer chests excel at organizing small hand tools, fasteners, and specialty items. Use foam inserts or dividers for custom fit and to prevent shifting. For rolling chests, look for lockable wheels and sturdy handles—especially useful in multi-purpose garages.
Ceiling and Overhead Storage
Ceiling racks or overhead shelves are perfect for rarely used items like seasonal tools or extension cords. Use heavy-duty brackets and anchors rated for your load. Always check for clearance under garage doors or low ceilings before installation.
Magnetic Tool Strips and Panels
Magnetic strips are ideal for metal tools—screwdrivers, pliers, drill bits. Mount them near workbenches for quick access. For safety, ensure strips are securely fastened and not overloaded.
DIY Storage Bins, Racks, and French Cleats
Custom bins from plywood or plastic are great for sorting screws, nails, and fittings. Label bins for easy identification. French cleat systems—a wall-mounted strip of angled wood—let you hang shelves, holders, and bins in endlessly rearrangeable configurations. This is a top choice for growing tool collections, allowing instant reorganization without new holes in the wall.
Step-by-Step: Building a Custom Pegboard Tool Wall
Materials and Tools Needed
- 4’x8’ pegboard panel (wood or metal)
- 1×2” furring strips (for wall standoff)
- Wood screws and anchors
- Drill/driver and level
- Pegboard hooks/holders
- Measuring tape, pencil
Instructions
- Plan the Layout: Mark the wall where the pegboard will go. Locate studs for secure mounting.
- Install Furring Strips: Attach horizontal furring strips to the wall, anchoring into studs. These provide space behind the pegboard for hook clearance.
- Mount the Pegboard: Screw the pegboard into the furring strips. Use a level to ensure even mounting.
- Add Hooks and Holders: Arrange hooks for your most-used tools. Adjust as needed for workflow optimization.
- Label and Outline: Draw outlines or attach labels for each tool’s spot. This encourages consistent organization.
Safety and Accessibility: Organizing for Protection and Efficiency
Safe Storage for Sharp and Heavy Tools
- Keep sharp tools (chisels, saw blades) in sheaths or dedicated holders to prevent accidental cuts.
- Store heavy power tools on lower shelves to reduce lifting injuries.
- Use locking cabinets or chests to keep hazardous tools out of reach of children.
Fire and Chemical Safety
- Store flammable materials (paints, solvents) in metal cabinets away from heat sources.
- Avoid overloading electrical outlets near tool storage. Use GFCI outlets in damp locations.
- Maintain a clear path to exits and keep a fire extinguisher mounted in the workshop.
Maintenance and Upkeep: Keeping Your System Working
Regular Tool and Storage Checks
- Inspect tool storage every season—look for rust, loose fasteners, or water damage.
- Wipe down tools before storing, especially after outdoor use.
- Replace or repair worn-out storage components (broken hooks, sagging shelves).
Adapt as Your Collection Grows
DIYers often add new tools and materials. Modular storage systems—like French cleats, stackable bins, or adjustable shelves—make it easy to adapt without rebuilding from scratch. Don’t hesitate to purge tools you no longer use to free up valuable space.
Case Study: Transforming a Cluttered Garage in Ohio
John, a homeowner in suburban Ohio, struggled with a chaotic garage where tools were scattered in boxes and drawers. After inventorying his collection, he built a wall-mounted pegboard system for hand tools, added ceiling racks for seasonal items, and repurposed old kitchen cabinets for power tool storage. With a total investment of $220 and a weekend of work, John’s garage became a model of efficiency. He reports cutting project prep time in half and has avoided costly tool replacements thanks to improved organization and rust prevention.
Advanced Tips: Digital Tools and Smart Storage
- Use a smartphone app or spreadsheet to track tool inventory, purchase dates, and maintenance schedules.
- Install LED lighting under shelves for better visibility.
- Integrate USB chargers or power strips near workbenches for battery-powered tools.
- Add QR code labels to bins for quick digital lookup of contents.
Conclusion: Invest in Your Workshop, Invest in Your Success
Effective tool storage is one of the most rewarding DIY upgrades you can make in your home workshop. It doesn’t require a massive budget or advanced carpentry skills—just thoughtful planning, a willingness to adapt solutions to your space, and a commitment to safety. By organizing your tools, you not only reduce clutter and save money on duplicate purchases, but you also create a safer, more inviting workspace that inspires creativity and confidence. Whether you’re a seasoned renovator or just starting your DIY journey, a well-organized workshop pays dividends in time saved, accidents avoided, and projects completed with pride. Start with one corner, one wall, or one shelf, and build from there. Your future self—and every project on your to-do list—will thank you.
After taking inventory and mapping my space, what’s the easiest first DIY storage project for someone with minimal woodworking experience?
A simple wall-mounted pegboard is a great first project. It only requires basic tools, is easy to customize, and instantly helps organize tools. Start by measuring, cutting to size, and mounting the board securely to wall studs.
How do you suggest handling tool storage in a shared garage that also needs to fit bikes and kids’ gear without everything getting jumbled together?
Try using wall-mounted racks and pegboards for tools to keep them off the floor. Install ceiling hooks or shelves for bikes, and use labeled bins or cubbies for kids’ gear. Keeping zones for each category helps everything stay organized.
When mapping out a small basement workshop, how can I best use awkward spaces like above-door areas for storage without making things hard to reach?
Above-door spaces are perfect for infrequently used items. Install a sturdy shelf with a small lip to prevent things from falling, and keep a step stool nearby for safe access. Store only lightweight or seasonal tools up high.
For those of us on a tighter budget, which DIY storage materials actually hold up best in high-humidity southern climates without rusting or warping?
For high-humidity areas on a budget, consider using plastic storage bins and PVC piping, as they resist rust and warping. Pressure-treated wood is also a good choice when sealed properly to withstand moisture.
After taking an inventory and sketching my space, how do I prioritize which DIY storage solution to build first on a tight budget?
Focus on building storage for your most-used tools or items that create the most clutter. Start with simple, low-cost solutions like pegboards or wall shelves before moving to more complex projects as your budget allows.
I noticed you suggested sealed storage for metal tools in humid areas—are there any DIY storage ideas that won’t blow my budget but still protect against rust?
You can use airtight plastic bins with inexpensive silica gel packets to keep humidity out. Another budget-friendly idea is repurposing old jars or food containers with tight lids for smaller tools and adding a bit of rice to absorb moisture.
I have a really small workshop in my basement with low ceilings. Any ideas for using above-door space or other overlooked areas for tool storage?
Above-door shelves are perfect for storing lesser-used tools or supplies in tight spaces. You could also use wall-mounted magnetic strips, pegboards, or slim racks along the ceiling perimeter to keep tools accessible without taking up valuable workspace.
Could you suggest affordable moisture protection solutions for storing tools in a humid basement workshop?
To protect your tools from moisture in a humid basement, try using silica gel packs, desiccant containers, and a dehumidifier. Store tools in airtight plastic bins or cabinets with moisture absorbers for extra protection.
I have a really small workspace in my garage, so do you have any tips on using ceiling or above-door areas for tool storage without making it hard to reach things?
For small garages, consider installing shallow shelves or hanging racks above doors or along the ceiling for items you use less often. Use labeled bins or clear containers, and keep a sturdy step stool nearby to access tools safely.
Is there a way to organize tools above doors without drilling into walls? My rental has lots of restrictions, so I want something temporary but sturdy.
You can use over-the-door storage racks or organizers, which hang from the top of the door and require no drilling. They’re sturdy, removable, and ideal for holding lightweight tools in a rental space.
When mapping out a small basement workshop, how do you decide which tools or supplies to store overhead versus along the walls, especially if ceiling height is limited?
For limited ceiling height, reserve overhead storage for lightweight, rarely used items like seasonal supplies. Keep frequently used tools and heavier equipment along the walls at an accessible height to maximize safety and convenience in your small workshop.
How do you recommend dealing with humidity in a garage workshop in the South if you are on a tight budget for storage upgrades?
Try to use moisture-resistant plastic bins instead of cardboard, and add inexpensive silica gel packs or charcoal dehumidifiers inside storage. Keep tools off the floor, and if possible, increase ventilation by using a fan or leaving the garage door open occasionally.
What are some low-budget but secure options for organizing power tools in a small shed without losing easy access to them?
Consider using sturdy wall hooks or pegboards for hanging power tools, along with labeled plastic bins or crates on shelves. Lockable toolboxes or cabinets can add security while keeping everything organized and within reach in a small space.
When planning my workshop layout, should I prioritize vertical storage on walls or overhead storage above doors for better accessibility and safety?
Prioritize vertical storage on walls for easier access and greater safety. Overhead storage above doors can be harder to reach and may increase the risk of items falling, especially with frequent use.