Introduction: Breathing New Life into Hardwood Floors
There’s nothing quite like the warm, enduring beauty of genuine hardwood floors—a hallmark of American homes from historic brownstones to modern ranches. Yet, even the most resilient planks can lose their luster over time, dulled by decades of foot traffic, sunlight, and the occasional furniture mishap. When faced with scratches, fading, or stubborn stains, many homeowners consider the costly prospect of replacement. But here’s a well-kept secret: with the right know-how, tools, and a bit of elbow grease, you can refinish your hardwood floors yourself—saving thousands and restoring your space’s original charm.
Refinishing hardwood floors is one of the most rewarding DIY restoration projects. It offers a transformative impact on your home’s appearance and value, often at a fraction of the cost of new flooring. However, success hinges on careful planning, mindful budgeting, and understanding the specific quirks of your home’s wood species and regional climate. This comprehensive guide walks you through every step: from plotting your project budget to selecting the right equipment, navigating common pitfalls, and drawing inspiration from real-world DIYers who’ve reclaimed their tired floors across the U.S. Whether you’re tackling a single room or an entire house, you’ll find practical advice tailored to both beginners and seasoned DIY enthusiasts. Let’s unlock the secrets to hardwood floor refinishing done right.
Understanding the Cost: Breaking Down Your Refinishing Budget
DIY vs. Professional: What’s the Real Difference?
Professional hardwood floor refinishing can cost anywhere from $4 to $8 per square foot, depending on your location, floor condition, and desired finish. For a 500-square-foot area, that’s $2,000 to $4,000. DIYers, on the other hand, typically spend $1.50 to $3 per square foot, mainly on materials and equipment rental—often halving total expenses.
Key Budget Categories
- Equipment Rental: Drum or orbital sander ($40–$70/day), edge sander ($20–$40/day), shop vacuum ($20–$40/day), and hand tools.
- Consumables: Sandpaper (various grits, $30–$60 total), wood filler ($10–$20), tack cloths ($5–$10), painter’s tape ($5–$10).
- Finishing Products: Stain ($20–$40/gallon), polyurethane ($40–$80/gallon), applicator pads or brushes ($10–$20).
- Safety Gear: Respirator mask ($20–$40), ear protection ($10–$20), knee pads ($15–$30), protective eyewear ($10–$20).
- Incidentals: Floor repair supplies, cleaning agents, plastic sheeting for dust containment, etc. ($30–$80).
Sample Budget Breakdown
For a standard 300-square-foot living room:
- Equipment rental (2 days): $180
- Sandpaper and supplies: $50
- Stain and polyurethane: $100
- Safety gear: $60
- Incidentals: $40
- Total Estimated DIY Cost: $430
Compare this to a $1,500–$2,400 professional quote for the same space.
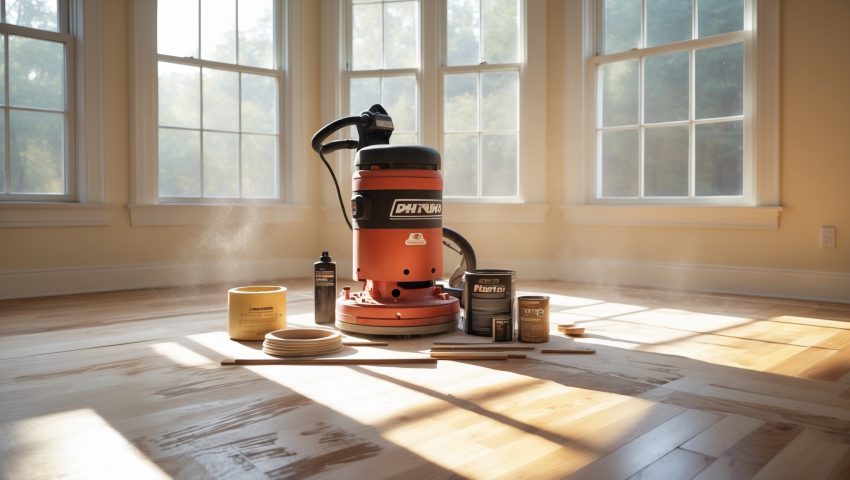
Essential Tools & Equipment Guide
Choosing the Right Sander
- Drum Sander: Powerful and fast, ideal for severely worn floors. Requires a steady hand to avoid gouges.
- Orbital (Random-Orbit) Sander: More forgiving, easier for beginners, but slower—best for floors in good shape.
- Edge Sander: Reaches where large sanders can’t (along walls and corners).
Supporting Tools
- Shop vac or dust extractor for cleanup
- Hand scraper or detail sander for tight spots
- Putty knife for applying filler
- Applicator pads, foam brushes, or lambswool applicators for stain and finish
Safety Essentials
- Respirator mask (protects against fine dust and fumes)
- Hearing protection (sanders are loud!)
- Eye protection
- Knee pads for comfort
Pro Tip: Tool Rental vs. Purchase
Most homeowners rent sanders from big-box stores or local tool libraries. Always inspect rental equipment for wear and request a quick demo if you’re unfamiliar with the tool.
Step-by-Step Refinishing Process
1. Preparation: Clear and Protect
- Remove all furniture, rugs, and wall hangings.
- Seal doorways and vents with plastic sheeting and painter’s tape to contain dust.
- Check for protruding nails or staples—remove or countersink them.
2. Initial Cleaning
Vacuum thoroughly to remove dirt and grit. This prevents unnecessary scratches during sanding.
3. Sanding: The Heart of the Project
- Begin with coarse-grit sandpaper (36–40 grit) to remove old finish and deep scratches.
- Progress through medium (60–80 grit) and fine (100–120 grit) for a smooth surface.
- Always sand in the direction of the wood grain.
- Use the edge sander along walls and corners.
- Vacuum between each sanding stage.
4. Filling and Repairs
- Fill gaps, holes, and cracks with wood filler matched to your floor color.
- Allow drying, then sand smooth with fine grit.
5. Final Cleanup
- Vacuum thoroughly, then wipe with a tack cloth to remove all dust.
6. Staining (Optional)
- Test stain on a hidden area or scrap piece to confirm color.
- Apply with a clean applicator pad, working in manageable sections.
- Wipe off excess and let dry per manufacturer instructions.
7. Applying Finish
- Choose between oil-based (warmer tone, longer dry time) and water-based polyurethane (faster drying, less odor).
- Apply thin, even coats with a brush or applicator pad.
- Allow each coat to dry fully, then lightly sand (220 grit) before the next.
- Apply 2–3 coats for durability.
8. Curing and Cleanup
- Let the final coat cure for at least 24–48 hours before light foot traffic.
- Replace furniture only after a full week for optimal durability.
Common Beginner Mistakes (and How to Avoid Them)
- Skipping Grits: Don’t jump from coarse to fine sandpaper; progress gradually to avoid swirl marks and unevenness.
- Over- or Under-Sanding: Too much sanding can thin the floor; too little leaves old finish and uneven patches.
- Neglecting Dust Control: Dust left behind will mar your finish. Vacuum and tack between every stage.
- Applying Too-Thick Finish Coats: Leads to drips and uneven sheen. Multiple thin coats are better.
- Rushing Curing Time: Don’t move furniture back until the finish is fully cured, or you risk permanent marks.
Regional Considerations: Climate and Wood Species
Humidity and Drying Times
In humid Southern or coastal climates, water-based finishes may take longer to dry, and excess moisture can cause wood to swell. In drier Western states, finishes may cure faster, but cracks and gaps can form if humidity drops too low. Always check local weather and adjust your timeline accordingly.
Popular U.S. Hardwood Species
- Oak: Common nationwide, takes stain evenly, durable and forgiving.
- Maple: Popular in Northern regions, harder and less porous—can be tricky to stain.
- Pine: Found in older homes, softer and more prone to dents; requires gentle sanding.
- Hickory/Cherry: Less common, but highly durable and beautiful when properly finished.
Real DIY Success Stories: Inspiration from Across the U.S.
Brooklyn Brownstone, NY: Rediscovering 100-Year-Old Maple
After pulling up layers of linoleum and carpet, a couple discovered original maple floors in their 1910 brownstone. Despite deep pet stains and heavy wear, they rented an orbital sander, used a water-based finish for fast drying, and restored the floor’s honeyed glow—spending just $700 and a long weekend. Their tip? “Don’t be intimidated by old stains; most lift with coarse sanding and a little patience.”
Suburban Phoenix, AZ: Beating the Heat with Quick Curing
In Arizona’s dry climate, a homeowner tackled 600 square feet of red oak. The rapid evaporation meant the polyurethane set quickly, so they worked in small sections to avoid lap marks. Total project cost: $1,100, compared to a $3,200 pro quote.
Atlanta Bungalow, GA: DIY on a Tight Budget
Faced with heavy foot traffic and scratches from pets, a DIYer refinished their pine floors using a rented drum sander and oil-based polyurethane. They recommend budgeting extra time for sanding softer woods and always wearing a respirator. Their outlay? $480 for a 350-square-foot space.
Maintenance Best Practices for Long-Lasting Results
- Weekly: Dry mop or vacuum with a soft-bristle attachment to remove grit and dust.
- Monthly: Damp mop with a wood floor cleaner (avoid harsh chemicals and excess water).
- Immediately: Wipe up spills to prevent water damage or staining.
- Annually: Inspect for wear in high-traffic areas and touch up as needed.
- Protect: Use felt pads on furniture legs and area rugs in entryways.
Permits and Compliance: Do You Need Approval?
In most U.S. jurisdictions, refinishing existing floors does not require a permit, as it’s considered routine maintenance. However, if you’re repairing or replacing subflooring, or working in a multi-family building with HOA rules, always check local codes and building regulations. In historic districts, special guidelines may apply to preserve original materials—contact your local preservation office for advice.
Safety Checklist: Protecting Yourself and Your Home
- Wear a respirator mask and eye protection at all times.
- Keep the area well-ventilated—open windows and use fans.
- Handle oil-based products away from open flames; store rags in sealed containers to prevent spontaneous combustion.
- Unplug sanders before changing sandpaper.
- Take regular breaks to reduce fatigue and maintain focus.
Conclusion: Your DIY Path to Beautiful, Durable Hardwood Floors
Refinishing hardwood floors is a transformative project that can dramatically boost your home’s beauty, comfort, and value—without breaking the bank. While the process demands effort and attention to detail, the rewards far outweigh the challenges. With careful planning, a realistic budget, the right equipment, and a respect for safety, even first-time DIYers can achieve professional-quality results. The stories of homeowners from Brooklyn to Phoenix prove that old, tired floors can be reborn with perseverance and the right guidance.
Remember, the key to success lies in methodical preparation: thoroughly clean, sand with care, choose your finish wisely, and allow for adequate curing. Factor in your region’s climate and your floor’s wood species to avoid common pitfalls. Don’t be afraid to seek out advice from local experts or online communities—many have walked this path before you and are eager to share tips.
Finally, enjoy the process. Each board tells the story of your home, and with every pass of the sander or brush of finish, you’re preserving history while making it your own. Whether you’re restoring a century-old bungalow or updating a modern loft, DIY hardwood floor refinishing empowers you to shape your living space and take pride in a job well done. Step onto your renewed floors with confidence, knowing you’ve invested in both your home’s heritage and your own DIY legacy.
If my hardwood floors have some deep stains and a few boards with water damage, is DIY still possible or would a professional be safer?
DIY refinishing can work for minor stains, but deep stains and water-damaged boards often require replacing sections, which can be challenging without experience. For the safest and most durable results, a professional may be better in your situation.
Does the equipment rental cost typically include sandpaper and other consumables, or should I budget for those separately when planning a DIY refinishing project?
Equipment rental usually covers just the machines, while sandpaper and other consumables are charged separately. It’s a good idea to budget extra for these items when planning your DIY refinishing project.
How do I figure out if my particular wood species needs a different approach or tools compared to what you described in the general equipment guide?
Check the hardness and grain pattern of your wood species—softer woods like pine may need gentler sanding, while exotic hardwoods might require specialized sandpaper or finishing methods. Consult your floor’s manufacturer or a local expert for tailored advice.
Does the estimate for DIY refinishing include the cost of safety gear like masks and goggles, or should I budget extra for those items?
The estimate for DIY refinishing in the article generally covers basic tools and materials but does not specifically include safety gear like masks and goggles, so it’s wise to budget a bit extra for those important items.
Can you explain which equipment rentals are absolutely essential for beginners, and what could be skipped to keep costs on the lower end of the DIY range?
For beginners, essential rentals are a drum sander, an edger, and a shop vacuum. You can usually skip specialty buffers and floor nailers if you’re just refinishing. Hand tools and smaller sanders can be bought or borrowed to save money.
For someone new to refinishing, how long should I realistically expect a 500-square-foot project to take from start to finish?
For a beginner, refinishing 500 square feet of hardwood typically takes 4 to 6 days. This includes time for prepping, sanding, staining, applying finish, and letting each coat dry properly before moving to the next step.
When budgeting for equipment rental, is it better to rent everything at once for a whole house or tackle one room at a time? Does that affect costs much?
Renting equipment for the entire house at once usually saves money compared to renting multiple times for each room. It also minimizes rental duration and extra fees. Planning to do all rooms together is generally more cost-effective.
Does the article break down how much time a single room refinishing typically takes if you’re doing it yourself on weekends?
The article mentions time estimates for DIY refinishing projects, noting that a single room usually takes a full weekend or about two to three days, especially if you’re working only on weekends.
The article mentions different wood species and regional climates—are there specific types of hardwood floors that are more challenging to refinish for a beginner?
Yes, certain hardwoods like maple, cherry, and exotic species can be tougher for beginners to refinish because they are harder or have unique grain patterns. Softer woods like oak or pine are usually more forgiving and easier to work with.
For someone with no experience, how long does it realistically take to refinish a 500-square-foot area compared to hiring a professional?
For a beginner, refinishing a 500-square-foot floor usually takes 3 to 5 days, factoring in sanding, staining, and drying time. Professionals often finish the same area in 1 to 2 days due to experience and equipment.